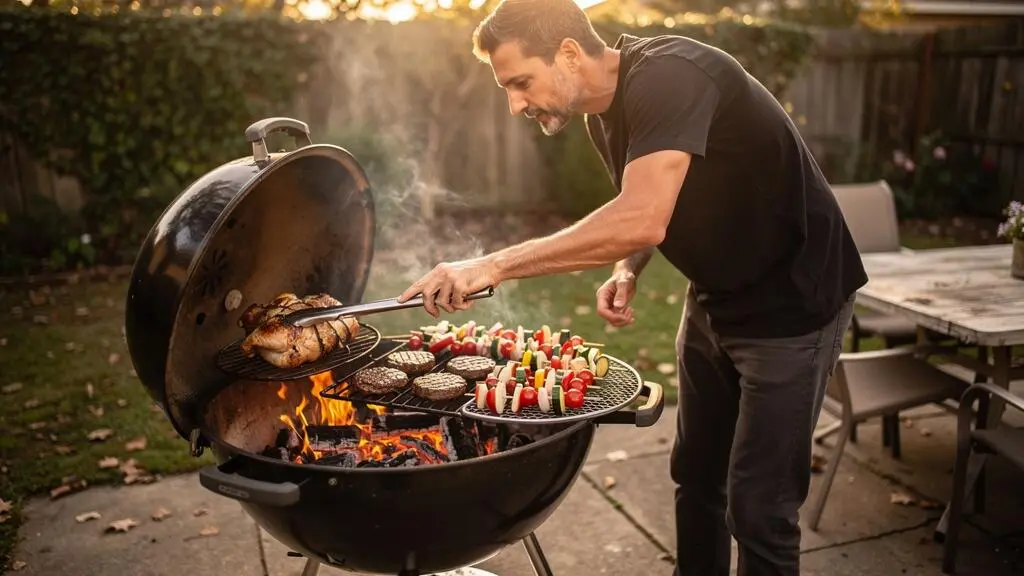
Six different foods, one grill, and guests expecting everything at the same time. The difficult part is rarely getting the barbecue hot enough. It is deciding what goes on first, where each ingredient belongs, when to turn it, and what to do when something finishes before the rest.
The solution is to run the grill as a controlled cooking system rather than a single crowded surface. Divide it into direct and indirect heat zones, arrange foods according to thickness and cooking speed, and work backwards from a shared serving time. Keep raw poultry physically separate from cooked and ready-to-eat food, use dedicated utensils, and check meat with a thermometer.
For a typical mixed barbecue of chicken thighs, burgers, sausages, peppers, courgettes and mushrooms, that means starting slower items earlier while reserving the final cooking window for foods that need quick attention. The exact minutes will depend on the grill, portions and weather; the sequence is what keeps the meal coordinated.
The three rules for grilling six foods together
- Split the heat: use direct heat for quick searing and indirect heat for slower cooking, with enough spare space to move food away from flare-ups.
- Build one finishing timeline: start thick, slow foods first and introduce thin, fast foods closer to serving time.
- Keep the food-safety boundary: separate raw from cooked food, use clean serving equipment and verify safe internal temperatures.
- Why Does Multi-Food Grilling Turn Into Chaos After the First 15 Minutes?
- How to Assign Foods to Grill Zones So Nothing Burns While You Flip Something Else?
- Vegetables First or Last: Which Keeps Them Hot Without Going Soggy?
- The Placement Mistake That Lets Raw Chicken Drip Onto Ready-to-Eat Food
- When Should You Pull Food Off Early and Hold It So Everything Serves Together?
- How to Read Your Grill’s Heat Map So Zone Assignments Actually Match Reality?
- How to Build Direct and Indirect Zones on a Kettle Grill in 5 Minutes?
- How to Use Two Heat Zones So You Can Grill and Roast at the Same Time?
Why Does Multi-Food Grilling Turn Into Chaos After the First 15 Minutes?
Multi-food grilling becomes difficult when ingredients with different cooking times start finishing at different moments. The cook must then check unfinished meat, protect ready food from burning, manage utensils and keep everything warm simultaneously. Without separate heat zones and a planned finishing order, each completed item creates another task competing for attention.
Consider a hypothetical barbecue with six foods: thick chicken thighs, beef burgers, sausages, pepper pieces, courgette slices and whole mushrooms. Starting everything together does not make everything finish together. The courgettes may be ready while the chicken still needs substantial cooking, and the burgers may need turning just as the sausages demand checking.
The first mistake is treating all meat as one category and all vegetables as another. Thickness, cooking method and distance from the heat matter more for scheduling than the broad label on the ingredient. A thin burger and a thick chicken thigh require different treatment even though both are proteins.
Before lighting the grill, sort the menu into three working groups:
- Thick and slow: bone-in chicken, substantial joints and large vegetables needing extended cooking.
- Medium and manageable: sausages, thick mushroom caps and pepper wedges that can cook more gradually.
- Thin and fast: thin burgers, courgette slices, asparagus and other foods that need frequent attention.
The second problem is mental rather than mechanical. Once several items reach different stages of doneness, the cook must remember which one was turned, which needs checking and which is ready to serve. A fixed sequence reduces those competing decisions.
Write down a target serving time, then work backwards to establish an estimated start window for each food. Use those estimates as planning tools rather than guarantees. Internal temperature checks, texture and actual grill conditions determine when food is finished.
The objective is not to make six ingredients cook at exactly the same speed. It is to give each ingredient enough time while ensuring the final serving window stays manageable. The next step is translating that timeline into physical grill zones.
How to Assign Foods to Grill Zones So Nothing Burns While You Flip Something Else?
Assign each food to a zone according to how quickly it cooks and how frequently it needs attention. Quick foods that require turning belong in the accessible direct-heat area; slower foods belong away from the strongest heat. Preserve some free space so you can move an item away from flare-ups without disturbing everything else.
A two-zone arrangement provides the foundation. As explained in Weber‘s charcoal grill fire configurations, direct heat cooks food above the coals, while indirect heat cooks food beside them. These zones allow quick grilling and longer, gentler cooking on one barbecue.
For practical control, treat the cooking surface as three working areas, even if the grill has only two heat systems.
| Working area | Best suited to | Cook’s priority |
|---|---|---|
| Direct-heat zone, nearest easy access | Burgers, thin vegetables and finishing sears | Frequent checks and turning |
| Indirect-heat zone | Chicken, sausages and thicker vegetables | Steady cooking and thermometer checks |
| Reserved spare space | Temporary repositioning and flare-up control | Prevent burning without crowding |
Place frequently turned foods where the tongs can reach them comfortably. This prevents repeated movement over other ingredients and makes it easier to check items systematically. A cooler section is particularly useful when something browns faster than expected.
Make flip order follow finish order where practical. Arrange the direct cooking area so the item requiring the earliest attention is checked first, followed by the next. However, a sudden flare-up, a temperature reading or a food-safety concern always takes priority over the routine.
Keep a separate physical direction for raw-food handling and finished-food collection. This can simplify the movement of plates and utensils, but direction alone cannot prevent contamination. Raw chicken must never be allowed to drip onto ready-to-eat food or come into contact with clean utensils.
Do not mistake a spare grill zone for unlimited hot-holding capacity. Food that has finished cooking may need to leave the grill for resting or safe temperature-controlled holding, rather than continuing to cook on an apparently cool grate.
This physical arrangement turns the grill into a predictable workspace. Once the positions are clear, vegetables can be scheduled without competing with the final checks on the meat.
Vegetables First or Last: Which Keeps Them Hot Without Going Soggy?
Start dense vegetables earlier over gentler heat and add quick-cooking vegetables closer to serving time. Cooking everything early can leave vegetables soft and damp; cooking everything last creates extra work when meat needs final attention. Spacing vegetables apart and allowing moisture to escape are just as important as their start times.
Vegetables behave differently according to their density, cut size and water content. Thick pepper wedges, onion wedges and whole mushrooms generally allow a more gradual approach. Thin courgette slices, asparagus and cherry tomatoes can change from firm to soft relatively quickly.
Instead of assigning all vegetables one starting time, use two overlapping groups:
- Earlier, lower-intensity group: thick peppers, onions and larger mushrooms, positioned where they can soften without aggressive surface scorching.
- Later, quick-cooking group: courgette slices, asparagus and tomatoes, placed on the grill during the final cooking stage.
The biggest texture problem often occurs after vegetables are cooked. Hot vegetables continue releasing water vapour. If they are stacked tightly under foil or sealed in a container, that vapour condenses and wets their surfaces. Browning loses its crispness even if the food remains warm.
Transfer finished vegetables to a clean, shallow, uncovered serving dish or a wire rack when appropriate. Arrange them in a loose layer rather than a mound. If a short hold is necessary, limit the time rather than relying on a covered container to preserve texture. For a longer delay, follow safe hot-holding guidance instead of leaving cooked food at ambient temperature.
Use physical cues to decide when a vegetable should leave the cooking zone. Look for some browning, a surface that is no longer raw, and slight resistance when pierced with a skewer. Tenderness should suit the vegetable: an onion wedge and a courgette slice will not have identical textures.
For example, if chicken is still cooking indirectly, thicker peppers can progress nearby while courgettes remain off the grill. Once the chicken approaches its verified cooking endpoint, the courgettes can take their turn over direct heat.
Vegetables can then reach the table with good texture instead of occupying a long holding queue. That leaves an essential separate task: keeping raw poultry away from everything ready to serve.
The Placement Mistake That Lets Raw Chicken Drip Onto Ready-to-Eat Food
The dangerous placement mistake is allowing raw chicken, its juices or contaminated utensils to contact food that is already cooked or ready to eat. On a crowded grill, this can happen through dripping, careless movement, shared tongs or reusing a raw-meat plate. A controlled layout helps, but physical separation and clean handling equipment are essential.
Raw chicken should occupy a position where its juices cannot run, splash or drip onto cooked meat, vegetables or serving equipment. The correct position depends on the grill’s shape, the direction of any grease drainage and whether food is arranged on one level or on multiple racks.
On an ordinary kettle grill, there may be no universally safe left-to-right placement rule. Keep poultry securely in its allocated cooking area and away from ready-to-eat items. Never move raw chicken over cooked food during rearrangement, and avoid placing it on an upper rack where juices could drip onto other items below.
Food Standards Scotland‘s barbecue food-safety guidance recommends keeping raw and cooked meat separate and using different plates, chopping boards and utensils for raw and cooked foods.
Use one clearly designated set of tongs for raw meat and another clean set for food that is ready to serve. Keep the raw-meat tray away from the clean serving area. After handling raw poultry, wash your hands properly before touching clean plates, salad ingredients or cooked food.
Temperature is the second safety boundary. Positioning chicken correctly does not establish that it has cooked thoroughly. Insert a food thermometer into the thickest suitable part, avoiding contact with bone, and follow the appropriate authority’s temperature-and-time guidance.
Under US guidance, poultry must reach 74 °C (165 °F). UK guidance may use different validated temperature-and-time combinations, so UK hosts should follow the applicable local instructions rather than assuming one international threshold covers every method.
Do not depend on surface browning or clear-looking juices to determine poultry safety. Chicken can appear cooked externally while remaining insufficiently heated in its centre.
Five checks before a mixed-menu barbecue starts
- Mark a raw-food preparation area and a clean serving area; confirm they do not overlap.
- Set out separate raw-meat and cooked-food utensils; verify that each pair has a clear purpose.
- Position chicken away from other foods that could receive raw juices; check the direction of possible drips.
- Place a cleaned, working food thermometer within reach; identify where the thickest portions will be tested.
- Prepare an unused clean serving plate and a handwashing arrangement; confirm both are available before cooking.
Once raw and cooked handling is controlled, the final challenge is quality rather than contamination: holding finished foods without drying them out or compromising food safety.
When Should You Pull Food Off Early and Hold It So Everything Serves Together?
Remove food from active cooking when it has met its required safety endpoint and reached the intended doneness, allowing for any rest required by the relevant guidance. Thick cuts may continue warming internally after removal, while thin items gain less from resting. Holding is useful for coordinating service, but it cannot substitute for completing safe cooking.
Carry-over cooking happens because heat continues moving from the hotter exterior of a cooked item towards its cooler centre after it leaves the grill. The effect depends on the size, shape and temperature distribution of the food. A substantial roast may show a noticeable rise; a thin burger may show very little.
For food safety, do not assume an arbitrary number of degrees of carry-over cooking. A practical way to plan is to establish which foods can rest once they have satisfied their relevant cooking requirements, then schedule quicker foods to finish during that rest.
According to FoodSafety.gov‘s safe minimum internal temperature chart, US recommendations include the following endpoints. These are US values, not universal rules for every English-speaking country.
| Food | Minimum internal temperature | Additional requirement |
|---|---|---|
| Poultry | 74°C / 165°F | Check with a food thermometer |
| Ground meat, including beef burgers | 71°C / 160°F | Check the centre |
| Qualifying whole cuts of beef, lamb and veal | 63°C / 145°F | At least 3 minutes of rest |
| Fish | 63°C / 145°F | Follow the applicable guidance for fish |
UK hosts should use current UK guidance for cooking and hot holding, especially when preparing burgers, sausages and poultry. Specific preparation methods and temperature-and-time combinations can differ from US recommendations.
For a short rest, place a large cooked cut on a clean rack or plate, loosely tenting it with foil where appropriate. Loose covering limits excessive steam build-up while helping retain warmth. Avoid stacking thin foods, which traps moisture and can soften their browned surfaces.
A cooler grill area can provide temporary space during cooking, but it is not automatically a safe hot-holding zone. Residual heat may continue cooking the food, and an inadequately heated area may allow food to cool too far. For extended holding, use temperature-controlled equipment and the applicable hot-holding rules.
For better timing, aim to finish substantial cuts shortly before the final quick-cooking foods. Sausages, burgers and vegetables are generally more sensitive to prolonged holding, so schedule them closer to the point when guests will eat.
The last ten minutes should become a controlled series of checks, removals and plating decisions. Before relying on the zone layout, however, verify that the grill’s actual heat distribution matches the plan.
How to Read Your Grill’s Heat Map So Zone Assignments Actually Match Reality?
Check where the grill is genuinely hottest before placing food, rather than assuming every area behaves as its controls or coal arrangement suggest. Charcoal distribution, burner output, the lid and outdoor conditions can produce uneven heating. A simple bread-toasting test can reveal obvious hot spots, while a suitable grill thermometer provides a more useful temperature check.
On a charcoal grill, the area directly above a concentrated coal bed usually receives stronger radiant heat. Areas away from the coals receive less direct radiation, although temperatures also depend on airflow, lid position and grill construction.
Gas grills can likewise have uneven areas because of burner layout and heat distribution. A burner dial setting is not necessarily a precise reading of the heat at grate level.
One simple qualitative test is to arrange slices of plain bread across the clean grate before cooking food and briefly observe how they toast. The slices above hotter areas will brown faster. Dark patches can reveal concentrated heat, while pale slices show areas receiving less intense browning.
This test is useful for relative heat mapping, not for measuring the temperature of the grill or proving that a particular area is safe for slow cooking. Remove the bread after testing. Do not use it as a substitute for measuring food temperature.
A hand-hover test is sometimes used as a rough indication of radiant heat, but it cannot measure cooking temperature and carries a burn risk. A suitable thermometer and visual assessment of the fire are preferable, particularly when cooking for several guests.
If the intended indirect zone is unexpectedly hot, adjust the setup before loading it. On charcoal, this may mean repositioning the coals with suitable tools. On gas, it may mean reducing or switching off the appropriate burner while following the manufacturer’s instructions.
Closing the lid changes how heat circulates around food; it should not be treated as creating a guaranteed cool or shaded area. Check the indirect temperature with the lid in the position intended for cooking.
Wind, rain and frequent lid opening can change the temperature during a longer barbecue. Recheck the grill periodically, especially if cooking seems to accelerate or slow unexpectedly. Do not compensate by repeatedly opening the lid without a reason, as that can introduce further fluctuations.
With the hot and cooler areas identified, the charcoal can be arranged deliberately. A kettle grill makes the relationship between direct and indirect heat especially straightforward.
How to Build Direct and Indirect Zones on a Kettle Grill in 5 Minutes?
Build two heat zones by arranging the charcoal on one side of the kettle and leaving the other side without coals underneath the cooking grate. The area over the coals provides direct heat, while the opposite side provides indirect heat when the lid is closed. The arrangement can take minutes, but lighting and preheating require additional time.
The key is not an exact universal number of briquettes. Grill diameter, fuel type, weather and the desired cooking temperature all affect how much charcoal is appropriate. Follow the equipment and fuel manufacturer’s instructions.
Use the following setup sequence:
- Prepare the kettle. Position it securely outdoors, away from combustible materials, and check that the ash collection and ventilation components are ready.
- Light the charcoal safely. Use the approved lighting method and allow the coals to become suitable for cooking. Food Standards Scotland describes the appropriate charcoal condition as glowing red with a powdery grey surface.
- Bank the coals to one side. Use heat-resistant equipment to establish a concentrated direct-heat area, leaving the opposite side free of charcoal.
- Add an optional drip pan. A suitable pan beneath the indirect zone can collect fat from foods cooked above it, provided the setup follows the grill manufacturer’s instructions.
- Replace the cooking grate and close the lid. Allow the cooking environment to stabilise and confirm the actual temperature before adding food.
Food directly above the coals receives concentrated radiant heat and is suited to faster cooking or browning. Food on the opposite side cooks through heat circulating inside the closed grill, allowing larger ingredients to cook more gradually.
On compatible kettles, positioning the lid vent over the indirect side can encourage airflow across the cooking area. Vent placement and adjustment should nevertheless follow the specific grill’s instructions, since airflow systems and temperature responses vary.
The lid is especially important during indirect cooking. Leaving it open for long periods reduces control over the surrounding cooking temperature. Group checks together where possible, and avoid opening the kettle unnecessarily.
The phrase « in 5 minutes » refers to arranging the physical zones once the equipment and fuel are ready. It is not a promise that a cold charcoal barbecue can be lit, brought to a stable cooking temperature and loaded with food in five minutes.
Once the zones are ready and the grill has stabilised, direct grilling and indirect roasting can share the same fire. The remaining job is to schedule them so neither process interrupts the other.
Key takeaways before combining grilling and roasting
- Give long-cooking foods priority on the indirect side, and work backwards from the time the meal will be served.
- Reserve the accessible direct-heat area for shorter, more active cooking in the final stage.
- Batch thermometer checks and lid openings, but let verified doneness and safe handling override the planned schedule.
How to Use Two Heat Zones So You Can Grill and Roast at the Same Time?
Start the food requiring the longest indirect cooking first, with the lid closed to maintain the roasting environment. Use the quieter early period to prepare other ingredients, then introduce quick direct-heat foods closer to serving time. Coordinate checking and turning so the roast retains a stable cooking environment while faster items finish safely.
A two-zone kettle effectively supports two cooking methods. Above the coals, food is exposed to stronger direct heat for browning and rapid cooking. Away from the coals, enclosed heat supports a slower roasting process. The methods operate together, but they do not need identical attention.
Suppose, as a hypothetical planning example, the menu is a small roast, chicken thighs, burgers, sausages, pepper wedges and courgette slices. The exact starting times must come from the recipe, the portion thickness and actual cooking temperatures, not a fixed schedule applied to every barbecue.
A workable sequence looks like this:
| Cooking phase | Indirect zone | Direct zone |
|---|---|---|
| Early phase | Start the small roast; add chicken when its estimated cooking window calls for it | Keep clear for later cooking |
| Middle phase | Continue longer-cooking foods; add thick pepper wedges where suitable | Cook sausages or brown items as required, then move them to an appropriate zone to finish |
| Final phase | Check roast and poultry with a thermometer; remove foods only when their cooking requirements are met | Cook burgers and courgette slices, monitoring them closely |
| Serving phase | Complete any remaining cooking or required resting | Finish quick items and transfer them with clean utensils |
For a roast, keep the lid closed for most of its cooking time and verify progress using a suitable thermometer. Avoid making repeated lid lifts solely to inspect the surface. If other foods require frequent turning, organise those tasks into brief working intervals while recognising that opening the lid can affect the indirect-zone temperature.
Raw chicken remains a separate food-safety concern regardless of how the heat zones are arranged. Do not allow raw poultry juices or contaminated equipment to reach cooked food, and verify that chicken has satisfied the applicable temperature-and-time guidance.
If the roast reaches its safe cooking endpoint before the burgers are finished, transfer it to a clean resting or appropriate holding area. Do not leave it over heat indefinitely merely to make its removal coincide with the final burger.
Similarly, when quick foods finish ahead of schedule, consider whether they can be served immediately or safely held for a short period without excessive quality loss. Preventing overcooking is more effective than trying to reverse it after holding.
The final ten minutes should be organised around completed cooking checks, clean transfers and short, deliberate rests. Guests should not have to wait for chicken that has only just started cooking, while burgers should not spend that entire period drying out.
For the next mixed-menu barbecue, write the six foods on a simple timeline, mark their intended zones and prepare separate raw and cooked utensils before lighting the coals. Then follow the actual food temperatures and cooking conditions rather than forcing the grill to match the clock.
Can chicken and burgers cook on the same barbecue?
Yes, provided raw poultry and its juices cannot contaminate burgers or other food, raw and cooked handling equipment stays separate, and each item reaches its applicable safe cooking endpoint. Separate zones make coordination easier but do not replace hygiene and temperature checks.
How can different barbecue foods avoid picking up each other’s flavours?
Keep strongly seasoned or heavily marinated foods apart where practical, use separate utensils for incompatible marinades and remove excessive residue from cooking surfaces. A clean, suitable grill tray can help contain particular ingredients. Some flavour transfer through shared smoke may still occur, so absolute flavour separation is not guaranteed on one open cooking surface.
What should happen if the grill becomes too crowded?
Cook in staggered batches rather than filling every available section. Give priority to foods requiring longer cooking, preserve access for turning and thermometer checks, and keep raw and cooked foods separate. Finished items should be served promptly or held under safe conditions rather than left indefinitely on a low-heat area.
Should the lid stay open when cooking six foods together?
Keep the lid closed as required for indirect cooking and roasting, because the enclosed environment helps maintain the surrounding heat. Brief openings are often necessary to turn direct-heat foods and check temperatures. Work efficiently during those openings, following the grill manufacturer’s operating guidance.
Can a food thermometer replace a cooking-time chart?
A thermometer is essential for verifying the internal temperature of meat, but it does not replace planning or all other food-safety controls. A cooking-time chart helps estimate when to start each food; temperature checks establish whether relevant cooking requirements have been met. Safe handling, resting requirements and local guidance still apply.