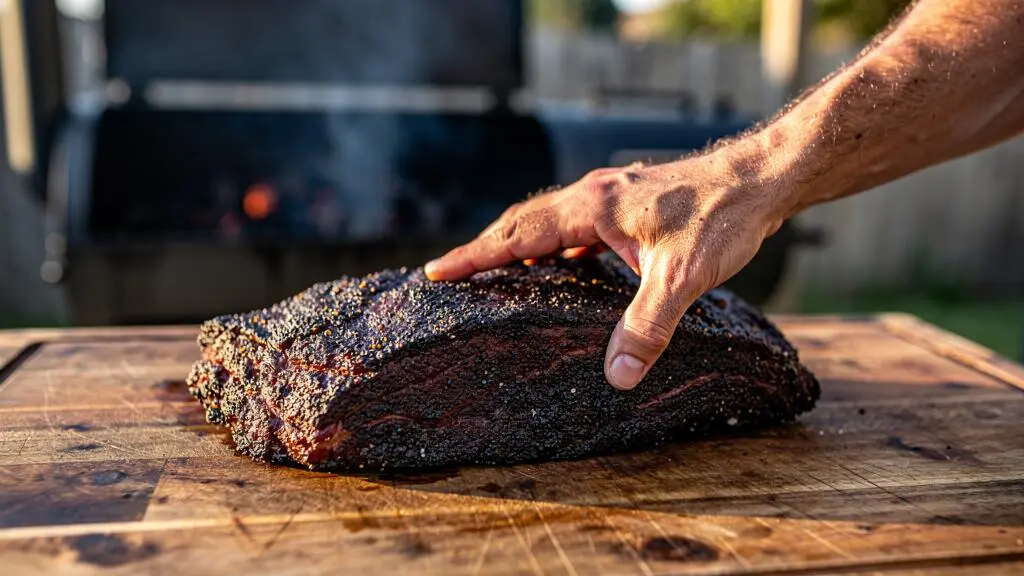
A proper barbecue bark should taste of beef, smoke, pepper and savoury aromatics—not like a dessert coating. Getting that result over an eight-hour smoke is less about piling on more seasoning and more about controlling what happens at the meat’s surface. Moisture, rendered fat, seasoning particles, smoke exposure and surface browning all contribute to the crust, and each behaves differently as the cook progresses.
The most reliable approach is to start with a restrained, sugar-light rub, measure salt rather than guessing, choose a pepper grind suited to the cut and let the surface dry before reaching for the spritz bottle. Airflow then helps regulate surface drying, provided it does not turn the bark hard and leathery. None of these adjustments guarantees an identical result on every smoker: brisket, ribs, fire management and ambient conditions all matter.
The goal is a crust that is dark, textured and firmly set, yet still complements juicy meat. Build that result through controlled seasoning and observation rather than using sweetness, extra salt or excessive heat to compensate for a weak bark.
The essentials of firm, savoury bark
- Use a simple, sugar-light rub and check commercial blends for hidden sweeteners.
- Measure the total salt, select pepper texture for the cut and apply seasoning in controlled layers.
- Let the bark set before spritzing, then adjust airflow gradually instead of adding more rub.
- Why Does Bark Taste Too Sweet After 6 Hours Even When You Barely Used Sugar?
- How to Build a Savoury Bark Using Only 4 Core Spices Without Tasting Harsh?
- Coarse or Fine Pepper: Which Creates Better Bark on Ribs vs Brisket?
- The Early-Spritzing Mistake That Stops Bark From Setting
- How to Get Firmer Bark by Tweaking Airflow Instead of Adding More Rub?
- How to Layer Savoury Seasoning in 2 Stages Without Overdoing Salt?
- How to Build a Dry Rub Using a 4-Part Ratio So You Can Scale It Easily?
- How to Build a Savoury Seasoning Crust That Doesn’t Taste Over-Salted After 8 Hours?
Why Does Bark Taste Too Sweet After 6 Hours Even When You Barely Used Sugar?
Bark can taste sweeter late in a smoke because the surface changes as moisture evaporates, fat renders and seasoning ingredients interact with the meat. However, it is not safe to assume that every sweet note comes from sugar becoming proportionally concentrated: the finished flavour depends on the rub, the meat, the cooking environment and the reactions taking place at the surface.
Start by auditing the seasoning. Paprika, onion powder and garlic powder can contribute rounded, naturally sweet or savoury-sweet notes, while commercial barbecue blends may include sugar under several names. Check for brown sugar, dextrose, honey powder, glucose syrup solids and other sweetening ingredients. A rub described as savoury is not necessarily sugar-free.
There is also a difference between caramelisation and the Maillard reaction. Caramelisation involves sugars, while the Maillard reaction involves reactions between amino compounds and reducing sugars. Both can contribute to browning and flavour under suitable conditions, alongside other processes involved in bark formation. AmazingRibs.com‘s explanation of barbecue bark formation discusses the Maillard reaction, polymerisation and the interaction of moisture with rub ingredients. It does not establish that every long cook makes a rub taste progressively sweeter.
A practical diagnosis is to compare flavour at different stages. If the bark tastes balanced early but noticeably sweeter later, review the sweeteners and any sugary binder or spritz before changing the smoker temperature. A small sample of the dry rub mixed with water can help reveal obvious sweetness, but it is only a rough screening test: it cannot accurately reproduce the flavour of a smoked crust.
For a more savoury finish, reduce sweet ingredients at the recipe stage, allow surface browning to develop and avoid repeatedly coating the meat with sweet liquids. Do not confuse a dark bark with proof of caramelisation; colour alone cannot identify the chemistry responsible.
The key is to correct the seasoning and surface-management choices that actually produce the unwanted flavour. Once the sweet notes are under control, a short ingredient list makes it easier to build a robust savoury profile without masking the beef.
How to Build a Savoury Bark Using Only 4 Core Spices Without Tasting Harsh?
A four-part rub can deliver a deeply savoury bark when salt, black pepper, an allium and a warm spice each have a clear job. The objective is not to find a universal ratio that works for every cut, but to create a repeatable starting point that lets beef, smoke and rendered fat remain prominent rather than burying them under a complex, sweet seasoning blend.
Use these four components as a framework:
- Salt: seasons the meat and supports the overall flavour. Measure it separately so it can be controlled.
- Black pepper: supplies bite, aroma and the familiar coarse texture of a pepper-forward crust.
- Garlic or onion: adds savoury depth. Choose one initially so its contribution remains easy to judge.
- Paprika, cumin or coriander: adds warmth and aromatic complexity. Select one rather than combining several before the base formula is tested.
Minimal does not mean harshness-proof. Fine garlic powder and onion powder can darken quickly at exposed, hot surfaces, while pepper may become acrid if particles scorch. A coarser allium granule can be worth testing, but particle size alone cannot guarantee that it will not burn. Avoid treating heavily toasted spices as a requirement; smoke already contributes substantial flavour, and additional heat treatment can make an already assertive rub taste bitter.
Mix a small trial batch, then season a small piece of the same meat and cook it under conditions close to the intended smoke. Tasting the dry blend or stirring it into water can help screen for excessive salt or a one-note spice hit, but neither test predicts the final bark reliably. The real test is the cooked surface.
A simple rub also makes troubleshooting easier. If the result is bitter, inspect scorching and airflow; if it tastes flat, adjust the aromatics; if it is too salty, measure and reduce the salt. Adding sugar to correct every imbalance merely trades one problem for another.
Once the flavour balance is sound, particle size becomes the next useful variable: pepper affects not only the taste of the crust but also the way seasoning sits on brisket and ribs.
Coarse or Fine Pepper: Which Creates Better Bark on Ribs vs Brisket?
Coarse black pepper is a strong starting point for brisket because it creates a visibly textured, pepper-forward surface that suits a long cook. A somewhat finer grind can work better on ribs when you want more even coverage across a thinner surface. Neither choice is a hard rule: the right grind depends on the cut, your preferred texture, the rest of the rub and how your smoker behaves.
Large pepper fragments remain distinct on the meat and help create a rough-looking crust. Fine pepper distributes more evenly, but a very powdery application can make the surface less distinct and may become unpleasant if exposed to harsh heat. Coarse pepper has its own drawback: particles that are too large can leave isolated, sharp-tasting patches instead of a consistent seasoning layer.
For brisket, a crack or coarse grind around 14–16 mesh is a common practical reference among pitmasters. For ribs, a somewhat finer blend may offer better coverage; mesh figures such as 8–10 are not universal standards for a superior rib bark, and mesh terminology can be confusing because the numerical relationship between mesh and particle size runs opposite to what some cooks expect. Treat these figures as starting points to test, not specifications that guarantee a result.
Test your grind before committing to a full packer brisket or rack of ribs. Apply a consistent amount of rub to a small piece, smoke it, then assess coverage, bitterness and whether any pepper fragments taste raw or disproportionately hot. If the flavour is patchy, adjust the grind or distribute the seasoning in two passes: a coarser base followed by a lighter, finer layer.
Even a well-balanced grind will struggle to form a stable crust if the surface is repeatedly wetted too early. That makes spritz timing the next part of the process to control.
The Early-Spritzing Mistake That Stops Bark From Setting
Spritzing too early or too frequently can delay the formation of a firm bark by repeatedly wetting the meat’s surface. The practical rule is to wait until the rub has visibly darkened, the surface no longer looks wet and glossy, and the seasoning resists gentle fingertip pressure. This visual test is more useful than following a fixed number of hours, because the timing changes with the cut, smoker temperature and airflow.
During a long smoke, surface moisture evaporates while rendered fat and seasoning interact with the developing crust. Adding liquid can cool the surface temporarily and extend the time needed for it to dry again. That does not mean every spritz ruins bark: a light application can be useful if exposed areas are drying too aggressively or beginning to scorch. The mistake is spraying automatically at regular intervals when the surface does not need it.
Use the condition of the meat to decide what to do:
- Surface still wet or glossy: leave it alone and let the existing moisture evaporate.
- Rub darkening and drying: wait until the coating looks stable before considering any liquid.
- Localised scorching or excessively rapid hardening: consider a light, targeted spritz and reassess the heat and airflow.
- Firm, dry-looking bark: avoid unnecessary spraying that would soften or delay the crust.
The liquid matters, too. Apple juice, cola and other sweet liquids introduce additional sugars. Repeated applications can leave a sweet surface coating and may contribute to bitter, over-darkened patches where ingredients scorch. Plain water avoids adding sugar, although it can still wet and cool the surface. A spritz is a tool, not a compulsory stage of the cook.
Do not judge bark readiness by colour alone. A dark surface may still be soft, and a lighter surface may already be holding its seasoning well. Check appearance and resistance together, using a gentle touch that does not scrape the rub away.
Once the crust is stable, focus on maintaining a clean, controlled fire and a suitable drying rate. If the bark remains thin and damp despite restrained spritzing, airflow may be the next variable worth investigating.
How to Get Firmer Bark by Tweaking Airflow Instead of Adding More Rub?
Adjusting airflow can help develop firmer bark when the meat’s surface is staying too wet, but opening vents does not automatically improve every cook. Airflow affects the fire, combustion, smoke movement and moisture conditions around the meat. The aim is to promote steady surface drying without driving the meat towards a hard, leathery crust or an excessively dry interior.
First, establish a baseline. Keep the smoker operating steadily, observe how the bark changes and make a note of the vent settings, fuel conditions and surface appearance. If the crust remains wet and the fire is otherwise stable, a small airflow adjustment may help. Change one variable at a time rather than opening every vent, adding fuel and increasing heat simultaneously. Otherwise, it becomes difficult to identify what actually improved the result.
Airflow is not a direct measure of drying rate. A vent adjustment can also change combustion and cooking temperature, and the effect depends on the smoker’s design. More airflow is therefore not always the answer; the relevant question is whether the surface is drying appropriately under stable cooking conditions.
A useful target is bark that looks set, holds its seasoning and has a firm but not rock-hard texture. If the exterior becomes tough while the meat loses too much moisture, back off aggressive drying and review the fire management. If the bark is still damp, check whether repeated spritzing, poor draft or a fluctuating fire is responsible before adding seasoning.
The technical explanation of bark formation from AmazingRibs.com describes how surface moisture and evaporation interact with the developing crust. It does not establish a universal vent setting or prove that higher airflow always creates a better bark, so use it as context rather than a fixed operating formula.
Airflow management becomes easier when seasoning itself is consistent. A measured two-stage application gives you a stable base and aromatic finish, while reducing the temptation to keep adding salt and spices whenever the crust looks incomplete.
How to Layer Savoury Seasoning in 2 Stages Without Overdoing Salt?
A two-stage seasoning method separates salt management from the final aromatic coating. Apply the measured salt-and-pepper base in advance when appropriate, then add a lighter layer of garlic, onion or another chosen spice shortly before the meat goes into the smoker. The advantage is control: each application has a defined purpose, and the total salt can be tracked instead of guessed at independently in each layer.
For a substantial cut such as brisket, advance salting can give salt time to dissolve and move into the meat as moisture is drawn to the surface and later reabsorbed. Timing, thickness and refrigeration conditions matter, so keep meat safely chilled during preparation. Salt penetration is not instantaneous, and the rest of the rub largely remains a surface treatment rather than seasoning the centre of the meat.
The second application should be lighter and more aromatic, not a second full dose of everything. Garlic, onion and warm spices can become too assertive when layered heavily over an already seasoned surface. If a binder is used, such as a thin coating of mustard or oil, account for how it changes adhesion. A dry surface may hold seasoning differently from a slightly tacky one, and loose crystals that fall away should not be assumed to have reached the meat.
The important measurement is the total salt used across the entire process. Weigh the salt in the first stage and the second stage, if any, and record both quantities. A salt quantity expressed by volume can vary with crystal size and brand, so weighing is more repeatable. There is no universal surface-salt requirement in the available references that applies to every cut and every eight-hour cook.
Before cooking, inspect the surface for visible piles of crystals or uneven patches. A gritty feel can be a warning that salt distribution is excessive or inconsistent, but it is not a precise test of sodium content. Use the measured recipe and the cooked result to make the next adjustment.
With the salt under control, the next step is to formalise the rub into a ratio. A measured formula is easier to scale from a rack of ribs to a full brisket without changing its flavour balance accidentally.
How to Build a Dry Rub Using a 4-Part Ratio So You Can Scale It Easily?
A four-part ratio makes a savoury dry rub easier to reproduce because each ingredient has a defined role and the whole recipe can be scaled by weight. Use salt as the seasoning anchor, black pepper for structure, an allium for savoury depth and one warm spice for aromatic complexity. The ratio itself is a starting framework, not a validated universal formula: the right balance depends on the cut, salt already applied, seasoning preferences and cooking method.
Rather than measuring everything by spoonfuls, assign a chosen number of grams to each part. For example, if a test recipe uses four equal ingredient weights, each component can be increased or decreased proportionally without changing the formula. Equal weights are useful for illustrating the arithmetic, but they do not necessarily produce a balanced rub because salt, pepper and powdered spices have different intensities.
For a practical batch, decide the total amount of rub required, choose the proportion for each ingredient and calculate each weight from the total. Keep salt separate in the recipe notes if you prefer to apply it in advance. That prevents the seasoning blend from inadvertently adding a second full salt dose to meat that has already been dry-brined.
A pepper-forward beef rub is a useful reference for this style. The Big Bad Beef Dry Rub Recipe from AmazingRibs.com provides a concrete example of a blend using coarse black pepper, onion powder, garlic powder and other seasonings. It is one particular recipe, not evidence that any exact ingredient count or ratio is optimal for every brisket.
Test one change at a time. Cook a small, consistently seasoned piece of meat, evaluate the finished bark and change only one component in the next batch. If the result is too sweet, reduce sweet ingredients rather than adding more salt to compensate. If it tastes harsh, inspect scorching and spice intensity before increasing the quantity of another ingredient.
Five actions for a repeatable savoury rub
- List every ingredient and its purpose; deliverable: a complete ingredient inventory.
- Weigh each ingredient in grams; deliverable: a reproducible base recipe.
- Record the salt applied separately and in the blend; deliverable: a total-salt worksheet for each cook.
- Prepare a small test batch and cook a sample of the intended meat; deliverable: a tasting record covering sweetness, bitterness, salt and texture.
- Change one ingredient proportion at a time and retest; deliverable: a dated version of the rub with the change and result documented.
A repeatable formula prevents accidental over-seasoning, but it still needs a final salt check. Even a well-designed rub can taste too salty when the surface loses moisture during a long smoke, so the total amount matters as much as the ingredient balance.
Key takeaways before the final salt check
- Standardise the rub by weight so a larger batch preserves the intended proportions.
- Keep salt quantities visible in the recipe, especially when salting the meat in advance.
- Judge the finished bark after cooking rather than assuming that a balanced raw rub guarantees the same flavour after eight hours.
How to Build a Savoury Seasoning Crust That Doesn’t Taste Over-Salted After 8 Hours?
A savoury crust that stays balanced through an eight-hour smoke starts with a measured total salt application, even seasoning coverage and a cooking process that allows the bark to develop without repeated wetting. Salt does not simply become more concentrated in a predictable, uniform way throughout every cook; its distribution changes with moisture movement, dissolution, adhesion and the meat’s surface conditions. The practical solution is to measure the dose, record the method and evaluate the finished result.
Begin by weighing the salt rather than relying on a visual estimate. Record the amount used for advance salting and any additional salt in the rub. The appropriate quantity depends on the meat’s weight, cut, bone content, salt type and other seasoning already applied. A volume-based recipe may behave differently when the salt crystal size changes, so do not transfer spoon measurements blindly between brands.
Salt can dissolve in surface moisture and interact with the meat during the resting period. Some of it penetrates the meat, while seasoning ingredients such as pepper and many dried aromatics largely remain near the surface. As the cook progresses, moisture evaporates and fat renders, changing the crust’s texture and flavour. That makes a measured starting point more dependable than repeatedly adding seasoning because the bark looks pale or soft.
Keep salt and bark texture as separate diagnostic questions. If the crust tastes too salty but remains soft, adding more rub will compound the seasoning problem. Extending the cook solely to make the surface firmer may also intensify dryness. Review the total salt dose, surface wetting and fire management independently, and change the relevant variable on the next cook.
For a balanced result, aim for even coverage rather than visible heaps of crystals. Do not assume that a gritty surface is a precise measurement of salt concentration, but treat obvious unevenness as a reason to improve distribution. Keep a log of the cut, rub weights, salting interval, spritzes and smoker settings so the next result can be compared fairly.
The best next cook is a controlled test, not a more heavily seasoned one. Weigh the ingredients, let the bark develop without unnecessary intervention and record the finished flavour and texture. Those observations provide a practical basis for refining a firm, savoury crust without turning it sweet or excessively salty.
Can barbecue bark become firm without adding sugar?
Yes. A firm bark can develop from seasoning, surface drying, smoke exposure and browning reactions without deliberately adding sugar. Use a restrained savoury rub, manage moisture and airflow carefully, and judge the crust by its texture rather than relying on sweetness or a dark colour alone.
Should brisket be spritzed during an eight-hour smoke?
Not automatically. Wait until the rub has visibly darkened and the surface has begun to set. Spritz lightly only when conditions warrant it, such as localised drying or scorching. The appropriate timing depends on the cut, smoker and surface condition, not a fixed hour.
Is coarse black pepper always better for brisket than ribs?
No. Coarse pepper is a common choice for a textured, pepper-forward brisket crust, while a finer grind can provide more even coverage on ribs. Both approaches depend on personal preference, seasoning distribution and cooking conditions. Test the grind on the actual cut before committing to a large cook.
Why does a savoury bark taste too salty after several hours?
The salt dose may be too high, the surface distribution may be uneven, or moisture loss may have changed the perceived balance of the crust. Measure salt across every seasoning stage, avoid adding extra rub to fix a soft surface and use the finished result to adjust the next batch.
How can a dry rub be scaled from ribs to a full brisket?
Weigh each ingredient and preserve the chosen proportions when increasing the batch. Calculate the total salt separately if the meat is salted in advance, and allow for differences in cut, bone content and surface coverage. Scaling the recipe consistently is a starting point; the appropriate quantity still needs to be checked against the meat and the finished bark.