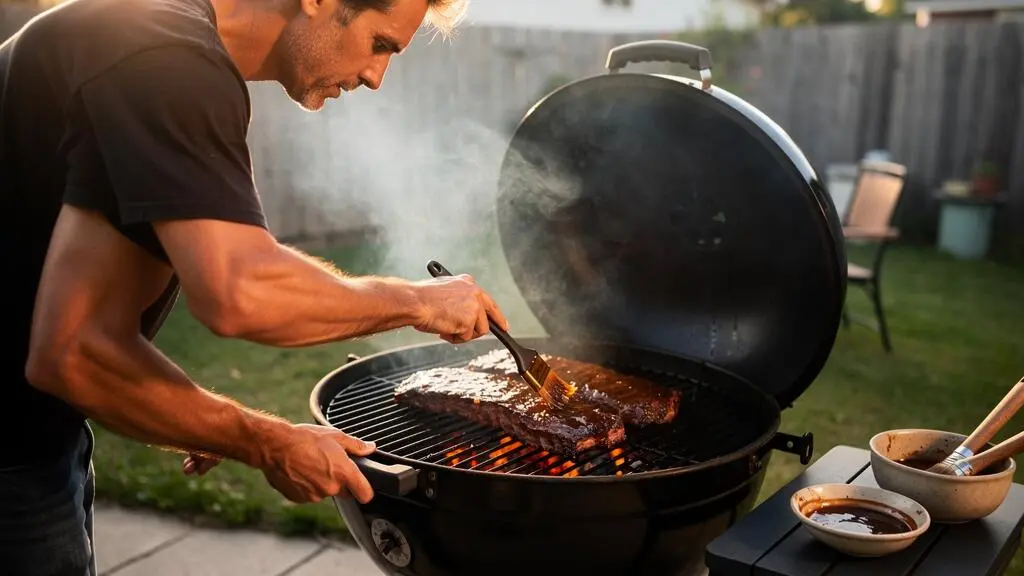
Barbecue glaze should finish cooking meat, not spend the entire cook fighting the fire. The simplest way to achieve a glossy, flavorful coating without bitter burnt sugar is to apply thin layers during the final 10 minutes, mostly over indirect heat, then use a brief, controlled exposure to direct heat only if the surface needs additional color.
Sugar-rich glazes behave differently from dry rubs. Honey, molasses, brown sugar, and fruit preserves can develop attractive color as they heat, but prolonged exposure to intense radiant heat can quickly darken the coating and produce unpleasant bitterness. A perfectly cooked rack of ribs can still taste scorched if its glaze has spent too long above the coals.
The solution is a combination of timing, coating thickness, and grill positioning. A two-zone setup gives the glaze time to cling and set while preserving the option of a quick final finish. Watching the coating change from wet to tacky is more reliable than treating a particular minute or grill temperature as an absolute rule.
Barbecue glazing essentials
- Glaze late: Reserve approximately the final 10 minutes for sugar-rich coatings, adjusting the window to the grill and protein.
- Use three thin passes: Brush lightly, let each layer become tacky, and avoid pooling sauce on the meat.
- Control direct heat: Set the glaze over indirect heat and use a short direct finish only when necessary, moving the meat immediately if the coating darkens too quickly.
- Why Does Barbecue Glaze Burn in Under 3 Minutes Over Direct Heat?
- How to Glaze in 3 Passes Using Two Heat Zones Without Making It Sticky-Sweet?
- Honey Glaze or Molasses Glaze: Which Works Better on a Kettle Grill?
- The Early-Glaze Mistake That Makes Ribs Taste Bitter by the Finish
- How to Reduce a Glaze to the Right Thickness in 8 Minutes Without Over-Salting?
- How to Glaze in 3 Passes Using Two Heat Zones Without Making It Sticky-Sweet?
- Sear First or Indirect First: Which Works Better for Chicken Pieces With Skin?
- How to Use Two Heat Zones So You Can Grill and Roast at the Same Time
Why Does Barbecue Glaze Burn in Under 3 Minutes Over Direct Heat?
Barbecue glaze can burn in under three minutes over direct heat because concentrated sugars receive intense radiant energy from the coals or burners. As moisture evaporates, the coating becomes more concentrated and can darken rapidly. There is no universal three-minute threshold: the distance from the heat, sugar composition, glaze thickness, and surface moisture all affect how quickly scorching occurs.
Sucrose, the main sugar in conventional table sugar, undergoes caramelization as it is heated sufficiently, developing darker colors and complex flavors. Temperatures around 350°F (177°C) are often associated with sucrose caramelization, but this is not a universal burning point for barbecue glazes. Real sauces contain water, acids, proteins, and mixtures of sugars that change how they behave.
Honey contains substantial fructose and glucose, while molasses contains a mixture of sugars and other dissolved compounds. Their behavior cannot be predicted from a single temperature. Both can scorch under strong direct heat, especially when brushed onto an already-hot surface.
The critical distinction is between controlled caramelization and destructive charring. A glaze that turns from amber to mahogany may be developing desirable flavor. A coating that develops black patches, produces acrid smoke, or smells sharply burnt is moving beyond useful browning.
Meat browning and glaze browning also compete for the available heat. The Maillard reactions responsible for much of a grilled meat’s savory crust are distinct from sugar caramelization. Once glaze covers the surface, it changes moisture and heat transfer, so the same grilling technique that produced a good crust on bare meat may scorch the coating.
For practical timing, Weber’s guidance on using sauces and glazes recommends applying high-sugar coatings during the final 10 to 15 minutes of cooking. That is a starting range, not a guaranteed safe exposure time over direct flames.
Four variables are worth checking before the first brushstroke:
- Heat distance: Coals close to the grate expose the glaze to stronger radiant heat.
- Sugar concentration: A syrup-heavy glaze can become highly concentrated as moisture evaporates.
- Coating thickness: Thick deposits may stay wet inside while overheating at the edges.
- Meat surface: A dry surface can help a thin glaze adhere; excess moisture may delay setting.
Once the glaze has developed an even sheen, additional heat is not automatically beneficial. The next step is to create that finish gradually rather than trying to achieve it with one heavy application.
How to Glaze in 3 Passes Using Two Heat Zones Without Making It Sticky-Sweet?
To glaze barbecue in three passes, cook the meat until it is nearly finished, move it to indirect heat, and brush on a very thin first coating. Let that layer become tacky before adding a second, then apply a light finishing coat. This method builds shine without leaving a thick, excessively sweet syrup on the surface.
Start with a grill divided into a hotter direct zone and a cooler indirect zone. On a charcoal kettle, concentrate the coals on one side. On a suitable gas grill, use lit burners beside the food while leaving the burner directly beneath it off.
This arrangement gives you control over how much radiant heat reaches the glaze. Weber’s instructions for direct and indirect gas grilling also recommend moving food to the cooler side when it colors faster than it cooks.
A useful final-10-minute schedule is:
| Stage | Approximate timing | Visual target |
|---|---|---|
| First pass | 10–7 minutes remaining | Thin, wet film becoming lightly tacky |
| Second pass | 7–3 minutes remaining | Even mahogany color without thick patches |
| Final pass | Last 3 minutes | Uniform sheen with no dark scorching |
These times are illustrative rather than experimentally established limits. On a hot grill, the layers may set much faster. A low-temperature indirect cook may require a longer interval. Always prioritize the appearance of the coating and the internal doneness of the meat.
For the first pass, dip a clean basting brush into the glaze and remove the excess against the bowl. Paint a light coat across the meat without leaving puddles around the edges or between bones.
Close the lid and let the surface change from glossy-wet to a more restrained tacky sheen. Apply the second pass only after the first has begun to set.
The third pass is for appearance, not for building another substantial layer. Brush sparingly. If the surface needs a little more color, briefly move the meat toward the direct zone while watching continuously. Return it to indirect heat before the coating develops black spots.
A hand-count test may help identify whether one grill zone feels hotter than another, but it cannot measure surface temperature or confirm a sugar-safe finishing range. A grill thermometer is a better temperature guide, and neither method replaces direct observation of the glaze.
It also matters whether you are working with a concentrated glaze or ordinary barbecue sauce. A thin, reduction-style glaze is usually easier to apply in successive coats. A watery sauce may need more time to thicken, while a very thick sauce may form sticky deposits. Adjust its consistency instead of assuming every bottled sauce behaves identically.
Five checks for a clean, glossy barbecue finish
- Confirm the cooking zones: Identify a hotter direct area and an indirect area with no active heat directly beneath the food. The result is a clear place to retreat if the glaze darkens.
- Check meat doneness: Measure the internal temperature before glazing and confirm that the meat can finish safely within the remaining cooking period.
- Brush the first thin coat: Remove visible excess glaze. The result should be an even film without pools.
- Wait for the tacky stage: Observe the surface between passes. Add the next layer when the previous one has begun to set rather than while it remains runny.
- Inspect the final finish: Check for consistent shine, no black patches, and an appropriate internal temperature before removing the meat from the grill.
Once the technique is consistent, the choice of sweetener becomes the next important decision. Honey and molasses create different flavors and surface appearances, even when applied with the same brush.
Honey Glaze or Molasses Glaze: Which Works Better on a Kettle Grill?
Honey works well when you want a bright, sweet, glossy finish during a short glazing window, while molasses is useful for a darker coating with deeper, slightly bitter caramel notes. Neither is automatically burn-proof or inherently better for every kettle grill. Heat intensity, dilution, cooking time, and the rest of the glaze formulation matter more than the sweetener alone.
Honey contains fructose and glucose, giving it a distinctive sweetness and a tendency to color quickly when exposed to strong heat. Molasses is a more complex ingredient containing sugars, minerals, and flavor compounds left from sugar processing. Its existing dark color can also make it harder to distinguish desirable browning from the onset of scorching.
Although molasses may appear more robust over longer cooking periods, that does not establish greater heat tolerance in every formulation. Both sweeteners need careful management around direct charcoal heat.
| Consideration | Honey glaze | Molasses glaze |
|---|---|---|
| Flavor | Floral or fruity sweetness, depending on the honey | Dark caramel, mineral notes, and potential bitterness |
| Appearance | Bright amber shine | Deep brown or mahogany finish |
| Best practical use | Short, carefully monitored finishing window | Flavorful, thin coatings during controlled indirect finishing |
| Main risk | Rapid darkening under strong heat | Scorching that can be difficult to recognize against its dark color |
| Useful adjustment | Thin slightly with vinegar or citrus juice | Loosen with stock, vinegar, or another suitable liquid |
Diluting either glaze with vinegar, citrus juice, or stock can make it easier to distribute in a thin film and reduce sugar concentration in the applied mixture. However, dilution does not establish a fixed increase in safe grilling temperature. The mixture may need additional time for moisture to evaporate before it becomes tacky.
For a fast cook on a kettle grill, honey is a practical choice when you can monitor the finish closely and keep the direct-heat exposure brief. Molasses is useful when deeper flavor and color are desired, particularly during lid-down indirect cooking.
The closed kettle lid creates a circulating hot-air environment that can help the coating dry more evenly than direct radiant heat alone. The actual result still depends on vent settings, coal placement, and the temperature of the cooking chamber.
A simple decision rule is to choose honey for a lighter, brighter finish and molasses for a darker, richer flavor. In either case, use acidity or savory ingredients to balance sweetness rather than increasing the thickness of the sugar coating.
Whichever sweetener you use, its greatest enemy is prolonged uncontrolled exposure. That becomes especially important when cooking ribs for several hours.
The Early-Glaze Mistake That Makes Ribs Taste Bitter by the Finish
The early-glaze mistake is brushing sugar-rich sauce onto ribs at the beginning of a long barbecue cook. The coating then spends too much time exposed to heat, allowing sugars and other sauce ingredients to darken repeatedly. By the time the ribs become tender, the exterior may taste bitter even though the meat underneath is properly cooked.
Ribs often need a prolonged cooking period to become tender, especially during low-and-slow barbecue. That extended cooking time is useful for rendering fat, developing smoke flavor, and softening connective tissue. It is not automatically beneficial for a sugary coating.
When glaze is applied early, moisture gradually evaporates and leaves a more concentrated layer on the meat. Subsequent heating can darken the coating further. Repeated applications may add fresh sugar on top of material that is already heavily browned or scorched, allowing bitter flavors to accumulate.
The problem is not that all caramelization is undesirable. A controlled amount can produce appealing sweetness and color. The problem is prolonged heat exposure after the coating has reached its useful finishing point.
For a long rib cook, use this sequence:
- Season the ribs with a suitable dry rub or other non-glaze seasoning.
- Cook them mostly without a sugar-rich glaze, maintaining the temperature and method appropriate to the cut.
- Check tenderness as the ribs approach the desired finish.
- Move them to a controlled indirect zone for the final glazing period.
- Apply thin layers and remove the ribs once the coating has set and the meat is ready.
A dry rub may itself contain sugar, so very sweet rubs can also darken excessively under strong heat. The important distinction is the amount of exposed sugar, the intensity of the heat, and the duration of exposure.
Some cooks glaze early because they believe a long cooking period will produce a thicker, more flavorful finish. If the goal is thickness, it is more controllable to reduce the glaze separately before applying it. That allows moisture to evaporate without repeatedly heating the sugar on the rib surface.
If ribs already have a bitter, blackened glaze, adding another sweet layer is unlikely to remove the underlying burnt flavor. Preventing the scorching is more effective than attempting to cover it afterward.
Preparing the glaze at the correct consistency before the meat reaches its finishing window makes that separation easier to maintain.
How to Reduce a Glaze to the Right Thickness in 8 Minutes Without Over-Salting?
To reduce barbecue glaze in approximately eight minutes without making it overly salty, use a wide uncovered pan, simmer gently, and check the texture frequently. Hold back most of the salt until the liquid reaches its final consistency. Eight minutes is a useful preparation target, not a guarantee: the volume, water content, pan size, and heat level determine the actual reduction time.
A wide pan exposes more liquid surface to the air, encouraging evaporation. Start with a glaze base containing the desired sweetener, acidity, and aromatics. Bring it to a gentle simmer rather than a violent boil.
Stir periodically, especially around the edges, where glaze can thicken or catch against the hot pan. As water evaporates, the coating should become more concentrated and cling more readily to a spoon.
The main seasoning problem comes from evaporation. Water leaves the pan, but dissolved salt largely remains. A glaze seasoned perfectly before reduction may taste harsh when much of the original liquid has evaporated.
Instead of adding the full intended salt quantity at the beginning, use unsalted or lightly seasoned liquids where practical. Taste once the reduction is nearly finished, then make small seasoning adjustments.
To check the consistency without a thermometer, dip a spoon into the glaze and allow a little to cool. The coating should cling to the back of the spoon while remaining fluid enough to brush. A trail across a chilled plate should move slowly rather than immediately spreading into a puddle.
If the mixture forms thick strings or becomes difficult to spread, it may be too concentrated for a thin-layer glazing method. Add a small quantity of a suitable liquid, stir thoroughly, and reassess after it cools slightly.
There is also a shortcut when heavy reduction is unnecessary: begin with an already-thick ingredient such as honey, molasses, or fruit preserves, then warm it briefly with aromatics and enough acidity or liquid to make it brushable. This minimizes evaporation and reduces the risk of concentrating salt excessively.
Keep any glaze that has contacted raw meat or a used basting brush separate from the portion intended for serving. A clean reserve portion avoids unnecessary cross-contamination.
Once the glaze is prepared, the final challenge is adjusting the glazing sequence to the meat. Ribs and chicken do not respond identically to the same amount of heat.
How to Glaze in 3 Passes Using Two Heat Zones Without Making It Sticky-Sweet?
The three-pass technique works for both ribs and chicken, but the time between passes should change with the protein. Ribs generally allow a slower finishing sequence over indirect heat, while smaller chicken pieces may need shorter intervals. The goal is the same: let each thin layer begin to set without exposing the sugary surface to excessive heat.
For ribs, keep the lid closed between applications when the grill and cooking method allow it. The indirect zone supplies more even heat while the glaze develops an adhesive, glossy coating. Larger racks can tolerate a slightly more deliberate brushing sequence because the finishing stage is less dependent on rapidly changing surface conditions.
Chicken pieces behave differently. Their size, skin, fat content, and proximity to the heat source can produce uneven browning. A wing or small thigh may develop dark patches while a larger piece is still approaching its safe internal temperature.
For this reason, the final glazing passes on chicken should generally be lighter and more closely monitored than those on a large rack of ribs.
On a kettle grill, place the coals on one side and keep the glazed meat over the charcoal-free area. On a gas grill designed for indirect cooking, turn off the burner directly beneath the food and maintain heat from the other burners as appropriate.
Without a thermometer, a cautious hand-count comparison above the grate can offer only a rough sense of relative heat intensity. It cannot confirm an exact temperature or prove that sugar will not scorch. Use a grill thermometer where possible and watch the coating itself.
Carryover heat also matters. The meat and glaze remain hot after leaving the grill, so a coating that is slightly tacky at removal may continue to firm as it cools. Avoid leaving the food over strong heat solely to make the glaze feel completely dry.
For reliable doneness, follow the food-safety temperature guidance relevant to the protein. Under USDA FSIS minimum cooking temperatures for meat and poultry, poultry should reach 165 °F (74°C), while specified whole cuts of pork, beef, lamb, and veal have a minimum of 145°F (63°C) followed by a three-minute rest. These are food-safety thresholds, not glaze-setting temperatures; tender barbecue ribs often need further cooking beyond the minimum safety endpoint.
Two symptoms help diagnose a failed finish:
- Wet and excessively sticky: The coating may be too thick, too concentrated, or insufficiently dried between passes. Use less glaze per application and allow controlled indirect heating.
- Glossy but unpleasantly bitter: The glaze may have been exposed to excessive direct heat or left in place too long. Reduce the intensity or duration of the final direct finish.
Skin-on chicken deserves particular attention because the sequence of searing, rendering, and glazing determines whether the final surface stays crisp or becomes soft and sticky.
Sear First or Indirect First: Which Works Better for Chicken Pieces With Skin?
Indirect-first cooking is generally the more forgiving choice for skin-on chicken that will receive a sugary glaze. It gives fat beneath the skin time to render before the final high-heat finish, while reducing the risk of scorching the coating. Searing first can work, but it requires greater control over the skin, flare-ups, and the timing of the later glaze.
Chicken skin contains fat that must render for the surface to become crisp. When chicken begins over intense direct heat, the skin can brown quickly before enough fat has rendered or the interior has cooked adequately. This is particularly relevant for thick thighs and drumsticks.
Starting over indirect heat allows the meat to cook more evenly while the skin gradually loses moisture and renders fat. Once the chicken is approaching its target internal temperature, a controlled direct-heat finish can crisp the skin.
The glaze should generally come after that principal crisping stage, not before it. Sugar-rich coatings can soften the skin by introducing moisture and forming a sticky layer over the crisp surface.
| Factor | Sear first | Indirect first |
|---|---|---|
| Initial skin treatment | Rapid surface browning | Gradual rendering and drying |
| Heat-management demand | Higher attention to flare-ups | More controlled initial cooking |
| Glaze application | Very late, after the initial sear and most cooking | Late, after rendering and any desired crisping |
| Primary drawback | Skin may color before fat renders adequately | Skin may need a separate brief direct finish |
| Best fit | Experienced heat control and appropriately sized pieces | Sugar-heavy glazes and thicker chicken pieces |
With an indirect-first approach, position the chicken skin-side up over the cooler part of the grill where appropriate. Cook with the lid closed, checking internal temperature and skin development rather than following a fixed schedule.
When the skin has rendered and dried sufficiently, give it controlled direct heat if further crisping is needed. Manage flare-ups carefully, because dripping chicken fat can ignite over hot coals or burners.
Then move the chicken back to indirect heat and apply the glaze in thin coats. Finish with only as much heat as needed to set the coating.
A heavily glazed chicken skin will rarely remain as dry and crisp as completely unglazed skin. For the best compromise, keep the final coating light and avoid soaking the skin in sauce.
The larger principle is that direct and indirect heat serve different purposes. Setting up both zones properly allows the cook to switch between them without sacrificing either meat texture or glaze quality.
Key takeaways before setting up your grill
- Reserve the cooler zone: Keep an indirect area available for cooking through, glazing, and rescuing food that colors too quickly.
- Separate browning from glazing: Develop the meat’s crust or chicken skin texture before introducing a substantial sugar coating.
- Protect the finishing window: Make adjustments using visible color, tackiness, and internal doneness rather than a rigid timer.
How to Use Two Heat Zones So You Can Grill and Roast at the Same Time
Two-zone grilling means creating a hotter area for direct cooking and a cooler area where food cooks without a burner or charcoal bed directly underneath it. On a kettle grill, bank the coals to one side. On a suitable gas grill, use selected burners while leaving the area beneath the food unheated. This setup allows searing and indirect roasting on the same grill.
The direct zone is useful for developing a crust, crisping skin, or applying a very brief finishing exposure. The indirect zone acts more like an outdoor oven, especially with the lid closed, allowing heat to circulate around the food.
For sugary barbecue glaze, that cooler zone is essential. It provides enough controlled heat to help a thin coating set without subjecting it continuously to strong radiant energy from the coals or burner flames.
On a charcoal kettle, create a concentrated pile of lit coals on one side. Leave the other side free of coals beneath the cooking grate, with a suitable drip pan if the cooking setup calls for one.
On a gas grill, follow the manufacturer’s instructions for indirect cooking. Burner arrangements differ by grill design, so the exact combination of lit and unlit burners is not universal.
With the grill arranged, the basic workflow is straightforward:
- Cook or sear over direct heat when the meat and recipe benefit from it.
- Move thicker pieces to indirect heat to finish cooking more evenly.
- Check doneness and tenderness before starting the final glazing period.
- Brush thin coats of glaze while the meat remains in the indirect zone.
- Use a brief direct finish only if additional color is needed and the coating can be monitored continuously.
A grill thermometer helps monitor the cooking environment. Without one, the appearance of the coal bed, burner settings, and relative intensity of heat can provide rough guidance, but they do not establish an accurate cooking temperature. A food thermometer remains necessary for checking internal doneness safely.
Two-zone cooking also provides a practical recovery option when glazing goes wrong. If the coating begins to darken aggressively, move the meat immediately away from the direct heat. If flames flare up, avoid leaving the glazed surface directly above them.
A cooler zone cannot reverse sugar that has already burnt, but it may prevent a small area of overbrowning from spreading across the entire piece.
Keep the glaze bowl and clean brush accessible without placing them where heat or raw-meat contamination creates additional problems. Organizing the tools before the finishing window reduces the temptation to leave glazed meat unattended over high heat.
For your next barbecue, prepare both heat zones first, cook the meat to near its intended finish, and reserve the final minutes for thin, closely monitored glaze applications. Aim for an even sheen and balanced flavor rather than the darkest possible coating.
Should barbecue glaze be warm or cold before brushing it onto meat?
A glaze that is fluid enough to brush in a thin layer is easiest to control. Gently warming a very thick glaze may improve spreadability, but it should not be boiling when applied. If a prepared glaze is already brushable at room temperature, additional heating may be unnecessary. Keep food-safety considerations in mind when storing and handling homemade sauces.
Can you fix barbecue glaze that has become too thick before grilling?
Yes. Add a small amount of an appropriate liquid, such as water, unsalted stock, vinegar, or citrus juice, depending on the intended flavor. Stir until smooth and assess its cooled consistency. The glaze should cling to the brush and meat without forming heavy lumps or strings. Dilution also changes sweetness and acidity, so taste before applying.
Does closing the grill lid prevent sugary glaze from burning?
No. Closing the lid encourages heat circulation and can help a glaze set during indirect cooking, but it does not eliminate the possibility of scorching. A glazed piece directly above hot coals may still receive intense radiant heat with the lid closed. Coal or burner placement, cooking temperature, and coating thickness remain important.
Can leftover barbecue glaze be served as a dipping sauce?
A portion set aside before contact with raw meat or contaminated utensils can be served as a dipping sauce if it has been stored and handled safely. Do not serve glaze that has been repeatedly contacted by a brush used on raw meat without an appropriate food-safe treatment. Keeping separate containers for brushing and serving is the simplest precaution.
Should glazed barbecue rest before serving?
Resting can help the meat’s temperature and juices settle while the glaze firms slightly as it cools. The appropriate rest depends on the protein and cooking method. For specified whole cuts of beef, pork, lamb, and veal, USDA guidance includes a minimum three-minute rest after reaching the applicable minimum internal temperature. Poultry must reach its recommended safe internal temperature before serving.