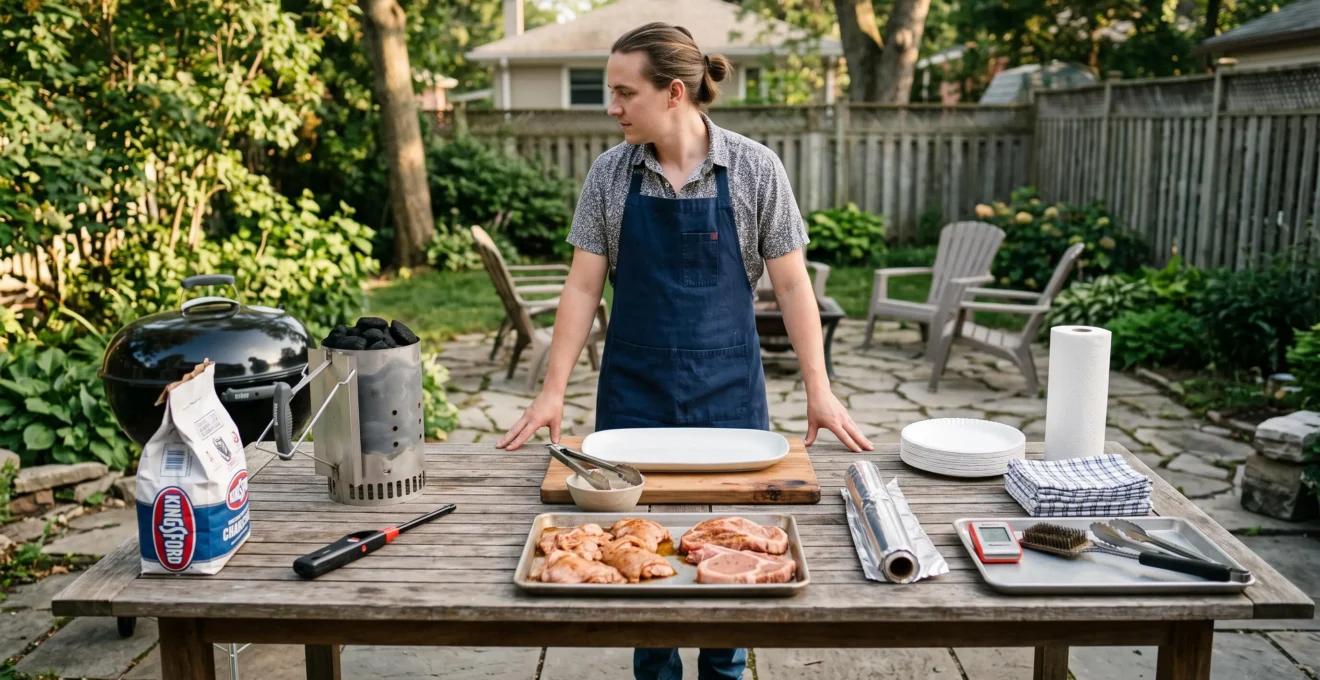
A successful barbecue starts long before the first sausage hits the grill. The problem with a rushed BBQ is rarely that the host has not prepared enough food. More often, ingredients are ready but the charcoal is missing, the clean serving platter is still in the kitchen, or the only pair of tongs has disappeared just when the food needs turning.
The solution is to treat barbecue preparation as a complete system rather than a collection of cooking tasks. Food preparation, equipment staging, serving arrangements and cooking order all need their own place in the schedule. Once these decisions are made before lighting the fire, the cooking itself becomes much easier to manage.
For UK hosts planning a garden gathering, this approach works with charcoal and gas grills, small patios and larger outdoor spaces. It also helps when cooking for a group, because the host can focus on the food instead of repeatedly disappearing indoors. The aim is simple: organise everything that can be organised before the grill becomes the centre of attention.
The BBQ preparation essentials
- Set up three zones before lighting the grill: cooking, food transfer and serving.
- Prepare marinades and stable ingredients ahead, but leave delicate salads and finishing tasks until closer to serving.
- Portion food into cooking batches, check equipment and assign simple hosting jobs so the grill cook can stay focused.
- Why Does BBQ Prep Feel Rushed Even When You Start Early?
- How to Stage Tools and Ingredients in 20 Minutes Before You Light the BBQ?
- Night-Before Prep or Same-Day Prep: Which Keeps Food Better for a BBQ?
- The Too-Early Prep Mistake That Makes BBQ Sides Go Limp Before Serving
- When Should You Batch-Chop and Portion So Serving Time Feels Easy?
- (bis): How to Stage Tools and Ingredients in 20 Minutes Before You Light the BBQ?
- (bis): Night-Before Prep or Same-Day Prep: Which Keeps Food Better for a BBQ?
- How to Run a Backyard Barbecue for 10 People Without Feeling Stuck at the Grill All Day
Why Does BBQ Prep Feel Rushed Even When You Start Early?
BBQ preparation feels rushed even when it starts early because cooking tasks are often organised while equipment, serving arrangements and workspace decisions are left until later. Chopping vegetables and marinating meat creates a sense of progress, but it does not guarantee that everything needed beside the grill is ready. The missing element is usually system preparation rather than additional cooking time.
Think about the last barbecue that involved several trips back into the kitchen. Perhaps the meat was already marinated, the vegetables were chopped and the drinks were cold. Yet the lighter was missing, the thermometer was still in a drawer, and nobody had prepared a clean platter for the cooked food.
These are separate categories of work. Task preparation covers activities such as chopping, seasoning, marinating and mixing sauces. System preparation covers the equipment, locations, order of operations and handovers that allow those ingredients to become a meal without constant interruptions.
A useful way to identify the problem is to audit the previous barbecue. Write down everything that was touched or fetched during cooking, then assign each item to one of three moments:
- Before lighting: charcoal, lighter, fuel, thermometer, marinades, utensils and clean trays.
- During cooking: tongs, heat-resistant gloves, foil, resting space and additional ingredients.
- At serving: plates, cutlery, sauces, napkins and clean serving dishes.
Next, mark every item that required a trip indoors. Patterns quickly emerge. If most interruptions involved serving equipment, the problem is not food preparation. It is that the serving area was never fully organised.
Distance also matters. A short walk between the kitchen and garden can become a significant interruption when the cook has to leave food unattended. Heat can fluctuate, food can cook unevenly and flare-ups may go unnoticed. The exact consequence depends on the grill and food being cooked, but the principle is consistent: an interruption creates another demand on the cook’s attention.
The better approach is to identify every task that can be completed before ignition and assign it a physical location. This changes preparation from a list of disconnected jobs into a repeatable system.
Once the missing categories are visible, there is little value in simply starting earlier and repeating the same routine. The next improvement is to place tools and ingredients where they will be needed before the fire is lit.
How to Stage Tools and Ingredients in 20 Minutes Before You Light the BBQ?
Staging tools and ingredients before lighting the BBQ means creating a cooking area, a food-transfer area and a serving area, then checking that each contains everything required. A practical 20-minute routine gives the host a defined sequence instead of another improvised preparation session. The exact duration depends on the menu and equipment, but the principle is to discover missing items before cooking begins.
Start by dividing the outdoor workspace into three functional zones. Their positions depend on the available space, but their purposes should remain distinct.
- Cooking zone: charcoal or gas supply, lighter, tongs, thermometer, heat-resistant gloves and foil.
- Prep-to-grill transfer zone: raw ingredients, marinades, clean utensils and separate trays for raw and cooked food.
- Serving zone: clean platters, plates, cutlery, sauces, napkins and resting space for finished food.
Keep raw meat separate from cooked food throughout preparation and cooking. A tray that has held raw chicken or meat should not become the serving platter unless it has been properly washed. The FDA barbecue food-safety recommendations explain the importance of separate utensils, clean serving platters and refrigerated marinating.
The simplest staging technique is the one-tray method. Place the ingredients and small tools needed for the first cooking session together on a large sheet pan or in a suitable container. This is not a reason to mix raw food with clean equipment. Keep ingredients safely covered and separated in their own containers, and use the tray as a transport and inventory surface.
Use the following sequence as a practical starting point for a 20-minute staging session:
- Minutes 0–5: Check fuel and grill position. Confirm that the charcoal or gas supply is sufficient, the grill is positioned appropriately and the lighting equipment is available.
- Minutes 5–10: Arrange the cooking tools. Put the tongs, thermometer, gloves, foil and paper towels within reach.
- Minutes 10–15: Group ingredients. Separate ingredients by cooking batch and dish. Keep raw proteins covered and appropriately chilled until needed.
- Minutes 15–18: Prepare transfer and serving areas. Position clean platters, serving utensils, plates and napkins.
- Minutes 18–20: Complete a final sweep. Check the three zones, confirm the heat-safe resting space and identify anything still missing.
Several small items deserve particular attention because they are easy to overlook: spare charcoal or fuel, a clean cooked-food platter, resting foil, paper towels and somewhere to place dirty tongs. These details often make the difference between a smooth cooking session and repeated trips indoors.
Staging should happen before ignition rather than being postponed until the grill is preheating. Preheating is not spare preparation time: it is when lighting problems, temperature adjustments and guest arrivals may all demand attention.
Once the outdoor workspace is organised, the next question is how much food preparation should happen the evening before. That decision affects both the quality of the menu and the workload on the day.
Night-Before Prep or Same-Day Prep: Which Keeps Food Better for a BBQ?
Neither night-before preparation nor same-day preparation is automatically better for every barbecue ingredient. Marinades, dry rubs and sauces can usually be prepared ahead, while delicate vegetables, dressed salads and freshly cut fruit often benefit from being assembled closer to serving. A split approach offers the most practical balance: complete flavour preparation early and leave delicate finishing tasks until the day.
The easiest way to decide is to consider the stability of each ingredient rather than applying one preparation rule to the entire menu.
| Food or preparation | Preferred timing | Reason |
|---|---|---|
| Dry rubs and sauces | Night before | Reduces same-day mixing and measuring. |
| Suitable meat marinades | Night before, where appropriate | Allows time for flavour development under refrigeration. |
| Hard vegetables and onions | Night before or same morning | Generally easier to portion ahead than delicate produce. |
| Leafy salads | Wash and prepare components ahead; dress later | Helps preserve texture. |
| Cut tomatoes and avocado | Closer to serving | Reduces the time they spend exposed after cutting. |
| Bread and delicate garnishes | Closer to serving | Helps avoid drying or loss of texture. |
| Desserts and chilled drinks | Night before where suitable | Reduces the number of day-of tasks. |
Food safety remains essential when preparing ahead. Raw or marinating meat should stay refrigerated rather than sitting on the kitchen counter. Keep it in a sealed container that prevents juices from leaking onto other foods. The CDC recommendations for preventing food poisoning reinforce the importance of refrigeration and separation between raw and ready-to-eat foods.
For UK households, the FDA and CDC guidance used here is American institutional guidance, not a substitute for applicable UK food-safety advice. The practical principles of keeping raw meat separate, covered and refrigerated remain useful, but local requirements should be followed.
There is also a difference between overnight marinating and overnight preparation. Marinating does not guarantee that flavour penetrates deeply into every cut. Its effects depend on the ingredient, cut, marinade and preparation time. Overnight preparation is therefore most useful as a way to reduce work on the day, not as a universal guarantee of better flavour or tenderness.
A practical compromise is to divide preparation into two sessions.
- The evening before: mix rubs and sauces, prepare suitable marinades, organise dessert components, chill drinks and check fuel supplies.
- The morning of the BBQ: chop delicate vegetables, assemble skewers, portion proteins, organise serving equipment and complete outdoor staging.
One detail can undermine the whole evening-before strategy: refrigerator capacity. If the fridge is already crowded with drinks, desserts and prepared side dishes, there may not be enough suitable space for raw meat. Make room in advance and keep raw ingredients safely separated.
Preparing components ahead is useful, but timing also matters after chopping. Some side dishes deteriorate when they are assembled too early, even if their ingredients have been stored correctly.
The Too-Early Prep Mistake That Makes BBQ Sides Go Limp Before Serving
Preparing BBQ sides too early can make them limp because cut vegetables release moisture, exposed surfaces change over time and dressings alter the texture of delicate ingredients. The answer is not to delay all preparation until guests arrive. Instead, prepare individual components in advance and combine them shortly before serving, while keeping perishable produce appropriately refrigerated.
Consider a prepared coleslaw. The vegetables can be shredded in advance, and the dressing can be mixed separately. However, combining everything hours before the meal gives the dressing more time to affect the texture of the vegetables. A similar problem can occur with dressed leafy salads and other delicate sides.
Salt and acidic ingredients can contribute to moisture release and texture changes. Cut surfaces also expose more of the produce to air. These effects vary according to the vegetable, dressing and storage conditions, so there is no single preparation deadline that works for every side dish.
The practical rule is to prepare early, assemble late.
- Wash and dry suitable vegetables ahead of time.
- Chop sturdy ingredients when convenient and store them in suitable covered containers.
- Mix dressings separately and refrigerate them where necessary.
- Keep delicate leaves, cut fruit and fragile garnishes protected until closer to serving.
- Combine dressed salads and slaws shortly before they reach the table.
Fresh produce should be handled carefully throughout preparation. The FDA guidance on selecting and serving fresh produce recommends refrigeration at 40°F or below for perishable produce such as lettuce and herbs, alongside appropriate washing and separation practices. These are US recommendations; UK hosts should also follow local food-safety guidance.
When preparing delicate ingredients ahead, the storage method should suit the produce. Some herbs can be kept fresh in a suitable container with a little water, while others benefit from careful wrapping and refrigeration. Avoid assuming that every vegetable responds to the same treatment.
Cut apples and avocado can also change colour after exposure to air. A suitable acid-based treatment may help slow browning, but it should be chosen with the intended dish and storage method in mind.
The challenge is that assembling everything at the last minute can recreate the same workload that preparation was supposed to eliminate. A better solution is to portion components into labelled containers according to their finished dish.
For example, put all the ingredients for one salad together in a designated group, with its dressing stored separately. When serving approaches, the dish can be assembled quickly without searching through several containers.
Once the components are prepared at the right time, the remaining task is to organise portions around the cooking order. This is particularly important when several different foods need the grill at once.
When Should You Batch-Chop and Portion So Serving Time Feels Easy?
Batch-chopping and portioning should happen according to ingredient stability and cooking requirements. Sturdy vegetables can often be prepared the evening before, while delicate ingredients are better handled on the day. Proteins should be divided into cooking batches based on thickness, cooking time and resting requirements, so the grill can work through manageable waves instead of receiving everything at once.
Chopping everything at the same time may appear efficient, but it creates unnecessary storage and sequencing problems. A more useful approach groups ingredients according to the dish they belong to and the moment they will be used.
For vegetables, use a simple timing framework:
- Night before: suitable hard vegetables, onions and other stable ingredients that can be stored safely.
- Same morning: ingredients that benefit from being freshly cut, including delicate vegetables and many salad components.
- Close to serving: fragile garnishes, cut fruit and ingredients that are best assembled immediately before eating.
Protein portioning should follow a different logic. Instead of putting all the meat into one large container, divide it according to its expected cooking sequence. Thin skewers, thicker cuts, sausages and items that need resting can each have their own batch.
This makes cooking waves easier to manage. Foods that need more time or indirect heat can be started earlier, while quick-cooking items can be added later. The result is a more manageable flow of food rather than several dishes finishing simultaneously.
Use labelled containers to make the system visible. Each container should identify the dish or cooking batch, rather than simply listing the vegetable or protein inside it. A container marked for a particular skewer batch is more useful during cooking than one marked only with the name of an ingredient.
The same principle applies to serving. Where practical, prepare serving vessels before cooking begins. If a dish needs a particular platter, bowl or sauce container, position it in the serving zone rather than waiting until the food comes off the grill.
Portioning also needs to account for food safety. Raw proteins should remain covered and refrigerated until needed, and containers used for raw food should not be reused for cooked food without proper cleaning.
Your five-step BBQ portioning checklist
- List every dish. Produce a written menu with one entry for each side, protein and serving component.
- Group ingredients by dish. Create labelled containers so each recipe’s components are easy to identify.
- Divide proteins into cooking batches. Label each batch according to thickness, cooking sequence or resting requirement.
- Assign preparation times. Mark which ingredients are prepared the night before, on the morning or immediately before serving.
- Prepare serving vessels. Match each finished dish to its platter or bowl and position the clean equipment in the serving area.
For a final practical improvement, consider what happens when food leaves the grill. A serving vessel that is already waiting in the right place removes an additional handling step. It also makes it easier for another person to help without interrupting the cooking sequence.
With the ingredients portioned, the next improvement is adapting the physical staging arrangement to the available outdoor space. A small balcony and a large garden do not need identical layouts, but both benefit from the same organisational principles.
(bis): How to Stage Tools and Ingredients in 20 Minutes Before You Light the BBQ?
The three-zone staging method works in almost any outdoor space, but the physical arrangement needs to change according to the grill and available surfaces. A small balcony may have room for only one compact table, while a charcoal kettle grill may have no useful side shelf. The important distinction is between the functions of each zone, not the number of tables used.
For a small balcony, use one narrow outdoor table or a compact trolley. Divide the surface into separate areas using trays or containers. Keep the cooking tools nearest the grill, the covered ingredients in a separate preparation area and the serving equipment furthest from raw food handling.
For a charcoal grill without side tables, use a stable heat-safe work surface nearby. Keep lighter equipment, tongs and the thermometer together, and make sure the surface is positioned safely away from direct heat and combustible materials.
For an indirect cooking setup, staging needs to reflect the movement of food between heat zones. Arrange tools so the cook can transfer food without searching for equipment or crossing the path of people carrying raw ingredients.
The flow should be straightforward: raw food moves from refrigerated storage to the preparation area, then towards the grill. Cooked food moves away from the grill towards clean serving equipment. These paths should not cross unnecessarily.
This arrangement supports food hygiene as well as convenience. Keep raw and cooked food separate, use clean utensils for cooked food and ensure that a raw-food tray never becomes a serving surface without proper washing.
One frequently overlooked problem is using the preheating window to finish organising. It feels like spare time, but it is often when the host needs to monitor ignition, adjust the heat and respond to guests. The staging process should therefore be completed before lighting begins.
Finish with a 60-second pre-flight check:
- Is there enough charcoal or gas for the planned cooking session?
- Are the tongs, thermometer and lighting equipment ready?
- Is there a clean platter for cooked food?
- Is there a safe, heat-resistant place for resting food?
- Are raw ingredients and cooked-food equipment separated?
This final scan is more useful than relying on memory because it checks the complete setup rather than one category of equipment. It also creates a natural stopping point before the fire is lit.
Once the layout becomes familiar, the host can repeat the same arrangement at every barbecue, making preparation less dependent on improvisation.
Equipment organisation is only one part of a calm barbecue. The same preparation logic needs to cover the evening before, particularly fuel, drinks, sauces and refrigerator space.
(bis): Night-Before Prep or Same-Day Prep: Which Keeps Food Better for a BBQ?
Night-before preparation is most effective when it covers the entire barbecue rather than just the food. Preparing sauces, checking fuel, chilling drinks and organising equipment can remove several day-of tasks. However, same-day preparation remains important for delicate ingredients and final staging. The strongest routine combines both sessions while keeping perishable food refrigerated and raw ingredients separate.
A useful evening-before routine should cover four areas.
Food and flavour preparation. Mix suitable marinades, prepare dry rubs, portion sauces and organise dessert components. Keep raw marinating meat in a sealed container in the refrigerator, away from ready-to-eat foods. The bottom shelf can be a practical location because it helps prevent accidental drips onto other ingredients, provided the container is properly sealed.
Fuel and equipment. Check the charcoal or gas supply, inspect the lighter, locate the thermometer and make sure the tongs and other cooking tools are clean. Store charcoal in a dry location so it remains suitable for use. Confirm that the grill itself is clean and ready for the next day.
Drinks and serving arrangements. Chill drinks where appropriate, organise glasses and check that the serving platters are available. A crowded refrigerator can make this step more complicated than expected, so leave adequate space for ingredients that need refrigeration.
Workspace preparation. Identify where the cooking, transfer and serving zones will be positioned. If the outdoor space is limited, decide in advance which items will need to be moved into position before ignition.
The next morning should be a finishing session rather than a complete restart. Chop delicate vegetables, assemble suitable skewers, portion proteins into cooking batches and prepare the staging table.
When nothing has been prepared the previous evening, a prioritised 30-minute recovery routine can still help. The sequence below is a planning framework, not a guarantee that every menu can be completed in that time.
- First priority: start any suitable marinade or seasoning process and immediately return perishable ingredients to refrigeration.
- Second priority: prepare the side-dish components that can be made in advance without compromising their texture.
- Third priority: portion the proteins into manageable cooking batches.
- Fourth priority: organise the serving equipment, sauces and drinks.
- Final priority: complete the outdoor staging check before lighting the grill.
There is one important limitation: a late start does not justify leaving food unrefrigerated or rushing cooking times. Food safety remains more important than keeping the original schedule. If the menu is too ambitious for the available time, simplifying it is a better decision than compromising safe handling or cooking.
With preparation organised across two sessions, the remaining challenge is managing the cooking itself. That becomes particularly important when ten people are waiting to eat and the host is responsible for every batch.
What to remember before hosting ten guests
- Prepare the cooking environment before ignition, not during preheating.
- Cook in waves, allowing longer-cooking items to rest while quicker batches finish.
- Delegate serving, drinks and simple kitchen tasks so the grill cook can concentrate on heat and food safety.
How to Run a Backyard Barbecue for 10 People Without Feeling Stuck at the Grill All Day
Running a backyard barbecue for ten people without spending the entire day beside the grill requires a manageable menu, staged ingredients, cooking waves and clearly delegated jobs. The objective is not to cook every item simultaneously. It is to establish a sequence that lets food finish in manageable batches while the host remains available to the guests.
A menu for ten should be designed around the capacity of the grill rather than the number of dishes that look appealing on paper. More variety means more ingredients, more utensils and more cooking decisions. A simpler menu with batch-friendly foods is often easier to manage.
Wings, skewers, sausages and grilled vegetables are useful options because they can be organised into identifiable batches. The final choice still needs to reflect the grill size, cooking method and preferences of the guests.
Build a day-of timeline around the serving time rather than starting with the moment the grill is lit. For example, if the intended meal is at 5 pm, the following is an illustrative schedule rather than a universal cooking timetable.
| Time | Task | Expected result |
|---|---|---|
| Previous evening | Prepare suitable marinades, sauces, dessert components and drinks. | Major preparation tasks completed. |
| Late morning | Check the menu, refrigerator space, equipment and fuel. | Missing items identified early. |
| Early afternoon | Prepare vegetables, portion proteins and label cooking batches. | Ingredients organised by dish and cooking order. |
| Before lighting | Set up the three staging zones and complete the final sweep. | Tools and serving equipment ready. |
| Cooking period | Cook longer items first and manage the grill in waves. | Food finishes in manageable groups. |
| Before serving | Finish delicate sides, assemble salads and organise platters. | Food and serving area ready together. |
Use resting time strategically. Thick cuts and other longer-cooking items can be started earlier where the recipe and cooking method allow. Once cooked, they may rest while quicker items finish. A suitable foil tent can help protect resting food, but it does not replace appropriate temperature control or safe holding practices.
Food safety should remain part of the timeline. The FDA guidance in the source pack identifies 40 °F as the recommended maximum cold-food storage temperature and 140 °F as the minimum hot-food holding temperature in its US recommendations. These figures should not be confused with UK-specific regulatory guidance. Use an appropriate food thermometer and follow the applicable local cooking and holding recommendations.
Delegate the jobs that do not require grill expertise. A barbecue becomes much easier when the host is not simultaneously responsible for every detail.
- The runner: fetches additional ingredients or equipment from the kitchen when required.
- The table-setter: organises plates, cutlery, napkins and serving dishes.
- The drinks manager: checks drinks, glasses and replenishment.
- The grill cook: manages heat, cooking order, food handling and the final cooking checks.
These responsibilities should be assigned before guests arrive. A simple request to look after drinks or set the table is much more effective when the person knows exactly what is expected.
There is also a useful trade-off to consider when building the menu. A large selection of different foods creates variety but increases the number of cooking decisions. A smaller selection of batch-friendly dishes reduces the number of moving parts and makes timing easier.
For ten guests, a practical menu might include one or two main protein options, a grilled vegetable selection, a prepared salad and a small number of accompaniments. The exact quantities depend on portion sizes, guest preferences and the other food being served, so a fixed quantity should not be assumed without a menu.
Finally, avoid making the grill cook responsible for all the finishing work. The serving area should already be prepared, salads should have their components ready, and another person should be able to move finished food to the table using clean equipment.
The most useful measure of a successful barbecue is not how many dishes were cooked or how complicated the menu looked. It is whether the food was served safely, guests were looked after and the host could enjoy the gathering instead of repeatedly disappearing into the kitchen. A reliable staging routine, sensible menu and clear division of responsibilities make that outcome much more achievable.
How far in advance should you prepare for a BBQ?
Start planning the menu and checking equipment the day before. Prepare suitable marinades, sauces, desserts and drinks in advance, while leaving delicate vegetables, salad assembly and final outdoor staging for the day itself. Raw and perishable ingredients must remain appropriately refrigerated throughout preparation.
What should you always have beside a BBQ grill?
Keep the appropriate fuel and lighting equipment, clean tongs, a food thermometer, heat-resistant gloves, foil and paper towels within reach. Also prepare a clean platter for cooked food and a separate place for used utensils. The exact equipment depends on the grill and menu.
Can you prepare BBQ meat the night before?
Yes, suitable meat can be seasoned or marinated in advance when the recipe allows. Store it covered in a sealed container in the refrigerator, separated from ready-to-eat food. Do not marinate raw meat at room temperature, and follow appropriate refrigeration and cooking guidance.
How do you stop BBQ salads from becoming soggy?
Prepare the individual ingredients and dressing separately, then combine them shortly before serving. Keep prepared produce appropriately refrigerated and protected. This reduces the time that delicate vegetables spend in contact with salt, acidic ingredients and dressing.
How do you manage a BBQ for ten people without missing the food?
Organise the menu into cooking batches, start longer-cooking items in an appropriate sequence and assign someone else to manage drinks and table preparation. Keep the cooking tools and clean serving equipment ready before lighting the grill. A simpler menu with batch-friendly dishes is generally easier to manage than several unrelated items that all need attention at once.