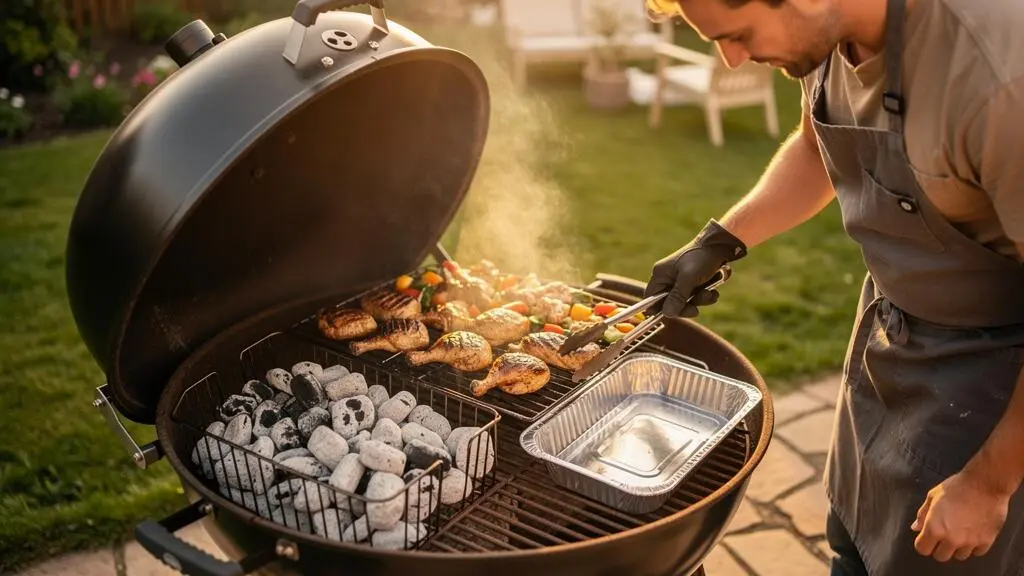
A crowded barbecue becomes difficult when everything needs attention at once. Sausages are colouring too quickly, chicken still needs cooking through, and sliced vegetables are threatening to burn while guests gather around the table. The solution is not necessarily a bigger grill. It is a better way to divide the heat.
Two-zone grilling creates a direct-heat area above the charcoal for searing and browning, alongside an indirect-heat area where food cooks more gently. On a kettle BBQ, the lid helps circulate heat around food positioned away from the coals, allowing you to grill and roast during the same cooking session.
The practical advantage is control. Chicken can finish away from fierce heat while sausages brown over the coals and vegetables cook alongside them. Foods no longer need identical cooking times, and a sudden flare-up does not have to disrupt the entire menu. The key is to build the zones correctly, assign each food a position and plan the final minutes around when guests will eat.
Two-zone grilling essentials
- Build two working areas: bank charcoal on one side of the kettle, leaving the other side clear for gentler indirect cooking.
- Match heat to food: use direct heat for browning and indirect heat for thicker chicken, delicate vegetables and controlled finishing.
- Work backwards from serving: stagger cooking starts, check internal temperatures and finish quick-cooking items near the end.
- Why Does Two-Zone Cooking Make Group BBQs Less Stressful in the First 20 Minutes?
- How to Build Direct and Indirect Zones on a Kettle Grill in 5 Minutes?
- Sear First or Indirect First: Which Works Better for Chicken Pieces With Skin?
- The Too-Hot ‘Indirect’ Zone Mistake That Dries Chicken Out Fast
- When Should You Move Each Item Between Zones So Everything Hits the Table Hot?
- How to Build Direct and Indirect Zones on a Kettle Grill in 5 Minutes?
- How to Assign Foods to Grill Zones So Nothing Burns While You Flip Something Else?
- How to Cook 6 Foods at Once on One Grill Without Mixing Flavours or Missing Timings
Why Does Two-Zone Cooking Make Group BBQs Less Stressful in the First 20 Minutes?
Two-zone cooking makes the opening 20 minutes of a group barbecue easier because not every food must compete for the same intense heat. The direct zone handles browning while the indirect zone provides space for slower cooking and temporary staging. This lets the cook respond to different cooking speeds without constantly moving food on and off the grill.
Consider what happens when guests arrive around a single-zone BBQ. Every sausage, chicken piece and vegetable skewer sits over the same charcoal bed. Some foods start charring before their centres are ready; others finish before the table is prepared. The cook must repeatedly choose between removing food early, exposing it to further heat or abandoning another task to prevent burning.
A defined indirect area changes the decision. Once chicken has developed enough colour, it can move away from the coals to continue cooking with the lid closed. A sausage that is browning faster than expected can also leave direct heat while its centre finishes. Meanwhile, a new batch of vegetables can occupy the hot side.
The benefit comes from separating three operations that a single hot surface tends to combine: browning, cooking through and managing serving order.
As explained in AmazingRibs’ two-zone grilling explanation, this arrangement is especially useful when several foods with different cooking characteristics share a grill. It also provides an escape route when direct heat becomes excessive.
However, an indirect zone is not a food-safe waiting room. Food continues cooking there, and the temperature may not be suitable for prolonged hot holding. Items that have finished cooking should be removed when necessary, rested appropriately and served promptly rather than left indefinitely on the grate.
In practice, the first 20 minutes become less about reacting to flames and more about managing a sequence. You can prioritise a hungry guest’s sausages while chicken finishes under the lid, without forcing both dishes into the same cooking window.
That control begins before the first ingredient touches the grate: the charcoal arrangement must create enough separation between fierce heat and gentle cooking.
How to Build Direct and Indirect Zones on a Kettle Grill in 5 Minutes?
To build two heat zones on a charcoal kettle, arrange already-lit coals on one side of the lower grate, leaving the opposite side free of fuel. Put a foil drip tray beneath the indirect area, replace the cooking grate and check the heat difference before adding food. The five-minute setup assumes the charcoal is already ready to cook.
The objective is not to create a hot half and a completely cold half. It is to establish a usable temperature gradient: strong radiant heat directly above the coals, weaker heat further away and circulating hot air under the lid.
A practical setup for a typical round kettle follows this sequence:
- Prepare the charcoal. Light the briquettes or lump charcoal using your normal safe method, then wait until they are sufficiently established for cooking. Never use lighting fluid on burning coals.
- Bank the fuel. With suitable heat-resistant equipment, keep the lit charcoal together on one side of the lower grate. Avoid spreading stray coals beneath the intended indirect area.
- Position a drip tray. Put an aluminium tray on the charcoal grate, away from direct contact with the coal bank and below the food that will cook indirectly.
- Replace the cooking grate. Keep the area above the coals available for searing, and the opposing area for roasting or gentler finishing.
- Check the gradient. Confirm that the indirect cooking position is noticeably less fierce before loading chicken or other delicate ingredients.
For a mixed menu, favour a substantial indirect area rather than dedicating nearly the entire grill to charcoal. The exact division depends on the kettle diameter, the quantity of fuel and the food being cooked. There is no universally correct coal count or grate-area ratio.
Weber describes a different valid kettle arrangement in Weber’s kettle cooking methods: charcoal on opposite sides, with a central drip pan for indirect roasting. A single-sided bank is more convenient when the cook needs a clear hot side and a clear gentler side for moving several foods between them.
Without a grate-level thermometer, Weber’s approximate hand test offers a rough comparison. Its guidance describes holding a hand around 12 cm above the cooking grate, with shorter comfortable exposure indicating stronger heat. The test must stop before discomfort, with sleeves and other flammable materials kept clear of the grill. It cannot establish an exact cooking temperature or whether meat is safe to eat.
A small piece of bread can provide an additional informal visual check. Briefly observe how quickly it browns over the intended indirect area. Rapid scorching suggests the position is receiving more heat than expected. This is a practical diagnostic, not a calibrated test or a validated temperature measurement.
Finally, close the lid and observe how the grill behaves. Vents and lid position change airflow and combustion; opening the lid repeatedly can destabilise cooking. Wind and cold outdoor conditions may also affect the temperature balance, so keep a suitable thermometer available and reassess the setup during the cook.
Five checks before loading the grill
- Confirm that the charcoal occupies a defined area on the lower grate; the result should be a visible fuel bank with a coal-free indirect area.
- Place the drip tray beneath the indirect cooking position; confirm that it sits securely and does not touch the burning fuel.
- Identify the direct and indirect positions on the cooking grate; the result should be two usable areas with room to move food safely.
- Compare their heat using a suitable grate-level thermometer, or a cautious qualitative check; confirm that the intended indirect position receives gentler heat.
- Check that the lid fits, vents are unobstructed and tools are ready; finish with a grill that can be operated without rearranging hot charcoal after food is loaded.
Once the heat zones are established, the next decision is which cooking sequence gives each ingredient the best balance of browning and gentle finishing.
Sear First or Indirect First: Which Works Better for Chicken Pieces With Skin?
For skin-on chicken, indirect-first is generally the more forgiving method on a busy kettle barbecue, especially for thick pieces, sugary marinades or crowded cooking sessions. Sear-first can work well when the grill is controlled and the cook can watch the skin closely. The better choice depends on thickness, fat rendering, available grate space and flare-up risk.
Chicken skin needs enough heat to render fat and develop colour. The challenge is that the skin can darken long before the meat beside the bone is fully cooked. Fat dripping onto hot coals can also ignite, creating sudden bursts of heat that burn the outside.
Sear-first starts skin-side down over direct heat for browning, followed by a move to the indirect side to finish cooking. It can be effective for manageable portions when the cook has enough attention and space to respond immediately to flare-ups.
Indirect-first lets the centre cook progressively with the lid closed, keeping the skin away from the most intense radiant heat until the final browning stage. This often suits thick thighs and drumsticks, particularly when other foods need the direct zone.
For wings, the relatively small pieces can brown quickly, but exposed skin and rendered fat still require monitoring. Chicken breasts with skin are more vulnerable to drying out if the cook spends too long chasing crispness after the centre is already done.
The following grid provides a practical way to choose a sequence. It is a cooking decision guide, not a set of experimentally validated cooking times.
| Cooking situation | Preferred approach | Reason and adjustment |
|---|---|---|
| Thick, bone-in thighs or drumsticks | Indirect-first | Cook through more gradually, then brown the skin briefly over direct heat. |
| Smaller, evenly sized pieces without sweet marinade | Either sequence | Sear-first is practical when the direct zone is stable and closely supervised. |
| Chicken with a sugary glaze | Indirect-first | Limit exposure to fierce heat and apply or finish the glaze carefully to avoid scorching. |
| Skin-on breast pieces | Controlled indirect-first | Prioritise the internal temperature and avoid prolonged high-heat finishing. |
| A crowded grill with sausages and vegetables | Indirect-first | Reserve the direct zone for shorter browning jobs and finish the chicken when space opens. |
If the chicken is ready for final browning, move it skin-side down over the coals for a closely supervised finish. The lid can be open briefly for access and monitoring, but the chicken should not be left unattended over the fire. If flames appear, move it back to the indirect area rather than fighting them with repeated flipping.
Skin colour is not a reliable doneness test. The US government’s FoodSafety.gov chart specifies 74°C (165°F) as the minimum internal temperature for poultry, measured with a food thermometer. Its official guidance is available in FoodSafety.gov’s safe minimum cooking temperature chart. UK cooks should also follow applicable local food-safety guidance.
Whichever sequence you choose, it will only protect the chicken’s texture if the indirect area is genuinely gentler than the coal side.
The Too-Hot ‘Indirect’ Zone Mistake That Dries Chicken Out Fast
An indirect zone can still be hot enough to overcook chicken. When a kettle contains too much charcoal, or the food sits close to the coal bank, substantial radiant and circulating heat can reach the supposedly cooler area. Chicken breast is particularly vulnerable because its texture deteriorates with excessive cooking, even without direct flame contact.
The mistake is easy to overlook. The cook sees an empty charcoal grate beneath the chicken and assumes the meat is cooking slowly. But heat radiates from the neighbouring coals and the hot kettle surfaces, while heated air circulates under the lid. The absence of charcoal immediately beneath the food does not mean the absence of intense heat.
On a compact kettle, a chicken breast sitting close to a large coal bank may receive enough heat to finish much faster than expected. If the cook continues relying on an assumed roasting time, the meat can pass its intended doneness before the sausages or vegetables are ready.
The correction starts with the fuel arrangement, not the clock.
- Reduce excessive fuel loading on the next cook. Avoid assuming a fully loaded charcoal chimney is appropriate for every grill size and menu. Do not attempt to remove burning charcoal without appropriate equipment and a safe procedure.
- Consolidate the fuel bank. Keeping coals together and away from the indirect cooking position can create a clearer separation than scattered hot fuel.
- Increase the food’s distance from the coals. Use the farthest practical indirect position, particularly for chicken breast and delicate items.
- Manage airflow carefully. Vent settings influence the fire, but closing airflow excessively can destabilise combustion. Make small adjustments according to the grill manufacturer’s instructions.
- Use a suitable drip or water pan when helpful. A pan can intercept drippings and affect the cooking environment, but it does not guarantee a safe or stable indirect temperature.
A grate-level thermometer gives a more useful indication of what the chicken experiences than relying solely on the lid thermometer. For a rough check without equipment, Weber’s charcoal heat hand test describes approximate heat categories, but the technique is not a calibrated measurement and must never replace checking the food’s centre.
Recheck the grill partway through the session. The charcoal bed changes as fuel burns down, and adding fresh coals or altering ventilation can change the balance between the zones. The relevant question is not whether the chicken is sitting above charcoal, but whether it is receiving the appropriate heat for its stage of cooking.
With a stable indirect area, the next challenge is timing: deciding when each food should move so that all the finished dishes arrive at the table together.
When Should You Move Each Item Between Zones So Everything Hits the Table Hot?
Move food between zones according to its browning, internal doneness and remaining cooking time, rather than using one fixed timetable for everything. Start foods that need longer indirect cooking first, add quick-browning items later and reserve the final minutes for controlled finishing. Remove finished food when appropriate instead of assuming the indirect side will hold it safely.
The easiest planning method is to work backwards from serving time. List each food, decide whether it needs direct heat, indirect cooking or both, and identify which items have a narrow window between perfectly cooked and overdone.
For a typical group BBQ, bone-in chicken needs earlier attention than thin courgette slices. Sausages require thorough cooking but can be browned in stages. Peppers and mushrooms may tolerate a more flexible sequence depending on their size and preparation.
Exact cooking durations vary with thickness, starting temperature, grill heat, lid use and fuel condition. A written plan should therefore use flexible cooking windows and thermometer checks, not pretend that every batch will finish at an exact minute.
Consider this hypothetical service plan for a mixed menu. The times describe an organisational approach, not verified cooking durations.
| Stage | Food and zone | Decision before moving |
|---|---|---|
| Early session | Chicken thighs in the indirect zone | Allow gradual cooking; monitor internal temperature and skin colour. |
| Middle session | Sausages added according to their thickness; vegetables staged on the gentler side | Check the remaining cooking needs and available direct-heat space. |
| As chicken approaches doneness | Chicken moved briefly to direct heat if the skin needs browning | Finish colour without compromising the safe internal temperature. |
| Final minutes | Quick-cooking vegetables and any items needing final colour | Brown only as needed; remove foods already done. |
| Serving | Cooked food transferred to clean serving dishes | Confirm doneness, prevent raw-to-cooked contamination and serve promptly. |
The indirect area performs three different jobs, and these should not be confused. It can finish cooking chicken after browning, provide gentler heat for vegetables or temporarily move a rapidly browning item away from the coals. It is not equivalent to resting cooked meat off the grill, and it is not automatically suitable for prolonged hot holding.
Use observable signals to decide when to move food. Excessive surface darkening calls for less direct heat. Pale skin on chicken that is approaching its required internal temperature may justify a short, closely watched direct finish. Vegetables that are colouring too rapidly can move indirect; those remaining pale despite being nearly tender may benefit from brief direct exposure.
In the last five minutes before the intended service, stop introducing new foods that need substantial cooking. Prioritise final browning only where necessary, check any uncertain meat temperatures and begin transferring ready items to clean dishes.
If chicken is still undercooked, do not rush it to match the table schedule. Serve completed dishes appropriately while allowing the chicken to reach its safe endpoint.
Timing becomes easier when the charcoal arrangement is designed for the menu and maintained as the cooking session develops.
How to Build Direct and Indirect Zones on a Kettle Grill in 5 Minutes?
Building two zones quickly is easier when the charcoal layout reflects the food being cooked. For a mixed menu of chicken, sausages and vegetables, reserve enough indirect grate space to cook and reposition several items without crowding. The initial arrangement can take only a few minutes once the fuel is ready, but maintaining the gradient is an ongoing task.
A kettle prepared for steaks alone may favour a larger direct-heat area because most cooking is concentrated around searing. A mixed group barbecue has different priorities. Chicken needs gentler cooking, glazed vegetables may scorch, and sausages can release fat over the coals. A wider indirect area provides more flexibility when several items demand attention simultaneously.
Start from the menu, not from a habitual charcoal layout. Before placing the coals, estimate how many foods require prolonged indirect cooking and how much direct grate space is actually needed for browning at one time.
For example, if chicken occupies much of the indirect side, sausages can be browned in batches rather than forcing every ingredient over the coals simultaneously. If vegetables need more space, use a suitable tray or arrange them in batches so that overcrowding does not undermine cooking.
No specialised charcoal baskets or metal dividers are essential for a basic two-zone kettle setup. A grill with suitable grates, a defined coal bank, a properly positioned foil tray and long-handled tongs can provide the core functionality. A reliable food thermometer remains important for checking meat doneness.
As the session progresses, resist the temptation to rebuild the charcoal arrangement whenever food cooks unevenly. First try moving food within the available temperature gradient. On a suitable grill, changing food positions or carefully rotating an accessible cooking grate may help distribute exposure, provided this can be done safely.
If additional fuel is necessary, add it to the designated charcoal side using a safe method and appropriate tools. Scattering fresh coals beneath the indirect area defeats the purpose of the setup and makes subsequent food movements harder to predict.
The grill’s behaviour will also change with burning fuel, airflow and outdoor conditions. What began as a gentle finishing area may become cooler as coals burn down, while new fuel can temporarily increase heat. Continue checking the cooking environment rather than treating the first layout as permanent.
Once the charcoal arrangement matches the menu, each ingredient needs a predictable position so that the cook can concentrate on the few foods requiring immediate attention.
How to Assign Foods to Grill Zones So Nothing Burns While You Flip Something Else?
Assign foods to grill zones according to how easily they burn, how thick they are and how closely their doneness must be monitored. Thick or scorch-prone foods generally benefit from indirect cooking, while foods needing active browning can occupy the direct zone briefly. Giving each item a predictable location reduces unnecessary movement and helps prevent flare-ups from disrupting the whole meal.
Think of grill space as a limited resource, and the cook’s attention as an even more limited one. A piece of chicken skin can flare over charcoal while a thin slice of aubergine scorches in the time it takes to turn several sausages. Putting all three in the hottest area creates avoidable competition.
Three characteristics help determine placement:
- Fat or sugar content: fatty foods can cause flare-ups, while sweet marinades and glazes scorch readily over intense heat.
- Thickness: thick pieces often need more time for the centre to cook and may benefit from indirect finishing.
- Doneness tolerance: foods with a narrow acceptable cooking window require closer monitoring and a gentler approach.
The resulting assignment should reflect what is happening during the cook, rather than permanently labelling particular ingredients as direct-only or indirect-only.
| Food | Starting position | When to move |
|---|---|---|
| Bone-in chicken thighs | Indirect | Move briefly to direct heat for skin browning when appropriate. |
| Sausages | Controlled moderate or indirect heat | Use direct heat for final colour while monitoring fat drips and internal doneness. |
| Thick steaks | Indirect or direct, depending on the chosen sequence | Move to direct heat for a sear or away from it when sufficient colour develops. |
| Thin courgette slices | Direct, with close attention | Move off intense heat as soon as colour and tenderness are satisfactory. |
| Glazed peppers or mushrooms | Indirect or a suitable tray | Finish briefly over stronger heat only if needed. |
| Delicate fish | Gentler, separate cooking area | Avoid unnecessary movement and strong direct exposure that can damage the flesh. |
Organise the grate into three functional positions: a relatively stable indirect space for foods requiring less attention, a direct-heat rotation area for active browning, and an accessible indirect landing strip for moving items away from sudden heat.
These positions are functional rather than physical barriers. On a small kettle, the landing strip may simply be the farthest available spot from the coals. If that space is occupied or too hot, remove the item to a suitable clean dish instead of stacking food or allowing it to burn.
Flare-up management is also a scheduling issue. When dripping fat ignites beneath a sausage, attention shifts away from everything else. Keeping potentially flare-prone foods away from uncontrolled high heat reduces the chance that one incident forces the cook to abandon the planned sequence.
Separate handling is equally important. Use clean utensils and dishes for ready-to-eat food, and prevent raw chicken juices from reaching cooked vegetables or meat. Distinct grate positions help organisation, but they do not by themselves prevent microbial cross-contamination.
The final challenge is combining these positions with a workable timetable and keeping strong flavours from dominating every dish on the same grate.
Key takeaways before cooking a full mixed menu
- Decide which foods need the gentlest cooking space before assigning charcoal and grate positions.
- Keep high-risk browning jobs manageable by leaving room for immediate movement away from the coals.
- Coordinate cooking order, clean utensils and separate food handling alongside the heat plan.
How to Cook 6 Foods at Once on One Grill Without Mixing Flavours or Missing Timings
Cooking six foods on one kettle grill works best when every ingredient has an assigned heat zone, a planned cooking sequence and a clear removal condition. Use indirect heat for slower or more delicate cooking, reserve direct heat for controlled browning and separate foods that produce strong smoke or drippings. Keep a short written plan so changing timings do not become guesswork.
The goal is not necessarily to put six foods on the grate simultaneously. It is to coordinate six dishes during one cooking session without burning early starters, undercooking meat or making every ingredient taste of the strongest marinade.
Flavour transfer has several causes. Fat and sugary marinades dripping onto coals can produce bursts of smoke that affect nearby food. Shared cooking surfaces can also carry seasoning, residues and oils from one ingredient to another. Some smoke flavour is expected at a barbecue, but uncontrolled flare-ups are not necessary for good results.
Separate heavily seasoned foods where practical, use suitable trays for delicate or marinated ingredients and avoid placing food so that drippings fall onto another item. Cook milder foods before strongly spiced or smoky dishes when that sequence makes sense, and clean the grate appropriately between foods if flavour separation is important.
For ingredients requiring strict separation because of allergies or dietary restrictions, ordinary grate zoning is not enough to guarantee freedom from cross-contact. Separate utensils and cooking equipment may be necessary.
Wind direction can influence where smoke travels around an open grill, but smoke circulation changes when the kettle lid is closed. Prioritise controlling fat drips and flare-ups rather than assuming an upwind placement will prevent flavour transfer. Keep the lid position and vents consistent with safe grill operation and the cooking method.
A brief plan on paper or a phone helps prevent the main timing mistake: treating each food independently until several need attention at once.
Worked example: a six-food garden barbecue
This hypothetical cooking session uses a kettle grill with chicken thighs, sausages, beef steaks, courgettes, peppers and mushrooms. The charcoal is arranged on one side, with a drip tray beneath the indirect cooking area. Cooking times are deliberately flexible because the actual temperatures, portion sizes and weather conditions are not specified.
Before cooking: prepare the ingredients, check that the food thermometer is working, keep raw chicken separate from ready-to-eat food, and prepare clean serving dishes. Assign the chicken to the indirect zone, identify a direct-heat rotation area and reserve space for vegetables.
First cooking stage: start the chicken over indirect heat with the lid closed as appropriate. Monitor the grill conditions and check the thickest parts of the chicken with the thermometer as cooking progresses. Avoid touching bone when taking the reading.
Second stage: introduce the sausages according to their size and required cooking method. Use manageable batches rather than filling the whole direct zone. Place peppers and mushrooms in a suitable tray or gentler area where they are less exposed to drippings and scorching.
As service approaches: cook the steaks using the chosen direct-and-indirect sequence. Add courgette slices when there is enough free direct-heat space for close monitoring. Move chicken briefly over the coals if the skin still needs browning, without sacrificing safe internal doneness.
Final service: verify the meat temperatures, remove cooked foods to clean dishes and finish any vegetables that need a short period of direct heat. Serve completed items promptly. If one ingredient is not yet safely cooked, continue cooking it instead of forcing the entire menu to finish together.
The example illustrates a sequence rather than a guaranteed timetable. A larger grill may accommodate several of these jobs at once, while a smaller kettle may require more batching. Either way, fewer foods need simultaneous hands-on attention when their heat assignments are deliberate.
The written cook plan only needs a few fields: food name, starting zone, likely next move, doneness check and intended serving order. A note such as « chicken: indirect, thermometer check, optional skin finish » is more useful during a busy barbecue than a detailed timetable that becomes obsolete after the first flare-up.
The same principle applies to smoke management. Avoid overloading the direct zone with fatty or sugar-coated foods. If smoke suddenly increases because fat is burning, move the affected food away from the coals and restore control before continuing with the rest of the sequence.
Two-zone grilling cannot eliminate differences in cooking time or guarantee identical results every session. Its advantage is giving the cook more options when those differences appear. The more varied the menu, the more useful it becomes to separate cooking through from final browning.
Write down the six foods you intend to cook, group them by their heat requirements and build the charcoal layout around that list. Start the longest-cooking items first, leave space for quick browning and use actual doneness checks to guide every final move. That turns one crowded grill into a controlled cooking process without needing to cook every dish at the same speed.
Can you use two-zone cooking on a small charcoal BBQ?
Yes, provided there is enough room to keep food away from direct exposure to the coals. Bank charcoal on one side and use the opposing grate area for gentler cooking. Small kettles may have a narrow indirect area, so cook in batches and verify the actual heat rather than assuming the empty side will remain cool.
Should the lid stay open or closed when using two heat zones?
Keep the lid closed for indirect roasting when circulating hot air is needed to cook food away from the coals. Briefly opening it can be useful for turning food, checking temperatures or supervising a direct-heat finish. Repeated opening changes the cooking environment, so use measured checks instead of constant inspection.
Can cooked sausages stay on the indirect side until everyone is ready?
Only if the food remains within suitable food-safe hot-holding conditions, which cannot be assumed from its position on the grill. Indirect heat may continue cooking sausages, making them dry or overdone. For ordinary home barbecues, check that they are thoroughly cooked, remove them when ready and serve promptly rather than relying on the cool side as an indefinite holding area.
Can two-zone grilling work with lump charcoal instead of briquettes?
Yes. Both fuel types can be arranged into a concentrated coal bank with a separate indirect cooking area. Because fuel pieces and burn behaviour can vary, monitor the grate-level heat and adjust food placement as needed. A stable temperature difference matters more than using one particular type of charcoal.
How do you avoid raw chicken contaminating vegetables on the same grill?
Keep raw chicken and its juices away from ready-to-eat vegetables, cooked meat and clean serving dishes. Use separate utensils or wash them thoroughly between raw and cooked foods. Place ingredients so that chicken drippings cannot fall onto food that will not receive further thorough cooking. Direct and indirect zones manage heat; they are not substitutes for food hygiene.