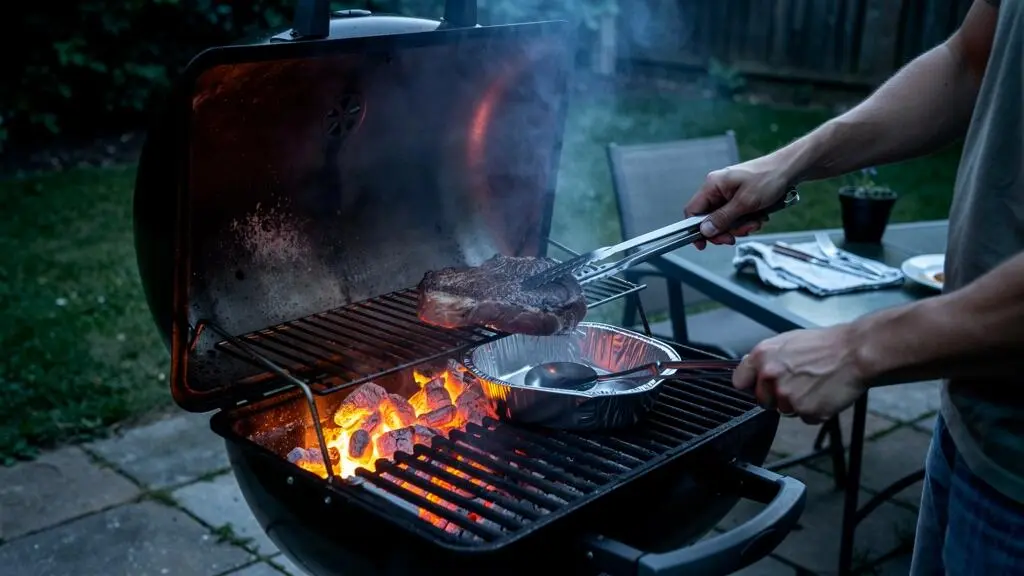
Thick steaks, bone-in pork chops and large chicken pieces can burn on the outside while remaining undercooked in the centre when they sit directly above intense flames. The solution is to separate the heat source from the food. Indirect grilling lets thick cuts cook in circulating heat, much like food in an oven, rather than receiving the full intensity of a flame or glowing charcoal directly underneath.
The technique works on both gas and charcoal barbecues. On a gas grill, switch off the burner beneath the food while keeping the appropriate neighbouring burner or burners lit. On a kettle barbecue, bank the coals to one side and place the food over the area without charcoal underneath. In both cases, the lid stays closed to maintain a stable cooking environment.
For the most reliable results, control the temperature inside the grill, monitor the centre of the meat with an instant-read thermometer and use direct heat only when a strong seared crust is needed. Cooking time varies with thickness, starting temperature, grill design and outdoor conditions, so a fixed number of minutes is never a substitute for checking doneness.
The essentials of indirect grilling
- Keep thick cuts away from the active burner or glowing coals and maintain a stable, oven-like environment with the lid closed.
- Use a grill thermometer to monitor cooking conditions and a food thermometer to check the centre of the meat.
- For steaks and chops that need a crust, cook indirectly first and finish briefly over direct heat without exceeding the required safe internal temperature.
- Why Does Indirect Cooking Keep Thick Cuts Juicier Than Direct Heat?
- How to Cook Indirect on a Gas Grill Without Accidentally Turning It Into Direct Heat?
- Indirect or Direct: Which Is Better When You’re Cooking for Only 2 People?
- The Lid-Lifting Mistake That Adds 20 Minutes to Indirect Cooks
- When Should You Finish With Direct Heat After Indirect Cooking to Avoid Overcooking?
- How to Cook Indirect on a Gas Grill Without Accidentally Turning It Into Direct Heat?
- How to Build Direct and Indirect Zones on a Kettle Grill in 5 Minutes?
- How to Use Two Heat Zones So You Can Grill and Roast at the Same Time
Why Does Indirect Cooking Keep Thick Cuts Juicier Than Direct Heat?
Indirect cooking helps thick cuts remain juicier because it reduces their exposure to intense, concentrated heat while allowing warmth to reach the centre more gradually. Direct heat can brown or char the outside before the middle approaches its target temperature. Indirect heat gives the interior more time to cook without forcing the surface to withstand the same intensity throughout the process.
On a barbecue, direct cooking means positioning food over a lit burner or glowing coals. The surface receives strong radiant heat, and browning can develop quickly. Heat then travels towards the centre through the food. With a thick steak or bone-in chop, this creates a challenge: the exterior may become excessively dark while the centre remains undercooked.
Indirect cooking changes the balance. The food sits away from the main heat source, receiving heat through the surrounding hot air and gentler radiant energy. The result is closer to roasting in an oven. Weber recommends this approach for larger foods and preparations that need longer cooking, although the appropriate method depends on the cut and the grill.
Juiciness involves two related but distinct factors. First, intense surface heating can cause excessive browning and charring before the centre is ready. Second, overcooking can reduce moisture retention as muscle proteins contract and release more liquid. Indirect heat helps manage surface intensity and makes it easier to approach the desired internal temperature gradually, but it cannot prevent every form of moisture loss.
Rather than memorising cooking times, match the heat to the thickness of the food. A thin steak may cook quickly over direct heat, while a thick, bone-in cut generally benefits from an indirect phase. A thermometer inserted into the thickest part reveals how the centre is progressing and helps identify when the food needs more time or a different heat zone.
120–175°C
An illustrative low-heat barbecue air-temperature range published by Weber for charcoal cooking. This is the temperature inside the cooking environment, not the required internal temperature of the meat.
Based on Weber’s charcoal barbecue temperature-control guidance.
Use the grill’s ambient thermometer or a probe positioned near the food to check that the indirect zone is stable. The lid thermometer can be useful, but its reading may not represent the temperature at grate level. A probe in the meat provides a separate measurement of internal doneness.
Once the heat strategy is clear, the next step is creating a genuine indirect zone on a gas grill without accidentally exposing the food to direct heat.
How to Cook Indirect on a Gas Grill Without Accidentally Turning It Into Direct Heat?
To cook indirectly on a gas grill, switch off the burner directly beneath the food and keep the appropriate neighbouring burner or burners lit. Place the cut over the unlit area, close the lid and adjust the active burners until the cooking environment reaches the temperature required by the recipe. Food positioned over a lit burner is still exposed to direct heat, even when that burner is set low.
Start by checking your grill’s burner layout and following the manufacturer’s lighting and operating instructions. Weber recommends preheating a gas barbecue with the burners on high and the lid closed for approximately 15 minutes before configuring the cooking zones. This is a preheating procedure, not a recommendation to maintain maximum heat throughout indirect cooking.
- Two-burner grill: Preheat as directed, then switch off one burner and keep the other lit. Position the food over the unlit burner.
- Three-burner grill: Switch off the centre burner and keep the two outside burners lit, provided this configuration is appropriate for the model.
- Four-burner grill: Switch off the two middle burners and keep the outside burners lit when the grill design supports this arrangement.
Close the lid and reduce the active burners as necessary to achieve the intended indirect cooking temperature. Do not turn the remaining burners to maximum simply to compensate for the unlit zone. Excessive output can create strong radiant heat around the edges of the food and cause the underside to brown too quickly. The aim is stable, circulating heat, not the highest possible temperature.
Placement also matters. Centre the cut over the unlit area and leave some clearance from the active burner side. Large cuts positioned near a hot burner may receive considerable radiant energy despite sitting above an extinguished burner. The exact hot spots depend on the grill’s construction, burner layout and rack height.
Manage drippings as part of the setup. Fat can run across the grates and ignite when it reaches a hot surface, so an unlit burner does not guarantee that flare-ups are impossible. For large roasts or poultry, a suitable drip pan beneath a roasting rack can collect juices and reduce mess. Keep the pan compatible with the grill and ensure it does not obstruct necessary airflow.
During cooking, look for signs that the arrangement is no longer working as intended: rapid charring on the underside, repeated flames beneath the food or a cooking-zone temperature that climbs beyond the desired range. If these appear, move the cut farther from the active burner and adjust the heat source. Avoid relying on a hand held above the grate as a precise temperature measurement; use a suitable grill thermometer instead.
A five-step gas grill setup check
- Inspect the burner layout and identify the burner directly beneath the intended cooking position; record which controls must be off.
- Preheat the grill according to its manufacturer’s instructions; note the starting ambient temperature.
- Configure the indirect zone and position the food over the unlit burner area; confirm that no active burner sits directly beneath the cut.
- Measure the cooking-zone temperature with a suitable grill thermometer; record the reading before the food goes on.
- Check the setup during cooking for unexpected temperature rises, underside charring or flare-ups; record any burner or positioning adjustment.
With a stable indirect zone established, the choice between direct, indirect and combined cooking becomes easier, even when preparing only two portions.
Indirect or Direct: Which Is Better When You’re Cooking for Only 2 People?
For two people, direct heat is usually the simplest choice for thin steaks and burgers that cook quickly, while indirect heat is more suitable for thick steaks, bone-in pork chops and larger chicken pieces. The number of portions does not determine the cooking method; thickness, the required internal temperature and the risk of burning should guide the decision.
Direct cooking is practical when the food reaches the desired doneness before its surface becomes excessively dark. Thin cuts need less time for heat to reach the centre, so a full indirect setup may add unnecessary preparation and cooking time. Keep a close eye on browning and move the food away from the flame if it starts to char too quickly.
Thicker cuts present a different challenge. The outside can brown well before the centre is ready, especially over a powerful burner or a concentrated bed of charcoal. An indirect zone reduces that exposure, allowing the centre to warm more gradually. On a small gas barbecue, this may require only one burner on and the other off. On a kettle grill, a modest bank of charcoal can create the necessary separation.
| Food or situation | Recommended approach | Why it works |
|---|---|---|
| Thin steaks | Direct | Fast cooking can bring the centre to doneness before excessive surface charring develops. |
| Burgers | Direct, with close monitoring | Direct heat gives rapid browning; use a thermometer to verify safe doneness. |
| Thick steaks | Indirect, then optional direct sear | The centre can cook gradually before a short final browning step. |
| Bone-in pork chops | Indirect or hybrid | The bone and thickness make controlled cooking useful for avoiding an overdone exterior. |
| Chicken pieces | Indirect, with direct finishing if useful | Gentler heat helps the interior cook through without excessive surface browning. |
A two-person meal does not need a large, elaborate setup. Use the smallest effective indirect zone, avoid lighting more charcoal than the cook requires and skip a bulky drip-pan arrangement when there is no practical need for one. For gas grills, the existing burner layout usually provides a simple way to create two zones.
For a thick steak that needs both even doneness and a pronounced crust, consider a reverse-sear approach. Cook the steak indirectly until its centre approaches the desired final temperature, then move it briefly to direct heat for browning. The finishing step should be short and closely monitored, because the centre has already accumulated heat during the first phase.
Whichever method you choose, one habit can undermine temperature control and make cooking less predictable: repeatedly lifting the lid to check progress.
The Lid-Lifting Mistake That Adds 20 Minutes to Indirect Cooks
Repeatedly opening the lid can extend an indirect cook because hot air escapes and the grill must recover its cooking temperature. The often-quoted 20-minute delay is an illustrative possibility, not a universal measured result: the actual time lost depends on how often the lid is opened, how long it stays open, the weather, the grill’s heat capacity and the amount of fuel available.
Indirect grilling depends on maintaining an oven-like environment around the food. When the lid opens, the hot air surrounding the cut escapes and the temperature distribution changes. The grill then needs time to return to its previous conditions. On a charcoal barbecue, opening the lid also introduces additional oxygen to the burning fuel, potentially changing combustion and making temperature control less predictable.
Gas grills respond differently depending on their design and burner controls, but the underlying problem remains: frequent interruptions disturb the cooking environment. A sequence of quick peeks may seem harmless, yet each one can make the overall cooking process less consistent. The lid thermometer may also show a change that does not immediately reflect the temperature near the food.
Use a simple lid-discipline strategy. Decide in advance when inspection is genuinely needed, such as when checking internal temperature, applying a glaze or carrying out a planned finishing step. For other checks, use a built-in probe or a compatible wireless thermometer that allows the cooking environment to remain closed.
Weber’s charcoal guidance recommends making small vent adjustments and allowing approximately five minutes for the temperature to respond. This is a practical starting point for charcoal control, not a guarantee that every grill will stabilise within that period. Avoid making several large adjustments in quick succession before the previous change has had time to take effect.
If the food is running behind, verify the internal temperature and the ambient cooking-zone temperature before changing anything. If the zone is too cool, make a modest adjustment to the heat source and allow the grill to respond. If the zone is correct but the centre remains below target, continue cooking rather than raising the temperature sharply or extending the cook based on an arbitrary clock estimate.
Once the centre approaches its target temperature, the next decision is whether a final burst of direct heat will improve the surface without pushing the interior too far.
When Should You Finish With Direct Heat After Indirect Cooking to Avoid Overcooking?
Finish with direct heat when the centre of the cut is close enough to its target temperature that a short sear can develop the desired crust without making the interior overcook. Use an internal thermometer rather than a fixed number of minutes to make the decision. The appropriate transfer point depends on the cut, its thickness, the intensity of the searing zone and the temperature rise that occurs after removal from the grill.
During the indirect phase, the centre gradually approaches doneness while the exterior remains less exposed to intense radiant heat. Direct finishing then provides the higher surface temperature needed for browning and crust development. This combination is especially useful for thick steaks and pork chops, where a strong crust is desirable but prolonged direct cooking can dry out the exterior before the centre is ready.
The main risk is leaving the cut over direct heat for too long. Meat that has already spent considerable time cooking indirectly carries residual heat, and its internal temperature may continue rising after it is moved or removed. A long final sear can therefore push the centre past the intended result even if the first phase was controlled carefully.
For a reverse sear, monitor the centre and transfer the food when it is a few degrees below the desired final temperature, adjusting that margin to the cut and the cooking conditions. There is no universally reliable offset for every steak, chop or roast. If you are unfamiliar with the cut, keep the finishing phase short, turn the food frequently enough to manage surface browning and move it away from any flare-up rather than leaving it parked above a flame.
Not every cut needs this second stage. A whole chicken or a large roast that has already developed sufficient surface colour may gain little from a prolonged direct finish. For these foods, prioritise safe internal temperature and avoid additional high heat simply because the recipe uses a two-zone setup.
Resting matters too. After cooking, the temperature may continue to rise slightly as residual heat moves through the cut. Account for this when planning the finish, but never assume carryover heat will reliably bring undercooked food to a safe temperature. Food safety takes precedence over achieving a particular degree of pinkness or crust.
According to FoodSafety.gov’s safe minimum cooking temperature chart, intact beef and pork steaks, roasts and chops should reach 63°C (145°F) and rest for at least three minutes under US guidance. Ground meat and sausages should reach 71°C (160°F), while poultry should reach 74°C (165°F). These are internal food temperatures, not barbecue air temperatures, and local official recommendations may differ.
For a reliable result, treat the indirect phase, the optional sear and the resting period as parts of one temperature-controlled process rather than separate cooking tasks.
Key decisions before building the charcoal zone
- Keep the food over the part of the grate without charcoal underneath, rather than placing it directly above glowing coals.
- Use the bottom and top vents to regulate airflow gradually, allowing the temperature to respond before making another adjustment.
- Wait until the charcoal is properly prepared and the cooking environment has stabilised; the five-minute setup describes the arrangement, not the complete preparation and preheating process.
How to Cook Indirect on a Gas Grill Without Accidentally Turning It Into Direct Heat?
An indirect setup can drift back towards direct cooking when the food is too close to an active burner, the remaining burners run too hot or fat ignites beneath the cut. The solution is to check the actual cooking-zone temperature, keep the food centred over the unlit area and adjust the heat source rather than relying on burner settings alone.
Start by confirming that the burner directly beneath the food is switched off. On a three-burner grill, the common arrangement is to leave the outside burners on and switch off the centre burner. However, burner layouts differ, so the correct configuration must follow the grill’s design and instructions.
Next, assess the heat reaching the food. A strong temperature difference between the active and unlit sides is normal, but the cool zone should remain within the intended cooking range. A grill thermometer or ambient probe near the food is more useful for this purpose than a subjective hand test. If the temperature rises too far, reduce the active burner output gradually and allow time for the change to take effect.
Food position is another frequent cause of trouble. A thick steak placed near the active burner may receive strong radiant heat from the side. Move it towards the centre of the unlit area, leaving enough space for hot air to circulate. Do not crowd the cooking grate or place large cuts directly against the hottest part of the grill.
Pay attention to drippings. Fat falling onto hot surfaces can ignite even when the burner underneath the meat is switched off. A drip pan may help collect juices under large cuts, but it should not be treated as a guarantee against every flare-up. If flames reach the food, use appropriate grill-safe tools to move it away from the affected area and follow the manufacturer’s safety instructions.
Weber’s guidance for gas grilling also distinguishes initial preheating from the temperature used for the actual cook. After preheating, adjust the active burners to the intended cooking temperature. Do not treat the initial high-heat reading as the correct temperature to maintain throughout indirect cooking.
Before placing the food on the grill, compare the temperature readings across the cooking surface. A stable, cooler zone should be evident. Repeat the check if the food begins charring underneath, flare-ups recur or the internal temperature climbs unexpectedly quickly relative to the cooking conditions.
These checks make gas grilling more controllable, while charcoal grilling requires a different adjustment method because the fuel itself responds to airflow.
How to Build Direct and Indirect Zones on a Kettle Grill in 5 Minutes?
To create two heat zones on a kettle grill, arrange the lit charcoal on one side of the charcoal grate and leave the other side clear. Place the food above the clear area for indirect cooking, then use the lid and vents to manage the airflow. The physical arrangement can be quick, but lighting the charcoal and waiting for the grill to stabilise take additional time.
Begin by preparing the charcoal using a suitable chimney starter and following the equipment manufacturer’s safety instructions. Weber suggests a chimney filled to approximately one-third as a starting point for low-temperature or shorter indirect cooking, and around one-half for medium-temperature indirect cooking. These are starting suggestions, not fixed quantities for every grill or recipe.
Wait until the charcoal has developed a light grey ash coating before transferring it to the grill. Arrange the coals on one side to create a hot zone and a cooler zone. Alternatively, placing coals on both sides can leave a central area for indirect cooking, depending on the amount of food and the grill’s capacity.
Put the food above the area without charcoal directly underneath. A drip pan in the cooler zone can catch fat and juices, making cleanup easier and helping manage drippings. For a large cut, position the pan and food so that air can still circulate around the meat.
The vents control combustion by changing how much oxygen reaches the charcoal. Opening them generally increases airflow and helps the coals burn hotter; partially closing them restricts airflow and reduces heat. Make small adjustments and allow approximately five minutes for the temperature to respond, as recommended in Weber’s charcoal temperature-control guidance. Closing both vents completely during cooking can extinguish the coals.
Vent placement matters as well. For indirect cooking, position the lid so that the vent is opposite the lit charcoal. This encourages heat and smoke to travel across the food before exiting. Keep the lid closed during the cook to maintain a more stable environment and avoid introducing unnecessary temperature fluctuations.
Use an ambient probe near the food to monitor the cooking zone. A thermometer mounted in the lid can provide useful context, but its reading may differ from the temperature where the food sits. Outdoor conditions, charcoal quantity, grill design and airflow all affect the final result, so make small changes and observe their effects rather than copying a vent position without checking.
Although the zone arrangement may take only a few minutes, the charcoal must be properly lit and the grill must be preheated before cooking conditions become dependable. Starting with charcoal that is still heating can produce a temperature that continues rising after the food goes on.
Once both zones are stable, the same arrangement can support a complete meal by cooking quick items directly while larger cuts roast indirectly.
How to Use Two Heat Zones So You Can Grill and Roast at the Same Time
Two-zone grilling lets you cook quick items over direct heat while thicker cuts cook more gradually in the indirect zone. The most effective approach is to schedule food according to its cooking needs, leaving enough space for hot air to circulate and finishing each item when its own temperature and texture are right. Starting everything at once is not necessary.
Use the direct zone for foods that benefit from fast browning, such as vegetables, thin steaks and burgers. Reserve the indirect zone for larger or thicker items, including chicken quarters, roasts and sausages that need more time or are prone to scorching. The exact placement should reflect the grill’s hot spots, the food’s thickness and the cooking temperature required.
Plan backwards from the intended serving time. Start the items that need the longest, gentlest cooking first, then add quicker-cooking foods as the meal progresses. Check each item individually rather than assuming that food sharing the same grill will finish together. A thermometer is especially useful for thicker meat and poultry, while visual cues can help assess the browning of vegetables and other quick-cooking foods.
Leave clear space around the indirect items. Overcrowding can obstruct airflow, make the cooking environment less consistent and prevent heat from circulating evenly. If the grill is too full, cook in batches or finish one group before adding another. A two-zone setup is useful only when each zone has enough room to function.
Pay attention to dripping fat and flare-ups. Meat placed directly over the hot zone may release fat onto the coals or burner area, producing flames that affect nearby food. Keep vegetables and other delicate sides away from flare-ups, and move food as needed if the surface begins to burn. A drip pan beneath larger indirect cuts can help collect juices and reduce mess.
Organise the finishing sequence before opening the lid. Remove items that have reached their intended doneness, then use the available direct zone to finish cuts that need extra browning. This reduces unnecessary movement around the grill and makes it easier to manage the short searing stage without leaving other foods unattended.
For a thick steak, the sequence might be an indirect cook followed by a brief direct sear. For vegetables and thin burgers, direct cooking may be sufficient from the start. For a roast that is already browned, further direct heat may be unnecessary. Each item should be managed according to its own cooking requirements rather than following one universal method.
Keep the lid closed whenever possible during indirect cooking, and use a suitable thermometer to check the centre of thick cuts. When you do need to move food between zones, make the transition efficiently and close the lid again to restore the cooking environment.
Before your next barbecue, identify the hottest and coolest areas, prepare the zones around the thickest cut and plan the finishing sequence. With a stable heat source and thermometer-led checks, it becomes easier to serve food that is evenly cooked without burning the outside while the centre catches up.
What temperature should an indirect grill be?
The appropriate temperature depends on the cut, its thickness and the recipe. Weber gives illustrative charcoal-barbecue ranges of 120–175°C for low heat and 175–230°C for medium heat. These figures refer to the cooking environment, not the internal temperature of the meat. Use an ambient grill thermometer to check the zone and adjust the vents or burners gradually.
Should the lid stay closed when cooking indirectly?
Yes, in most indirect grilling situations. Keeping the lid closed helps retain heat and maintain the circulating environment needed for even cooking. Open it when a check or adjustment is necessary, but avoid repeated inspections. A built-in or wireless thermometer can help you monitor progress with fewer interruptions.
Can indirect grilling be used for steaks?
Yes. Indirect heat is particularly useful for thick steaks that may char before the centre reaches the desired temperature. Cook the steak over the cooler zone, monitor its internal temperature and, if a strong crust is desired, finish it briefly over direct heat. Thin steaks can usually be cooked directly when they reach doneness quickly enough to avoid excessive charring.
How do you know when meat is ready to come off the grill?
Use a food thermometer inserted into the thickest part of the cut. Cooking time and surface colour alone cannot confirm safe doneness. Under US FoodSafety.gov guidance, intact beef and pork steaks or chops should reach 63°C and rest for at least three minutes, while poultry should reach 74°C. Follow the applicable official food-safety recommendations in your country.
Can you cook indirectly on a small two-burner gas grill?
Yes. Preheat the grill according to the manufacturer’s instructions, switch off the burner beneath the food and leave the other burner lit. Place the cut over the unlit area and adjust the active burner until the cooking zone reaches the desired temperature. The available space and the grill’s design determine how much food can cook indirectly at once.