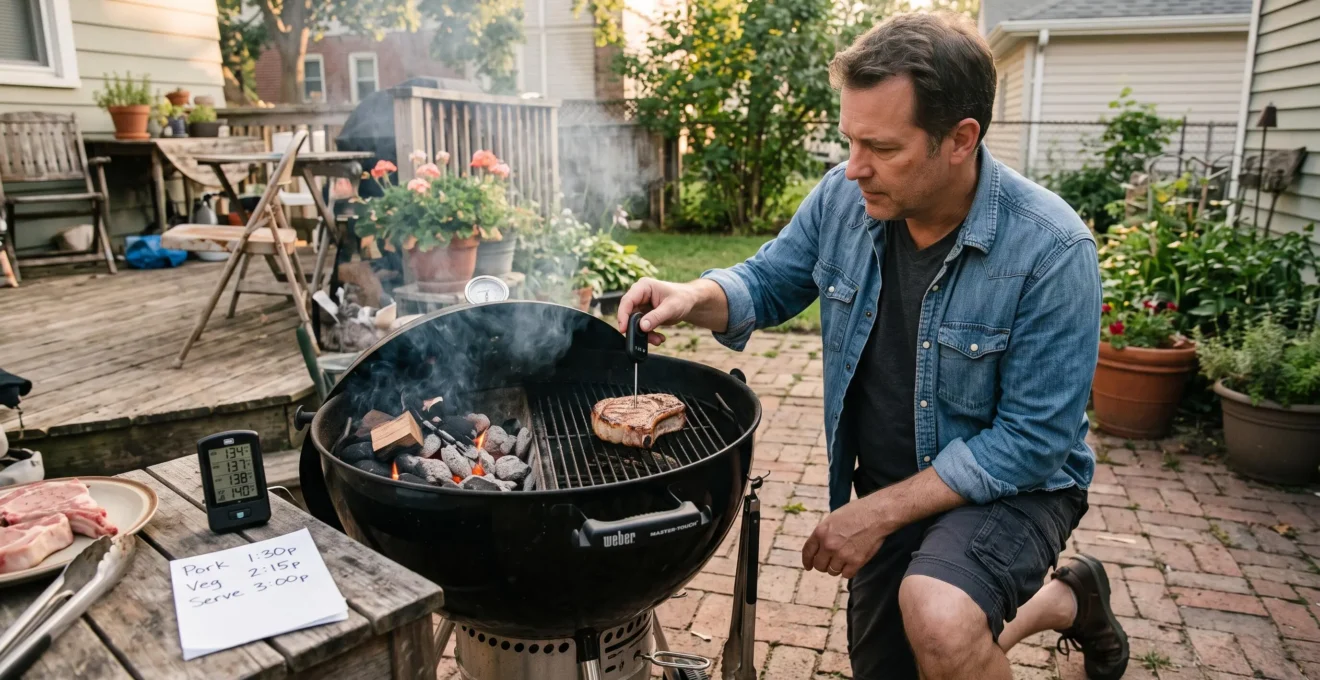
BBQ cooking times become manageable when you stop treating recipe timings as deadlines and start treating them as estimates that must be checked against actual grill and food temperatures. The practical approach is to work backwards from dinner, allow for predictable delays, and use a thermometer to decide when the food is ready.
For a UK home cook aiming to serve at 7 pm, the goal is not to predict the precise second every sausage, steak or pork shoulder will finish. It is to arrange the cooking stages so everything can be served within roughly 15 minutes of the intended time, without compromising food safety or leaving delicate cuts sitting around.
A reliable plan accounts for ignition, heat fluctuations, meat thickness, resting and any holding time. Large cuts need generous flexibility; quick-cooking foods need careful sequencing. Recording a few sessions on your own barbecue then makes future estimates more realistic. The following method works with charcoal kettles, gas barbecues and smokers, provided you measure conditions rather than assume the temperature on the lid represents the heat around the food.
BBQ timing: the essentials
- Plan backwards from serving time, giving ignition, cooking, resting and unexpected delays separate allowances.
- Use cooking times to organise dinner, but use a food thermometer to verify safe internal temperatures.
- Finish suitable large cuts early and hold them safely; cook steaks, sausages and other delicate items close to service.
- Why Are BBQ Cooking Times So Unreliable Compared to Oven Cooking?
- How to Build a BBQ Time Buffer So You Stop Serving Late
- Cook by Time or Temperature: Which Works Better for Sausages vs Steaks?
- The One-Thickness Rule Mistake That Leads to Raw Centres on the Grill
- When Should You Start Recording Your Own Cook Times to Stop Guessing?
- How to Build a BBQ Time Buffer So You Stop Serving 45 Minutes Late
- When Should You Start Recording Your Own Cook Times to Stop Guessing?
- How to Run a Low-and-Slow Smoke Overnight Without Waking Up Every Hour
Why Are BBQ Cooking Times So Unreliable Compared to Oven Cooking?
BBQ cooking times are less predictable because outdoor grills rarely maintain the same temperature around the food throughout a cook. Fuel output changes, heat varies across the grate, and weather affects heat loss. An oven generally controls its heating cycle around a setpoint, whereas barbecue timing depends heavily on the actual conditions surrounding the meat.
Three variables explain much of the difference:
- Fuel temperature fluctuations: charcoal changes output as it burns, gas heat can vary with burner settings and conditions, and pellet systems cycle fuel to regulate temperature.
- Uneven heat zones: food directly above burning coals or an active burner may cook faster than food near the edge of the grate or over an unlit burner.
- Weather and lid openings: wind, cold ambient air and repeated lid lifting can disturb the cooking environment and change the time required.
A published estimate therefore describes one combination of food, heat and equipment. It cannot automatically predict how long the same cut will take on a different barbecue.
Imagine two charcoal kettles both displaying 200°C on their lid thermometers. One has its coals directly below the meat; the other uses indirect heat. The food experiences different heating conditions even though the displayed readings match. A probe measuring air temperature near the cooking grate helps reveal that difference.
Each barbecue has a distinctive operating pattern: grate height, distance from the fuel, lid seal, airflow and thermometer position all influence how it cooks. Learning that pattern is more useful than memorising an apparently universal minutes-per-kilogram figure.
Thermometer placement introduces another source of error. A probe touching bone or sitting in a pocket of fat may not reflect the temperature at the thickest part of the meat. A grate-level sensor touching metal may also give a misleading picture of the surrounding air.
FoodSafety.gov advises checking the thickest part without touching bone, fat or gristle. Its four food safety steps also explain why thermometer measurements matter for cooking and holding food safely.
Once you know which conditions cause delays, the next task is to give those delays a place in the schedule before they happen.
How to Build a BBQ Time Buffer So You Stop Serving Late
A useful BBQ time buffer separates ignition delays, heat recovery, resting and optional holding into distinct scheduling allowances. Instead of adding an arbitrary half-hour to the recipe, work backwards from serving time and identify the stages that could run late. Suitable large cuts can finish early and remain safely hot, giving you flexibility without rushing the final cooking stages.
Start with a serving target. For an illustrative 7 pm dinner, a hypothetical plan for a large cut might look like this:
| Stage | Planning time | Purpose |
|---|---|---|
| Serve | 7:00 pm | Food reaches the table |
| Rest or verified hot hold | 6:15–7:00 pm | Absorb an early finish, if suitable for the cut |
| Target cooking completion | 6:15 pm | Meet verified internal-temperature requirements |
| Cooking period | Set from previous cooks | Allow for known cooking variability |
| Fuel and heat preparation | Before cooking starts | Allow for ignition and stabilisation |
The times are a planning illustration, not a validated cooking schedule. The actual cooking start depends on the cut, its thickness, the barbecue and previous observations. A brisket may also require a substantial contingency for the stall, when its internal temperature rises unusually slowly.
Resting and holding are not interchangeable. A short rest allows temperature redistribution and may improve eating quality. Holding is a deliberate attempt to keep finished food ready for later service, and must be managed safely.
Large cuts such as brisket and pulled pork generally tolerate an appropriate hot-holding period better than steaks or sausages, which can lose their preferred texture while waiting.
Wrapping meat and placing it in an insulated cooler may slow heat loss, but insulation alone does not establish a safe holding duration. The US FoodSafety.gov guidance recommends keeping hot-held food at or above 60°C (140°F). A cooler’s ability to maintain that temperature must be verified, rather than assumed. A temperature-controlled holding appliance is more predictable.
For a UK household, applicable UK food-safety guidance should also be followed. The US figure is presented as a published reference, not as a universal legal requirement.
Separate your allowances into ignition, temperature recovery and resting or holding. For long smokes, add contingency for fuel management and any stall. Avoid compressing these stages simply because guests are arriving sooner than expected.
This approach creates room for the barbecue to behave unpredictably. The next decision is which foods can be scheduled mainly by minutes and which require closer temperature monitoring.
Cook by Time or Temperature: Which Works Better for Sausages vs Steaks?
Use time to plan when sausages, steaks and other foods should go on the barbecue, but use internal temperature to confirm safe cooking. Uniform, quick-cooking foods are easier to schedule by time; thick or irregular cuts require more temperature-led decisions. Neither visual appearance nor elapsed minutes reliably establishes food safety, particularly for sausages and minced meat.
The difference is between planning the cook and deciding when the food is done. A timing estimate supports the first task. A correctly positioned thermometer supports the second.
According to FoodSafety.gov’s safe minimum internal temperature chart, US recommendations include:
| Food | Minimum internal temperature | Additional requirement |
|---|---|---|
| Ground beef or pork sausages | 71°C (160°F) | Measure the centre |
| Poultry, including poultry sausages | 74°C (165°F) | Measure the centre |
| Whole beef or pork steaks and chops | 63°C (145°F) | Rest for at least 3 minutes |
These are US consumer recommendations. UK guidance can differ, particularly for burgers, sausages and poultry. UK home cooks should apply the relevant local safety advice rather than treating every US threshold as interchangeable with UK practice.
When choosing how to schedule a batch, consider the food’s shape and thickness.
| Food characteristics | Scheduling approach | Doneness verification |
|---|---|---|
| Uniform sausages or burgers | Estimated minutes plus a margin | Internal thermometer check |
| Small, similarly sized chicken pieces | Estimated time with additional checks | Internal thermometer check |
| Thick steaks or chops | Time range adjusted as the centre heats | Centre temperature and applicable rest |
| Bone-in or irregular large cuts | Temperature-led plan with generous contingency | Check the thickest relevant areas |
As a practical scheduling heuristic, foods expected to cook in under about 15 minutes are easier to coordinate by time. If pieces differ substantially in thickness, especially by roughly 2.5 cm or more, rely more heavily on individual temperature readings. These are planning heuristics, not substitutes for thermometer verification.
Carryover cooking adds another complication. The centre of meat can continue heating after removal because stored heat moves inward from the hotter exterior.
4.9°F versus 11.5°F
In a ThermoWorks experiment, a 150 g pork chop removed at 140°F rose by 4.9°F after cooking at 300°F, compared with 11.5°F after cooking at 425°F. The measurements illustrate how cooking conditions influence carryover; they do not establish a universal temperature adjustment.
Carryover matters when planning resting and eating quality, but it should not be used as an assumed safety allowance. Meet the relevant safe-temperature and resting requirements, rather than removing food early on the expectation that an unverified temperature rise will finish the job.
That distinction becomes especially important when the pieces on the grate are not all the same thickness.
The One-Thickness Rule Mistake That Leads to Raw Centres on the Grill
Using one cooking-time estimate for meat of different thicknesses can leave the largest pieces undercooked even when their surfaces look ready. Heat takes progressively longer to reach the centre of thicker food, so cooking duration does not increase in simple proportion to thickness. Measure the thickest piece, arrange portions by size and verify the centre temperature before serving.
The problem is heat penetration. A thin piece has a short distance between its hot surface and centre. A thicker cut has a longer distance, so the centre may lag well behind the surface.
Under comparable conditions, doubling thickness can increase cooking time by more than double. The exact relationship depends on food geometry, cooking method and temperature differences, so it should not be converted into a universal multiplier.
Imagine an illustrative batch of pork chops containing pieces of different thicknesses. Applying the cooking time for the thinnest chop to every piece can produce a browned exterior on the thickest chop while its centre remains below the required temperature.
The answer is to control thickness variation before relying on a shared schedule.
- Measure the thickest part of the largest portion before cooking.
- Group pieces with comparable thicknesses together.
- Place thicker pieces where controlled, indirect cooking is available.
- Check centre temperatures individually where sizes or shapes differ.
- Remove each portion when its applicable temperature and resting requirements are satisfied.
High heat does not necessarily solve the problem. Trying to speed up thick chicken thighs or pork chops with prolonged direct searing can overcook or burn the exterior before the centre finishes.
Two-zone cooking provides more control. Use a hotter area for browning and a cooler, indirect area for finishing the centre without subjecting the surface to continuous intense heat.
You can also improve consistency before cooking by flattening thick portions, butterflying suitable cuts, dividing food into more uniform pieces, or spatchcocking a whole bird. These preparation choices reduce variation across a batch, although temperature checks remain necessary.
When several pieces must finish together, the thickest portion should influence the overall start time. Thinner pieces can go on later rather than waiting on the grate while the largest piece finishes.
Once food size and grill conditions become more consistent, recorded cooking times can provide a much better guide than published estimates alone.
When Should You Start Recording Your Own Cook Times to Stop Guessing?
Start recording BBQ cooking times from the first cook on a new barbecue, or immediately after changing fuel, thermometers or cooking configuration. The first three to five comparable sessions can reveal how your equipment differs from published estimates. Record both temperatures and conditions, then compare predicted and actual cooking durations to improve future schedules.
A useful log does not need sophisticated software. A notebook or simple spreadsheet is sufficient, provided the entries are consistent.
| Field | What to record |
|---|---|
| Date and weather | Outdoor temperature, wind and relevant conditions |
| Fuel | Charcoal, gas or pellets, including amount used where measurable |
| Cooking environment | Grate-level temperature and direct or indirect setup |
| Food | Type, weight and maximum thickness |
| Timing | Start, finish, ignition and resting durations |
| Doneness | Measured final internal temperature |
| Comparison | Estimated time versus actual time |
After each session, note the difference between your estimate and the observed cooking duration. Repeated entries help distinguish a consistently optimistic recipe estimate from occasional delays caused by wind or fuel problems.
For comparable cooks, a personal correction factor can provide a simple starting point:
Correction factor = actual cooking duration ÷ estimated cooking duration.
For example, in a hypothetical session, a cook estimated at 40 minutes that actually takes 50 minutes produces a factor of 1.25. Applied to another comparable 40-minute estimate, that suggests allowing 50 minutes before adding separate preparation, resting or contingency allowances.
This is an illustrative planning calculation, not a validated prediction model. It is most useful when food thickness, heat level and cooking method are similar.
Build your first usable BBQ timing record
- Record the setup: write down the barbecue model or type, fuel and cooking configuration to create a setup reference.
- Measure the conditions: note ambient conditions and grate-level temperature to establish a heating reference.
- Describe the food: record its type, weight and thickest measurement to create a comparable portion profile.
- Capture the result: log actual cooking duration, verified internal temperature and rest time to create a completed cook record.
- Calculate the difference: compare planned and actual durations, noting possible causes, to produce a revised estimate for the next comparable session.
Do not merge very different sessions into a single average. A windy winter cook with partially spent charcoal may not be comparable to a sheltered summer cook with a fresh fuel load.
With those estimates available, you can move beyond predicting one cut and start coordinating a complete meal around a realistic serving window.
How to Build a BBQ Time Buffer So You Stop Serving 45 Minutes Late
To avoid serving 45 minutes late, plan for a range of possible finishing times rather than a single exact deadline. Aiming for a 15-minute tolerance around the target gives you room to respond, but only if suitable foods can finish early and wait safely. Cook long-lasting items first, then schedule quick-cooking proteins and sides close to service.
For a target serving time of 7 pm, a practical tolerance band could run from 6:45 pm to 7:15 pm. That is a 30-minute range centred on the target, not a guarantee that every barbecue will finish within it.
For suitable food, an earlier cooking finish may be acceptable if a verified safe holding arrangement is available. For steak or sausages, finishing too early can harm texture, so their planned finish should sit much closer to the intended serving time.
A mixed-menu barbecue introduces another challenge: different foods require different durations and heat levels. Starting everything simultaneously often produces the wrong finishing order.
| Food | Scheduling priority | Service strategy |
|---|---|---|
| Large smoked pork cut | Start earliest | Allow a safe, measured hot-holding window |
| Thick steaks | Start according to thickness and available heat | Finish and rest close to service |
| Sausages | Plan around their measured cooking time | Verify safe temperature and avoid prolonged waiting |
| Prepared sides | Complete preparation ahead of protein service | Apply appropriate hot or cold storage controls |
Instead of asking when everything should start, work backwards to decide when each item must finish. Then assign cooking zones and available grate space.
When hosting, communicate the anticipated serving range rather than promising an exact minute that depends on unpredictable heat. Preparing the table, plates and sides ahead of time prevents small service tasks from becoming additional delays.
Some delays are recoverable. A brief temperature drop, a planned fuel refill or a short adjustment to cooking-zone placement may fit within the contingency already allocated.
Others are not. A thick cut still below its required internal temperature cannot be served simply because guests have sat down. Food safety requirements remain non-negotiable.
Before guests arrive, confirm that fuel is sufficient, thermometers are working, cooking zones are ready and the largest cuts are progressing as expected. This reduces the chance that an avoidable problem appears during the final minutes.
The aim is not to eliminate every possible delay. It is to make foreseeable delays manageable and discover serious timing problems early enough to adjust the meal plan.
When Should You Start Recording Your Own Cook Times to Stop Guessing?
A personal BBQ timing log becomes most valuable when you use it to create repeatable reference estimates for foods you cook regularly. After several comparable sessions, summarise the observed conditions and durations into a small reference chart. Update it whenever equipment, fuel or measurement methods change, and verify each important cook before relying on its predicted finish time.
Rather than searching through full notes before every meal, extract one practical reference entry per regularly cooked item.
A useful entry might follow this format:
Food + thickness + grate temperature + cooking method + observed time range + final internal temperature.
For example, a hypothetical reference could describe a 2.5 cm pork chop cooked on your barbecue at a measured grate temperature of 205°C, followed by the observed cooking duration and verified centre temperature. The duration should come from your actual records, not from an assumed number.
Over time, a small chart can distinguish regular foods such as sausages, burgers, chops and chicken pieces without requiring extensive calculations before every cook.
Not every meal deserves detailed monitoring. Two or three consistent records may be enough to establish a practical starting estimate for a familiar weeknight recipe. Large, infrequently cooked cuts deserve fuller notes because their timing behaviour may be harder to predict.
Remember that a log is tied to its measurement setup. Changing from lump charcoal to briquettes, replacing a thermometer or moving a temperature sensor can alter the conditions behind earlier entries. Flag the change and establish a new baseline rather than treating old figures as directly comparable.
For an important dinner, include a halfway verification. Compare actual progress with the logged estimate and check the centre temperature of the thickest relevant piece. If food is behind schedule, adjust heat or cooking-zone placement appropriately while still meeting safety requirements. If it is ahead, decide whether the cut can rest or be held safely.
This is also where records help identify unusual conditions. A cook running slower than previous entries may be experiencing heat loss, fuel limitations or a different starting food temperature.
For overnight smoking, this discipline becomes even more important because fuel stability, long cooking periods and safe holding have a greater effect on the final schedule.
Key takeaways before an overnight smoke
- An overnight finish estimate needs contingency for fuel consumption, weather changes and the possible stall.
- Reliable remote temperature monitoring is more useful than assuming a smoker will remain stable without supervision.
- Safe completion and measured hot holding matter more than protecting an exact finishing time.
How to Run a Low-and-Slow Smoke Overnight Without Waking Up Every Hour
An overnight low-and-slow smoke needs stable heat, sufficient fuel, reliable temperature monitoring and a realistic plan for the stall. Reducing unnecessary manual checks is possible with suitable equipment and alerts, but no fixed overnight checking schedule can guarantee safety. The frequency of supervision must reflect the smoker’s design, fuel system, environment and manufacturer instructions.
Long smoking sessions are especially sensitive to three factors: fuel burn rate, smoker insulation and overnight weather.
A smoker that loses heat through poorly fitted seals or requires frequent fuel replenishment will demand more attention than one designed to maintain stable temperatures automatically. Falling outdoor temperatures or strong wind can increase the heating demand.
Before planning any extended session, assess whether the equipment is suitable for the proposed operation. A remote thermometer can help detect changes, but an alarm does not remove the risks associated with combustion equipment.
Outdoor charcoal and other fuel-burning smokers must never be moved into a home, garage or enclosed space because of carbon monoxide and fire hazards. Follow the smoker manufacturer’s instructions on continuous operation, placement and supervision. Do not assume unattended overnight use is safe simply because remote monitoring is available.
The stall is another major timing consideration. During low-and-slow cooking, large cuts such as brisket or pork shoulder may experience a prolonged period when their internal temperature rises very slowly.
AmazingRibs‘ investigation of the barbecue stall attributes the effect primarily to evaporative cooling at the meat surface. Its observations describe stalls occurring around 150–170°F (approximately 66–77°C), although the onset and duration vary substantially.
Observed brisket stall during low-and-slow smoking
In an experiment discussed by AmazingRibs, a brisket began stalling around 150°F after approximately two to three hours of cooking.
In that specific example, the stall lasted approximately six hours. This demonstrates how a long delay can occur, but it is not a standard stall duration to add to every brisket schedule.
Wrapping meat in aluminium foil can reduce evaporation and help it progress through the stall. This approach is commonly called the Texas Crutch. The trade-off is that trapped moisture can soften the exterior bark. Butcher paper is another wrapping option, although it should not be assumed to produce the same timing improvement as foil.
A higher cooking temperature may also shorten the stall under some conditions, but raising heat must remain appropriate for the food, equipment and desired result. Increasing heat does not justify overlooking internal-temperature checks.
Before a planned overnight session, evaluate the smoker and schedule carefully:
- Confirm that the manufacturer permits the intended operating arrangement and that the location is safe.
- Establish fuel requirements from previous comparable sessions, without assuming a specific load guarantees uninterrupted operation.
- Check the food probe and grate-level sensor for consistent readings and correct placement.
- Observe the cooker until its temperature behaviour is stable.
- Configure suitable remote alerts for abnormal cooking temperatures or equipment problems, and maintain the supervision required by the equipment.
For a cooker whose approved operation and monitoring arrangement permits longer intervals between physical checks, planned checks around a significant fuel-management point and again near the expected morning finish may help organise supervision. These are scheduling opportunities, not a universal recommendation to leave an active smoker unattended or limit monitoring to two checks.
In the morning, compare the meat’s internal temperature and actual cooker temperature with the schedule. If the cook is behind, assess whether changing the cooking temperature is appropriate. Do not treat a slow temperature rise as permission to bypass safe cooking requirements.
If the meat finishes early, a temperature-controlled oven or suitable holding appliance may provide flexibility. A wrapped cut in an unheated cooler should only be treated as safely hot-held while measured conditions meet the applicable temperature requirements. There is no universally safe cooler-holding duration.
For UK home cooks, an overnight smoking plan should also account for local food-safety guidance, equipment-specific fire precautions and the practical possibility that the meal may need a revised serving time.
For your next barbecue, choose the serving time first, write down the actual cooking and resting stages, and check the thickest food with a thermometer. Save the result after dinner. Each properly recorded cook gives you a stronger basis for serving the next meal on time, without trading safety for speed.
How early should I light the BBQ before cooking?
Allow enough time for ignition and for the barbecue to reach a stable cooking temperature. Charcoal, gas and pellet equipment have different preparation requirements. Rather than relying on one universal ignition allowance, record how long your own setup takes under comparable conditions and build that time into the schedule before the food goes on.
Can I rely on the thermometer built into my BBQ lid?
A lid thermometer can help show broad temperature trends, but it may not reflect the air temperature immediately around the food. A separate grate-level sensor provides a more relevant cooking-environment reading, while a correctly positioned food thermometer verifies internal temperature. Use the measurements together rather than relying on the lid display alone.
What should I do if BBQ food finishes much earlier than expected?
First confirm that the food has met the appropriate safety requirements. Suitable large cuts may be kept hot in a properly monitored holding arrangement. Delicate foods such as steaks are less tolerant of extended holding. Do not assume that foil, towels or an insulated cooler will maintain safe temperatures for a particular period without measurement.
How can I coordinate BBQ cooking times when guests want different steaks?
Group steaks by thickness and desired finish, prepare direct and indirect cooking zones, and stagger their start times according to previous observations. Check internal temperatures individually, account for required resting and applicable food-safety guidance, and avoid leaving finished steaks over active heat while other portions catch up.
Is a 15-minute BBQ serving window realistic for every type of meat?
A 15-minute serving tolerance can be a reasonable planning objective for familiar meals on a well-understood barbecue. It is not guaranteed, particularly for large cuts affected by stalls, fuel changes or weather. The best approach is to combine measured cooking progress, realistic contingency allowances and safe holding where appropriate, while keeping a backup serving plan for unusually long delays.