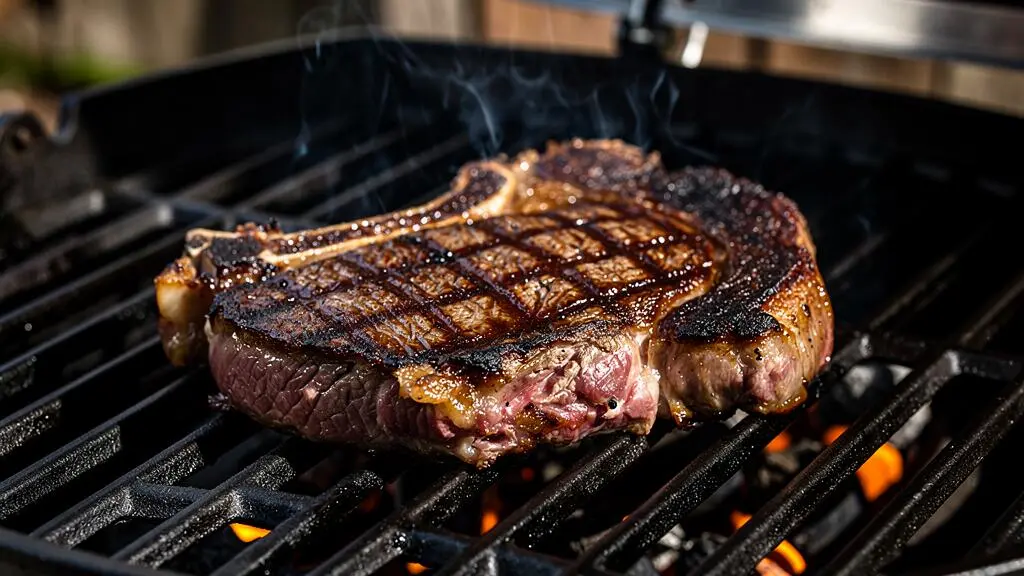
Dark, clean sear marks come from three things working together: thoroughly preheated grill bars, a dry meat surface and uninterrupted contact. Get those right and a steak can develop pronounced marks in a short searing window without being dragged across the grate or cooked until its centre is dry.
For a 3 cm steak, roughly 60–90 seconds of contact can be a useful starting point for checking the first set of marks on a sufficiently hot barbecue. It is not a guaranteed cooking time. The actual result depends on grate temperature, bar thickness, meat moisture and how much heat the grill loses when the lid opens.
The trick is to separate marking the surface from cooking the centre. Use concentrated direct heat to establish the pattern, then move the steak to a gentler zone if it needs further cooking. Resist the urge to lift, press or rotate it repeatedly. A strong sear is built through controlled contact, not constant movement.
Dark grill marks: the essentials
- Preheat the grate thoroughly and dry the steak before it touches the bars.
- Allow an uninterrupted contact window, checking for natural release rather than forcing a flip at exactly 90 seconds.
- Finish thicker steaks away from the hottest zone and verify the centre with a food thermometer.
- Why Are Your Sear Marks Pale Even When the Grill Feels Hot?
- How to Time Your First Flip to Get Sear Marks Without Overcooking the Centre
- Diagonal or Straight Placement: Which Gives Better Marks on 3 cm Steaks?
- The Too-Soon-Move Mistake That Rips Meat and Ruins Grill Marks
- When Should You Shift Food Across the Grate to Use Hot Spots Without Burning?
- How to Time Your First Flip to Get Sear Marks Without Overcooking the Centre
- How to Preheat and Oil Cast-Iron Grates in 10 Minutes Without Creating Sticky Build-Up
- How to Use Cast-Iron Grates Without Sticking, Rust, or Patchy Heat
Why Are Your Sear Marks Pale Even When the Grill Feels Hot?
Pale sear marks usually mean the meat is not receiving enough sustained heat where it touches the grill bars. A barbecue can feel fiercely hot while its grate is still underheated, especially after loading several cold steaks. Surface moisture compounds the problem by consuming heat through evaporation instead of allowing rapid browning.
The distinction is between the temperature of the air around the barbecue and the heat delivered by the metal at the contact points. Hot air can make the cooking area feel intense, but dark stripes require the bars themselves to transfer enough energy into the meat before that contact zone cools.
Thin bars, insufficient preheating and overcrowding can all weaken that transfer. A heavy grate offers useful thermal mass, but it must first absorb enough heat. Otherwise, the steak effectively cools the bars on contact.
Surface moisture is equally important. Water must evaporate before rapid browning becomes possible. The chemistry is explained in Serious Eats‘ explanation of the Maillard reaction, which describes how moisture and temperature influence the formation of browned flavours and aromas.
Pat the steak thoroughly dry with kitchen paper. If salting in advance, allow enough time for drawn-out moisture to be reabsorbed or evaporate; alternatively, salt immediately before cooking. The appropriate preparation depends on the cut, its thickness and how it has been stored.
For a practical heat check, use the bread-slice test before adding the steak. Place a slice briefly on the cooking grate and observe its contact pattern. Distinct browning where the bars touch suggests useful contact heat; bread that merely dries or remains pale suggests the grate needs more time.
A water-drop test is sometimes suggested for hot metal: a tiny drop that skitters and rapidly evaporates indicates a very hot surface. On an open barbecue, however, water can fall through the grate or cause unpredictable splattering, so this is not a reliable temperature measurement and should not be used as the deciding test.
Most importantly, do not keep lifting the steak to chase darker stripes. Every interruption breaks contact, while opening the barbecue or repeatedly shifting food can allow the grate to lose more heat.
Once the contact conditions are right, the next challenge is deciding when to flip without sacrificing either the crust or the centre.
How to Time Your First Flip to Get Sear Marks Without Overcooking the Centre
Flip a steak when its first contact marks have formed and the surface releases without tearing, rather than relying on a rigid countdown. On a thoroughly preheated grate, around 60–90 seconds is a reasonable initial observation window, but heat output, wind, bar design and steak thickness can change the timing considerably.
Watch the meat where it meets the metal. The contact areas should develop visible browning, and the steak should lift with little resistance. If the underside still grips, give it more time rather than forcing the turn.
Think of the first sear as a short, deliberate job. Its purpose is to create defined dark bars, not to finish the entire steak. Once the first side has released, flip decisively and establish the marks on the other side.
For comparison, Weber‘s Genesis barbecue searing instructions describe four contact stages of 45–60 seconds each, with a 90-degree rotation used to produce a crosshatch pattern. Those intervals apply to the manufacturer’s specified sear-burner method, rather than every barbecue.
45–60 seconds
Each contact stage in Weber’s four-stage Genesis crosshatch method. Four stages add up to approximately 3–4 minutes of direct searing, not 90 seconds of total cooking.
Weber-Stephen Products Co., Genesis four-burner barbecue cooking guide.
The important distinction is that sear colour is not an internal-temperature reading. Dark stripes can appear while the centre remains undercooked. Equally, leaving a steak over intense direct heat until its middle reaches the intended temperature can overcook the outer layers.
For a thick steak, switch to indirect heat after marking both surfaces. On gas, this means cooking away from the active high-heat burner. On charcoal, it means moving away from the concentrated coal bed. Check the thickest part using a thermometer and allow for further temperature rise during resting, which varies with the cut and how it was cooked.
Multiple flips during the finishing stage are not inherently a problem. What matters for the marks is giving each initial contact enough uninterrupted time to establish the pattern.
With the timing understood, the next decision is purely about how those marks should look: simple parallel bars or a more elaborate crosshatch.
Diagonal or Straight Placement: Which Gives Better Marks on 3 cm Steaks?
Diagonal placement offers more decorative possibilities, while straight placement is generally simpler and easier to repeat. Neither angle inherently creates deeper browning on a 3 cm steak. The darkness depends primarily on heat, surface moisture and contact duration; the orientation changes the geometry of the finished pattern.
For bold, parallel stripes, place the steak in a single direction across the hot bars and leave it undisturbed until the marks develop. Flip, then repeat on the opposite side. This reduces handling and gives each set of contact points an uninterrupted opportunity to brown.
For a restaurant-style crosshatch, the steak must contact the grate in two orientations on each side. The method is straightforward, but requires extra coordination.
- Place the dry steak diagonally across the preheated grill bars.
- Allow the first contact pattern to develop sufficiently for the surface to release.
- Rotate the steak approximately 90 degrees without flipping it.
- Allow the second set of contact marks to form, then flip.
- Repeat the two orientations on the opposite side before moving the steak to its finishing zone if required.
The Weber Genesis method provides an equipment-specific example using 45–60 seconds per contact stage. On a different grill, let the release and browning cues determine whether those intervals are appropriate.
Grate geometry also influences the result. Wide bars can create thicker dark stripes, while narrow bars and tight spacing may produce a denser pattern. On closely spaced grates, diagonal and straight placement may look less different than expected.
For a 3 cm steak, consider the trade-off before attempting the full crosshatch. Every extra rotation creates a new opportunity to disturb a developing crust or move the steak onto a cooler patch of metal.
| Consideration | Straight placement | Diagonal crosshatch |
|---|---|---|
| Appearance | Bold parallel stripes | Intersecting diamond-like pattern |
| Handling | One placement per side | Additional quarter-turn per side |
| Contact consistency | Easier to maintain | Requires more careful timing |
| Best practical use | Repeatable marks with minimal movement | Decorative presentation when heat and release are reliable |
Neither pattern makes the whole steak uniformly browned. The dark lines are concentrated where the meat touches the bars, while the areas between them receive a different balance of radiant and convective heat.
Whichever arrangement you prefer, preserving the developing crust matters more than the angle. That brings the most common sticking mistake into focus.
The Too-Soon-Move Mistake That Rips Meat and Ruins Grill Marks
Meat tears when it is lifted before the contact surface has developed enough crust to release cleanly from the grill. Proteins can adhere to hot metal during early cooking, and forcing the steak away may leave part of its browned surface attached to the grate. The safer approach is to wait for release rather than pull harder.
The first moments after placement are particularly tempting. The steak sizzles, smoke appears and the cook wants to check whether the marks are dark enough. But lifting at that point can interrupt the contact responsible for creating them.
Use a gentle release test instead. With tongs, try lifting a small corner without dragging the steak sideways. If it resists, lower it and allow another 20–30 seconds before checking again. That is an observation interval, not a guaranteed release time.
Never yank the meat free. If it remains stubbornly attached despite adequate cooking, poor grate condition, heavy residue or insufficient surface preparation may be contributing.
Release begins before the steak reaches the barbecue. Remove loose burnt deposits from the bars, allow the grate to preheat properly and avoid leaving a thick oil film. Dry the meat and, where appropriate, give its surface a very light coating of cooking oil.
The cost of an early lift is not merely cosmetic. Torn areas expose less-browned meat and can leave fragments stuck to the bars. Fat and released juices may then reach flames or hot surfaces, increasing the risk of flare-ups and irregular charring. Dripping does not guarantee a flare-up, but it makes aggressive handling particularly unhelpful.
Five checks before your first clean flip
- Clear the grill bars of loose residue. Check that the planned contact area is visibly clean.
- Complete the grate preheat. Confirm that a test slice of bread shows distinct contact browning.
- Pat the steak dry. Check that no obvious surface droplets remain.
- Place the steak once and leave it undisturbed. Note the placement time so you can assess the initial contact window.
- Test one corner gently with tongs. Flip only when it releases without tearing, leaving the first browned pattern intact.
Following the same five checks each time makes it easier to distinguish a temperature problem from a preparation problem. If every steak sticks in the same area, investigate that part of the grate rather than repeatedly changing flip technique.
Once the marks are secure, movement becomes useful again. The next question is where to move the steak as heat levels change across the barbecue.
When Should You Shift Food Across the Grate to Use Hot Spots Without Burning?
Shift a steak away from the hottest grate area once its marks are established, before the surface begins charring excessively or dripping fat creates aggressive flare-ups. Hot spots are best treated as short-contact marking zones, while cooler areas handle the remaining cooking. The goal is to move according to the cooking stage, not in response to burning.
Most barbecues have uneven heat distribution. Gas burners, deflectors, lid position, charcoal arrangement and wind can all influence which areas brown food fastest.
Before cooking, map those differences with a simple bread-slice test. Arrange slices across the usable grate, keeping them clear of direct flames. After approximately a minute, inspect their undersides and take a photograph of the browning pattern. Treat the result as a rough map, not a calibrated temperature measurement.
Dark patches indicate stronger browning conditions during the test, while pale patches identify comparatively weaker contact zones. Use the pattern to choose where the first sear should happen and where a steak might finish more gently.
During cooking, distinguish normal sizzling from a flare-up. A steady sizzle is expected. Rapid edge charring, rising flames or suddenly aggressive smoke are reasons to move the meat away from the immediate heat source. Do not wait for the surface to blacken.
For a 3 cm steak, the practical sequence is to establish the marks on the hot section and then assess whether the middle requires more cooking. If it does, transfer the steak to the cooler zone, close the lid if appropriate for the barbecue and check its internal temperature.
Remember that the heat map changes during a session. On charcoal, the distribution evolves as coals burn down and ash over. On gas, adjustments to burners, changing wind and repeated lid opening can alter the pattern.
A map taken before the first steak therefore remains useful as a starting point, not a permanent guarantee. If later batches brown unevenly, repeat a brief diagnostic when the grate is clear rather than assuming the heat distribution has stayed constant.
That separation makes the first-flip sequence much easier to execute, especially when several steaks must receive similar contact times.
How to Time Your First Flip to Get Sear Marks Without Overcooking the Centre
For a repeatable first flip, prepare the grate, place the steak once and check for release after a short, uninterrupted searing window. Flip when the first marks are defined, establish the second side and move to gentler heat if the centre needs further cooking. A thermometer, not the number of flips, determines whether the steak has reached an appropriate internal temperature.
Consider a hypothetical cook using a 3 cm steak on an already preheated barbecue. The following is an operational sequence rather than a promise that every grill produces identical marks in 90 seconds.
- Before placement: Make sure the hot marking zone and cooler finishing zone are ready. Dry the steak and have tongs and a thermometer within reach.
- 0 seconds: Place the steak across the hot bars. Avoid pressing it down or sliding it into position after contact.
- 60–90 seconds: Look for clear browning and test release gently. If the steak is still attached, allow additional contact rather than forcing the lift.
- First successful release: Flip once, choosing an undisturbed section of sufficiently hot grate if available.
- Following contact window: Let the second side develop its marks, again checking for release. Move to indirect or lower heat if further cooking is needed.
These intervals illustrate a simple two-contact sear. A four-contact crosshatch sequence requires additional time and rotation, so it should not be squeezed into the same schedule at the expense of crust development.
Do not press the steak with a spatula to make the stripes darker. Pressure can force moisture or fat out of the meat and into the fire, while flattening the surface does not automatically improve the raised-bar pattern. Correct preheating and steady contact are more predictable.
For food safety, the USDA FSIS safe internal cooking temperatures recommend that whole beef, pork, lamb and veal steaks reach at least 63°C (145°F), measured before removal from the heat, followed by a minimum three-minute rest. This is US guidance, not a universal legal requirement across English-speaking countries. Minced meat and poultry have different safety targets.
For a batch, place steaks in a consistent sequence and flip them in the same order. Record which pieces started first, particularly if their thicknesses differ. Similar contact windows make the visual outcome easier to control, although the thermometer must still govern each steak’s finish.
Good timing becomes substantially easier when the grate itself is properly prepared. Cast iron deserves particular attention because its thermal mass is helpful only after adequate preheating.
How to Preheat and Oil Cast-Iron Grates in 10 Minutes Without Creating Sticky Build-Up
Preheat cast-iron grates before applying any routine cooking oil, then use only the thinnest practical film. For equipment designed to reach searing conditions quickly, a covered preheat of around 8–10 minutes may be appropriate. The exact time depends on the barbecue and its manufacturer, and heavy oiling is more likely to leave unwanted residue than improve release.
Cast iron contains substantial thermal mass, so it can take longer to reach a useful contact temperature than the air around it. A short burst of flame does not mean the metal is ready to sear.
Use the manufacturer’s preheating instructions as the priority. The Weber Genesis guidance, for example, specifies a ten-minute preheat for its particular sear-burner procedure; that does not establish a universal ten-minute requirement for every cast-iron grate or charcoal barbecue.
For a compatible gas grill, the following routine provides a practical framework:
- Start with clean, dry grate bars and confirm that the burners and lid are operating correctly.
- Preheat with the lid in the recommended position for approximately 8–10 minutes where the equipment instructions support that duration.
- Assess whether the grate is delivering useful contact browning rather than judging readiness by hand proximity.
- If oiling is needed, use tongs to apply a minimal film of suitable high-smoke-point cooking oil with a folded paper towel, keeping hands well away from the heat and taking care to avoid drips or flare-ups.
- Place the prepared steak promptly and avoid adding further oil to the bars during active searing.
Do not use the hand-hover test to measure how hot the bars are. It cannot reliably establish contact temperature and exposes the cook to unnecessary heat. A contact-safe thermometer suited to the equipment, manufacturer guidance or a controlled food-contact test is more useful.
It helps to distinguish everyday oiling from seasoning. Seasoning is the bonded protective oil layer developed through appropriate heating and maintenance. Routine cooking oil is a temporary aid to contact and release; it should not form a visibly wet coating on the grate.
Sticky build-up can result from excess oil, incomplete seasoning and accumulated food residue. Applying oil to cold metal is not, by itself, proof that sticky deposits will form. The more relevant issues are film thickness, subsequent heating and whether residue is adequately removed.
After cooking, clean away food deposits in accordance with the manufacturer’s guidance. Allow components to cool sufficiently before handling, then dry and protect exposed cast iron with a very thin oil layer where recommended.
A well-prepared grate is only half the job. Long-term cleaning, drying and storage determine whether that same surface performs consistently next weekend.
Key takeaways before choosing your grate
- Heat storage is useful only when the bars have been preheated thoroughly enough to deliver it.
- Rust prevention and reliable release both depend on removing moisture and keeping the surface maintained.
- The best grate is the one whose cleaning and storage routine you can realistically sustain.
How to Use Cast-Iron Grates Without Sticking, Rust, or Patchy Heat
Cast-iron grates produce reliable sear marks when they are thoroughly preheated, kept clean, lightly protected with oil and stored dry. Their mass can help maintain contact heat, but it does not eliminate hot spots or guarantee darker marks than stainless steel. If the maintenance routine is neglected, rust, residue and inconsistent contact become more likely.
Think of cast iron as a heat reservoir. Its mass allows it to store energy and deliver it at the points where meat rests on the bars. That can be useful for short, intense searing, particularly when the barbecue itself has sufficient heating capacity.
The disadvantage appears when preheating is rushed. Heavy bars that have not absorbed enough heat may cool considerably when a cold steak lands on them, producing weak browning despite an impressive flame beneath the grate.
Cast iron also needs consistent maintenance. Lodge‘s cast-iron grill cleaning and care instructions recommend removing residue, drying promptly, applying a thin protective oil layer and storing the equipment in a dry environment. These instructions concern Lodge’s specific grill, but the basic importance of controlling moisture is relevant to exposed cast iron more broadly.
Thin oil layer
Lodge’s recommended protective finish after cleaning and drying its cast-iron grill. Excess oil is unnecessary for routine storage protection.
Lodge Cast Iron, Sportsman’s Pro cleaning and care guidance.
Light surface rust is often a maintenance problem rather than a reason to discard a grate. Remove the corrosion using a cleaning method appropriate for the grate’s coating and construction, dry it thoroughly and restore its protective finish as directed. Deep damage, flaking coatings or uncertain surface materials require a different assessment.
Patchy marks have several potential causes. Some result from unequal burner or coal heat; others come from carbon deposits, uneven surface condition or damaged seasoning that alters contact with the steak.
To separate those causes, clean the grate and repeat a brief bread-slice heat-map test. If browning follows the burner layout, inspect heat distribution. If irregular patches align with particular bars or deposits, focus on grate condition first. The test is diagnostic rather than a precise measurement of metal temperature.
Cast iron and stainless steel therefore involve different practical trade-offs:
| Criterion | Cast iron | Stainless steel |
|---|---|---|
| Contact heat | Substantial thermal mass when properly preheated | Depends strongly on bar thickness and construction |
| Routine maintenance | Cleaning, drying and protective oiling are important | Generally less dependent on protective seasoning |
| Corrosion concerns | Exposed iron can rust during damp storage | More corrosion-resistant, depending on grade and conditions |
| Most suitable cook | Someone prepared to maintain a seasoned surface | Someone prioritising relatively straightforward upkeep |
Neither material guarantees dark marks without sufficient heat. Bar geometry, grill design and meat preparation may have more influence on the finished appearance than the material label alone.
For a UK garden barbecue exposed to damp weather, consider how easily the grates can be cleaned, dried and sheltered between uses. A well-maintained stainless grate may deliver more consistent everyday results than cast iron that is repeatedly left wet.
On the next barbecue session, choose a suitably thick steak, dry its surface, preheat the grate properly and make the first placement deliberate. Check for natural release, finish away from intense heat where needed and verify the centre with a thermometer. Repeat that simple sequence before adding decorative quarter-turns: consistent dark marks begin with consistent technique.
Can you get dark grill marks in just 90 seconds?
Yes, a sufficiently hot grate can produce visible dark marks within approximately 90 seconds of uninterrupted contact, depending on the grill and steak. That does not mean the entire steak will be cooked in 90 seconds. Check whether the crust releases cleanly, then continue cooking as required.
Does a darker grill mark mean a steak has more flavour?
Browning reactions create aromatic and flavourful compounds, but darker stripes alone do not guarantee a more flavourful steak. The areas between the bars also matter, and excessive charring can introduce bitter flavours. Aim for a rich brown crust rather than blackened lines.
Should you oil the steak or the barbecue grate?
A very light coating on the dry steak is often easier to control than heavy oiling of the grate. Some cast-iron grates also benefit from a minimal oil wipe, depending on their seasoning and manufacturer instructions. Avoid excess oil that can drip, smoke heavily or encourage flare-ups.
Can you create restaurant-style crosshatch marks on a charcoal barbecue?
Yes. Arrange a concentrated hot zone with a cooler area available for finishing, and establish two contact orientations on each side using a 90-degree rotation. Charcoal heat distribution changes as the coals burn, so judge each turn by browning and release rather than assuming a fixed interval will always work.
Why do grill marks sometimes turn black before the steak is cooked?
The contact zones may be receiving excessive heat, or the steak may have been held over direct heat for too long. Dripping fat and sugary marinades can also contribute to rapid scorching. Move the steak to a cooler area once the marks form and use a thermometer to guide the remaining cooking time.