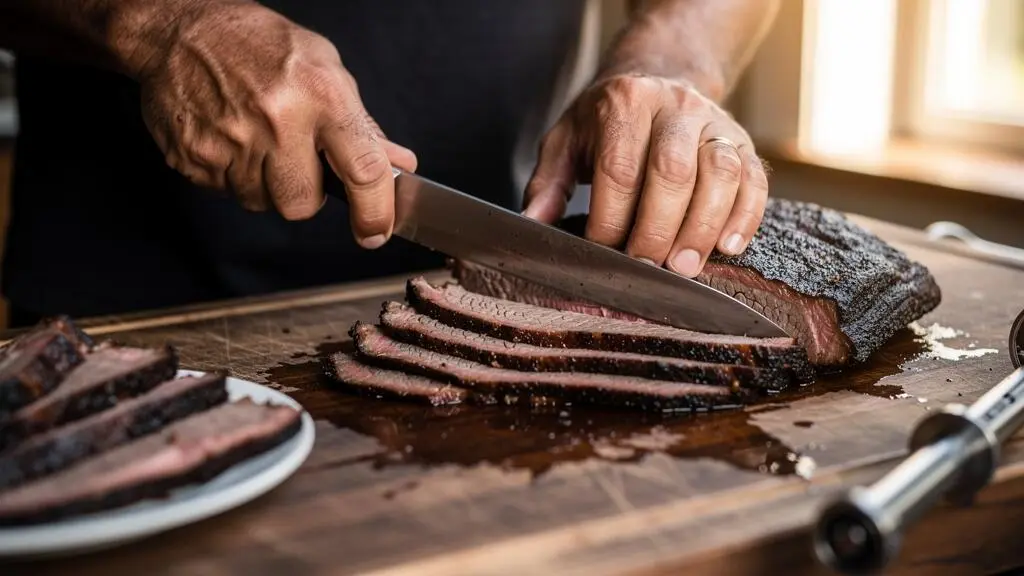
Two steaks can reach exactly the same internal temperature and still feel completely different when you chew them. One practically melts in your mouth. The other makes your jaw work, despite being perfectly cooked to the temperature you intended.
The difference often comes down to something your thermometer cannot measure: the direction and length of the muscle fibres in each bite. A knife moving across those fibres can make a noticeable difference to how tender meat feels. Move that same knife along the fibres, and even a juicy steak may seem stubbornly chewy.
Connective tissue, resting, slice thickness and serving temperature also matter. A brisket needs a different approach from a tenderloin, and pulled pork requires a different texture check from a sliced roast.
The practical goal is simple: identify the grain, decide how much resistance you want in each bite, and carve at the right moment. Once those choices become deliberate, the same piece of meat can deliver a much better eating experience without changing its final cooking temperature.
The three rules for serving meat that feels tender
- Cut across the grain: Shorter muscle-fibre segments are easier to chew than long, intact strands.
- Match slice thickness to the cut: Thin slices help firmer brisket, while properly tender meat can support thicker portions.
- Rest, check and serve promptly: Account for carryover cooking, avoid unnecessary juice loss and keep carved meat from cooling too quickly.
- Why Can Two Steaks at 130°F Feel Completely Different When You Chew Them?
- How to Find the Grain Direction in 20 Seconds Before You Start Slicing
- Thin Slices or Thick Slices: Which Makes Brisket Feel More Tender for Guests?
- The Pulling Mistake That Makes Pork Feel Stringy Instead of Silky
- When Should You Slice After Resting to Keep Fibres From Squeezing Out Juices?
- The One Slicing Mistake That Makes a Juicy Brisket Taste Dry in 30 Seconds
- How to Translate ‘I Like It Medium’ Into a Pull Temperature and Rest Time?
- How to Hit Your Desired Doneness Every Time Even When Cut Thickness Changes
Why Can Two Steaks at 130°F Feel Completely Different When You Chew Them?
Two steaks at 130°F (54°C) can feel different because temperature is only one part of tenderness. Muscle-fibre orientation, connective tissue, fat distribution and the cut itself determine how much resistance your teeth encounter. Even within the same steak, slicing across rather than along the grain can change the chewing experience without changing its internal temperature.
Think of meat as bundles of long, narrow muscle fibres surrounded by connective tissue. When you bite through a slice, your teeth must separate or break some of those structures. A slice containing long, continuous fibres generally requires more chewing than one in which the knife has already shortened them.
There is also a difference between intrinsic tenderness and perceived tenderness. Intrinsic tenderness depends on the meat’s structure and how cooking changes it. Perceived tenderness includes the extra influence of carving, portion size and how the meat breaks apart in your mouth.
The Beef Research fact sheet on beef tenderness and mechanical tenderization distinguishes connective-tissue tenderness from muscle-fibre tenderness. It also explains why a connective-tissue-rich cut such as brisket behaves differently from tenderloin.
That distinction matters when comparing cuts. A tenderloin naturally contains relatively little tough connective tissue, while a chuck roast or brisket requires cooking conditions that soften more resistant structures. Slicing cannot undo insufficient collagen softening, but it can reduce the fibre length your teeth must manage.
Carryover cooking creates another variable. A steak removed at 130°F may continue warming during its rest, particularly if it is thick. Two pieces removed at the same measured temperature can therefore reach different peak temperatures and develop somewhat different textures.
Practical comparison: two bites from one steak
Imagine a rested flank steak with clearly visible parallel fibres. Cut one small piece across the grain and another parallel to it. Keep both pieces similar in thickness.
Chew them separately. The cross-grain piece should generally feel easier to break down because the knife has shortened the fibre bundles. This is a simple kitchen demonstration, not a controlled scientific measurement.
The important limitation is food safety. The familiar 130°F steak example is a culinary comparison, not a universal safe cooking target. Under US government guidance, whole beef steaks should reach 145°F (63°C) and rest for at least three minutes.
Once the temperature is right for the preparation and applicable safety guidance, the next decision is not another degree on the thermometer. It is finding the grain before you make the first full slice.
How to Find the Grain Direction in 20 Seconds Before You Start Slicing
To find the grain quickly, look for parallel lines running through the muscle, trace their direction and position your knife across them. If the pattern is unclear, inspect a cut face or make a small test cut. On irregular cuts, check each muscle separately instead of assuming the grain runs in one direction throughout.
Grain is simply the direction in which muscle fibres run. On many raw cuts, it appears as faint, closely spaced lines. On cooked steak, those lines may become easier to identify on a freshly exposed surface, although browning, bark or softened connective tissue can obscure them.
A useful 20-second inspection follows three movements:
- Look: Find a section where the muscle lines are visible, avoiding heavy fat seams or dark crust.
- Trace: Follow several parallel lines with your eyes to establish their general direction.
- Rotate: Turn the meat or position your knife so the blade crosses those lines rather than travelling alongside them.
Cutting perpendicular to the grain is the clearest starting point. An angled presentation cut can still work, but it should cross the fibres decisively instead of following their length.
Consider the following simple orientation: if the fibres run from the front of the cutting board to the back, your knife should travel across the width of those fibres to create short fibre segments in each slice.
Some cuts make this harder. Tri-tip can have noticeably changing grain directions. Picanha may require adjustments as the muscle curves. A flat iron steak should be assessed according to how it has been trimmed and portioned. Brisket contains distinct muscles whose fibres do not necessarily run in the same direction.
For these cuts, divide the meat into manageable sections where practical. Locate the grain in each section and rotate that piece independently before slicing. Cutting an entire irregular roast in one fixed direction can leave some portions tender and others unexpectedly chewy.
After a long braise or smoke, the grain can be difficult to see. Try gently pulling a small corner apart with two forks or clean hands. The direction in which the meat separates into longer strands often helps reveal its fibre orientation. Use light pressure rather than tearing apart a serving-sized section.
Do not assume the grain is perpendicular to the butcher’s previous cut. A rotated piece or a steak cut from a muscle cap can make that guess unreliable.
Five-point grain check before carving
- Place the meat on a stable board and identify one visible group of parallel lines; confirm the grain direction.
- Inspect the opposite end or a second muscle and note any change in orientation; identify whether the piece needs dividing.
- Position the knife across the grain and make one small test slice; examine the exposed fibre ends.
- Check the test slice for long, continuous strands and adjust the angle if necessary; establish a consistent cutting direction.
- Carve one serving portion and assess its bite before cutting the rest; confirm the final slicing approach.
With the knife direction settled, the next adjustment is slice thickness. That choice matters especially for brisket, where tenderness and structural integrity must be balanced.
Thin Slices or Thick Slices: Which Makes Brisket Feel More Tender for Guests?
Thin, cross-grain brisket slices usually feel more tender when the meat is slightly firm because each bite contains shorter sections of muscle fibre. Thicker slices offer a more substantial, beefy chew and hold together better when the brisket is very soft. The best thickness depends on how thoroughly the connective tissue has softened and how the slices will be served.
Brisket is not simply a large steak. It contains considerable connective tissue, and cooking it successfully often means holding it under suitable heat conditions long enough for collagen-rich structures to soften.
According to a scientific review of intramuscular connective tissue and meat tenderness, texture reflects interactions among muscle fibres, connective tissue and fat cells. Collagen’s effect on toughness depends on more than its quantity alone.
That explains why slice thickness cannot solve every brisket problem. A piece with inadequately softened connective tissue may remain resistant even when sliced thinly. However, cutting across the grain can make a meaningful difference to how easily the muscle portion of the bite breaks apart.
A practical starting point is a thin, even slice approximately the thickness of a pencil, then adjusting based on how the cooked meat behaves. This is a carving convention, not a scientifically established universal optimum.
The following decision grid helps match thickness to the actual brisket on your board.
| Condition | Thinner slices | Thicker slices |
|---|---|---|
| Slightly firm brisket | Usually easier to chew when cut across the grain. | May feel more resistant and require extra chewing. |
| Fully tender brisket | Soft bites, but slices may begin to fall apart. | Often retains a more substantial, cohesive texture. |
| Very soft or fragile brisket | May crumble during handling. | Can help portions remain intact if lifted carefully. |
| Serving a large group | Cools relatively quickly and needs prompt service. | Offers more substantial portions with less exposed surface area per serving. |
Cross-grain direction matters at every thickness. Cutting thin slices along the grain can still leave long fibres that must be pulled apart during chewing.
For exceptionally tender brisket, the goal may actually be to avoid slicing too thinly. Guests should be able to lift the slice without it collapsing completely, yet separate a bite without excessive resistance.
There is also a temperature trade-off. Thin slices expose more surface area relative to their mass, allowing them to cool faster. Meat that felt juicy directly after carving may seem less pleasant after sitting uncovered on a cold platter.
Carve in small batches when serving several guests. Keep the remaining brisket intact until needed, use a warm serving platter where appropriate and return collected juices to the meat without soaking the bark unnecessarily.
Brisket tenderness can often be refined with the knife. Pulled pork presents a different challenge: the meat should be soft enough to separate naturally before shredding begins.
The Pulling Mistake That Makes Pork Feel Stringy Instead of Silky
Pulling pork before its connective tissue has softened sufficiently is a common reason for long, chewy strands. Forks or shredding claws can separate firm muscle into fibres without making those fibres tender. For silky pulled pork, cook the shoulder until a probe enters with very little resistance, rest it briefly and separate the meat along its natural seams.
Pork shoulder contains muscles with different orientations and significant connective tissue. During slow cooking, heat and time change the collagen-rich structures holding those muscles together.
If you begin pulling while the meat still feels firm, mechanical force does most of the work. The result may be a mound of thin but resistant strands that feel dry or stringy when chewed.
Even properly cooked pork can become unpleasantly stringy when shredded excessively into very fine, lengthy fibres. The goal is not to create as many strands as possible. It is to separate softened muscle into moist, manageable pieces.
Use the probe test before the pulling test. Insert a skewer or temperature probe into several thick parts of the shoulder, avoiding bone. Properly softened pork should offer very little resistance. A single thermometer reading cannot guarantee identical tenderness in every shoulder because collagen softening also depends on cooking history and the structure of the meat.
When the pork passes the tenderness test, let it rest long enough to become comfortable and safe to handle without unnecessarily cooling it. Then choose a pulling method that matches its texture.
- Hand-pulling: Offers the most tactile control and makes it easier to follow natural muscle seams, provided the meat is cool enough to handle safely.
- Shredding claws: Make larger quantities easier to process, but aggressive repeated pulling can produce overly fine strands.
- Slicing before pulling: Shortens long muscle sections first and can help create manageable pieces, especially when the grain produces unusually lengthy strands.
If the pork has already been shredded and remains firm, further gentle cooking in its retained juices or a modest amount of additional liquid may improve the texture. Use a covered, food-safe cooking vessel and continue until the pieces soften, monitoring temperature and moisture.
Liquid can reduce dryness, but it cannot restore the original structure after the meat has been torn apart. Adding sauce alone will not correct genuinely firm connective tissue.
Resting helps make pulling more manageable, but sliced steaks and roasts introduce another timing question: when does carving preserve the most appealing moisture and texture?
When Should You Slice After Resting to Keep Fibres From Squeezing Out Juices?
Slice meat after its initial carryover cooking and heat redistribution have settled enough for the cut and serving style. Cutting immediately can release more liquid onto the board, while excessive resting can leave portions unnecessarily cool. Use internal temperature trends, surface moisture and the meat’s handling characteristics alongside an appropriate rest period rather than relying on one universal clock.
Heating changes muscle proteins and their ability to hold water. Moisture also moves through the meat as temperature gradients develop. When the meat is cut, some of that liquid can escape along newly exposed surfaces.
Resting allows temperatures to become more uniform and reduces the immediate thermal differences between the surface and centre. This can improve the carving experience, although resting does not reverse all protein contraction or guarantee that no juices will escape.
It is useful to distinguish two separate purposes of resting:
- Resting for doneness: The centre may continue to warm after the meat leaves the heat source because energy moves inward from hotter outer layers.
- Resting for carving: Allowing the meat to settle can reduce immediate liquid runoff and make the cut easier to portion cleanly.
For a relatively thin steak, the rest may be brief because its internal temperature gradients are comparatively small. A thick roast has more stored heat and may continue warming for longer.
Large smoked cuts, including brisket, often benefit from a more deliberate holding and resting plan. However, covering them tightly can trap steam and soften the crust or bark.
Instead of assuming every steak needs the same number of minutes, assess three practical signals:
- Check whether the centre temperature is still rising noticeably or has approached its post-cooking peak.
- Observe whether large amounts of liquid are collecting on the surface or escaping when the meat is handled.
- Check whether the cut feels easier to handle and carve without tearing or collapsing.
These observations help with serving quality, but they are not substitutes for required food-safety temperatures or prescribed minimum resting periods.
145°F (63°C) + 3 minutes
The US recommended minimum internal temperature and subsequent minimum rest for whole cuts of beef, pork, lamb and several other red meats. This is a food-safety threshold, not a universal target for the most tender barbecue texture.
FoodSafety.gov’s official safe minimum internal temperature chart
Rules vary by country and preparation. Ground meat and poultry require different safety considerations, and local guidance should govern the final cooking plan.
For shredded or finely torn meat, the serving method offers more flexibility. Collected juices can be mixed back into the pork, helping distribute moisture over its exposed surfaces. Similarly, thinly sliced meat served immediately with warm jus is less dependent on remaining intact during a long platter rest.
Even perfectly rested meat can lose its appealing bite if the knife follows the wrong direction. Brisket makes that mistake particularly noticeable.
The One Slicing Mistake That Makes a Juicy Brisket Taste Dry in 30 Seconds
The mistake is cutting brisket with the grain instead of across it. Long, intact muscle fibres resist breaking apart, making an otherwise moist piece feel chewy and sometimes dry. The effect can be noticeable from the first bite, even though the cooking temperature and moisture content of the remaining brisket have not changed.
Imagine a smoked brisket with a well-developed bark and a soft centre. The first slice looks excellent: a moist interior and clearly defined muscle fibres. Yet the guest must tug at each bite to separate it.
The problem may be the orientation of those fibres rather than a lack of moisture.
When the blade travels parallel to the grain, it separates long bundles without cutting many of them into shorter sections. Your teeth must then do more of the mechanical work.
A slice taken perpendicular to the same fibres shortens their effective length within the portion. This generally reduces the resistance of the muscle-fibre component during chewing.
The perception of dryness is more complicated than a single cause. It depends on lubrication, fat, actual moisture content, temperature, connective tissue and how the food breaks down in the mouth. Long, resistant fibres can contribute to a dry impression, but carving direction alone does not establish how much moisture the meat contains.
The phrase « in 30 seconds » describes how quickly someone might notice the difference after serving. It is not a measured threshold at which brisket suddenly loses its juices.
Correct the angle before cutting the remainder. Find the fibre direction on the exposed face, rotate the meat and make a small cross-grain test slice.
If part of the brisket has already been carved incorrectly, there are still practical options:
- Turn the remaining intact piece and resume slicing across the grain.
- Cut already-carved, oversized strips into shorter sections if their shape permits.
- Chop incorrectly sliced portions into smaller pieces for sandwiches, tacos or sauced dishes.
- Add reserved juices when serving if the meat has lost moisture during holding.
The knife itself matters too. A sharp slicing knife should pass through meat smoothly with controlled strokes. A dull edge often requires pressure and repeated sawing, which can deform the slices and damage their presentation.
A clean cut will not repair undercooked connective tissue, but it avoids adding unnecessary mechanical damage to an otherwise properly cooked brisket.
With the carving angle corrected, attention returns to temperature. A guest asking for medium meat needs a cooking and resting plan that accounts for what happens between the heat source and the plate.
How to Translate ‘I Like It Medium’ Into a Pull Temperature and Rest Time?
Start by clarifying what the guest means by medium, then work backward from the desired plate temperature while allowing for carryover cooking. A thick roast usually develops a larger temperature difference between its exterior and centre than a thin steak. Use a thermometer to monitor the rise, rather than assuming every cut needs the same temperature reduction before resting.
In culinary language, medium often refers to a warm pink centre with more cooking than medium-rare. However, colour descriptions and preferred firmness vary among diners, and culinary doneness labels are not food-safety standards.
For reliable planning, distinguish three temperatures:
- Pull temperature: The internal reading when the meat is removed from the heat.
- Peak temperature: The highest reading reached during the subsequent rest.
- Serving temperature: The internal temperature when the meat is actually carved and plated.
The basic calculation is straightforward:
Estimated pull temperature = desired peak temperature − expected carryover rise.
The difficult part is estimating carryover accurately. It changes with thickness, surface temperature, cooking method, resting conditions and the difference between exterior and interior temperatures.
Consider an explicitly hypothetical example. Suppose a cook has chosen a target peak of 150°F and expects a 5°F rise during resting based on previous observations of the same preparation.
The calculated pull temperature would be 145°F. This illustrates the method, not a guaranteed carryover allowance for all steaks.
Hypothetical example: thin steak versus thick roast
Two pieces are cooked for diners who want a comparable final degree of doneness. The cook expects little carryover from a thin steak but a more pronounced rise in a thick roast.
Instead of removing both at an identical reading, the cook checks their centres separately, estimates each piece’s remaining temperature rise from previous experience and verifies the readings during resting. The roast may require an earlier removal relative to its intended peak temperature.
Any pull-temperature calculation must also respect applicable safe-cooking requirements. A predicted future rise is not a substitute for verifying that the required internal temperature has actually been reached.
For a larger roast, insert the probe into the thickest central area without touching bone or a large fat pocket. Check other relevant points to avoid relying on an unusually hot or cool location.
Before carving the entire batch, inspect one test slice for the requested appearance and texture, while remembering that colour does not establish microbiological safety.
Serving thickness also influences the result. Thin cross-grain slices can feel easier to chew than thick portions at the same final temperature. This is a texture adjustment, not a correction to the thermometer reading.
The same principle becomes more important when several pieces of different thicknesses share one grill. They cannot be managed reliably by cooking time alone.
Key takeaways before the final cook
- Measure the thickest relevant area and confirm that the required safe internal temperature has actually been reached.
- When pieces differ in thickness, change their heat exposure or cooking sequence instead of expecting one timer to suit all of them.
- Plan the complete sequence—from temperature measurement through resting to cross-grain slicing—before the first piece comes off the heat.
How to Hit Your Desired Doneness Every Time Even When Cut Thickness Changes
To achieve consistent doneness across pieces of different thicknesses, measure each piece independently, adjust its exposure to heat and account for carryover during resting. Thin cuts may need later placement or a cooler cooking zone, while thick cuts generally require more time for heat to reach the centre. Finish by checking one slice before carving everything.
The underlying problem is geometry. Heat enters meat primarily through its exposed surfaces and moves toward the centre. A thick piece has a longer path for heat to travel, so its interior can lag substantially behind its exterior.
A thin steak and a thick steak placed on the same hot grill for the same length of time will not necessarily reach the same centre temperature. Even if they do, their internal temperature distributions may differ.
This also affects carryover cooking. A hot exterior can continue transferring energy inward after a thick roast has been removed from the oven or grill.
The most practical response is to control each piece rather than treating a mixed batch as one uniform cut.
| Situation | Recommended adjustment | What to verify |
|---|---|---|
| Thin and thick steaks on one grill | Add thinner pieces later or use a cooler zone where appropriate. | Centre temperatures of individual steaks. |
| Roast with uneven thickness | Monitor the thickest section and inspect thinner areas separately. | Temperature variation across the roast. |
| Multiple steaks of similar weight but different shape | Group by thickness rather than weight alone. | Individual doneness and carryover behaviour. |
| Large smoked cut intended for slicing | Consider both temperature history and tenderness before the final rest. | Probe resistance, carving structure and moisture. |
On a grill with distinct heat zones, placing smaller pieces in a lower-heat area can help manage their cooking rate. Alternatively, stage the pieces so thicker portions begin first and thinner portions join later.
Neither technique eliminates the need for temperature measurement. A small steak positioned near an unusually hot spot can still cook faster than expected.
Probe the geometric centre of each steak, preferably from the side when the piece is thin enough to make top-down insertion unreliable. For larger roasts, take an additional reading in another thick area.
After resting, assess the first piece before slicing the whole batch. A test slice can reveal whether the fibre direction has been identified correctly and whether the portion thickness suits the texture.
It also provides an opportunity to verify the desired visual appearance. If the next piece requires additional cooking, return that piece to a suitable heat source and recheck its temperature. Do not rely on appearance alone for safety.
The complete serving sequence is therefore:
- Identify the cut, thickness and appropriate safe cooking requirements.
- Choose cooking zones or staggered placement according to thickness.
- Measure each piece’s internal temperature and account for observed carryover.
- Rest appropriately and locate the muscle grain.
- Carve across the fibres, adjust slice thickness and serve promptly.
This method will not make brisket biologically identical to tenderloin or transform poorly softened connective tissue into perfectly tender meat. It does, however, remove avoidable sources of chewiness and inconsistency at the final stage of cooking.
On the next cook, take one cross-grain test slice before carving the rest. Check its texture, adjust your knife angle or slice thickness if needed, then serve the remaining meat while it is still at an appealing temperature. That small decision connects everything the cooking process achieved to the bite your guests actually experience.
Does cutting against the grain make every type of meat more tender?
Cutting across muscle fibres generally reduces the length of the fibres within each bite and can make intact muscle easier to chew. The effect is especially useful for visibly fibrous cuts. However, slicing cannot completely overcome tough connective tissue, and very soft braised or shredded preparations may benefit more from careful portioning than extremely thin carving.
Should meat always be sliced at a 45-degree angle?
No. Cutting across the direction of the muscle fibres is more important than following a universal blade angle. A diagonal cut can produce attractive, broader slices, but if it follows the grain too closely it may leave long fibres. Establish the grain direction first, then choose an appropriate presentation angle.
Can a serrated knife make cooked meat feel tougher?
A serrated knife can cut meat, but aggressive sawing may tear delicate portions rather than producing clean, even slices. A sharp, suitable carving knife usually provides greater control over slice thickness and fibre direction. Blade sharpness and technique matter more than appearance alone.
Why does leftover steak sometimes feel tougher after reheating?
Reheating can change moisture distribution and further alter muscle proteins, particularly if the meat becomes hotter or remains under heat for longer than intended. Gentle, controlled reheating and thin cross-grain slicing can improve the eating experience, but they cannot completely reverse texture changes caused by previous cooking or storage.
Is it better to carve a roast before or after bringing it to the table?
Keeping a roast intact until shortly before serving generally reduces exposed surface area and helps prevent thin slices from cooling prematurely. Rest the meat as appropriate, bring it to a stable carving surface and cut portions as guests are ready. For large gatherings, carve in batches rather than leaving the entire roast sliced and uncovered.